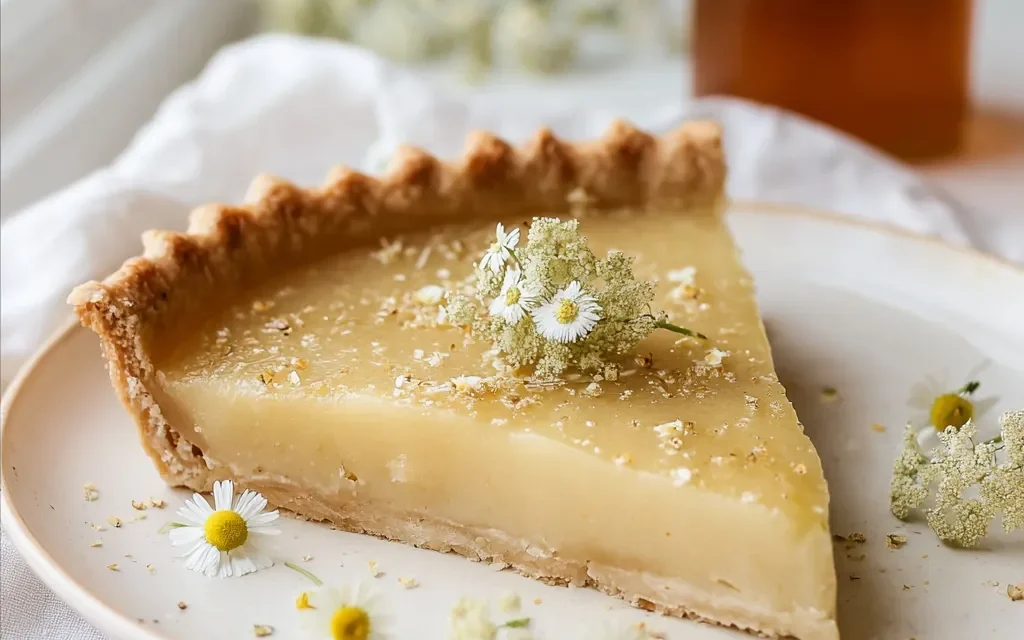
When I was a young baker, just starting to explore the world of pastries, my grandmother’s Salted Honey & Chamomile Pie was the first recipe that truly captured my heart. The way the buttery crust melted in my mouth, the gooey honey filling infused with the gentle floral notes of chamomile – it was a taste of pure magic. To this day, whenever I make this pie, I’m transported back to those warm summer afternoons, sitting on my grandma’s porch, savoring every bite and dreaming of the day I could perfect this family treasure.
Table of Contents
Why This Salted Honey & Chamomile Pie Recipe Will Become Your Go-To
The Secret Behind Perfect Salted Honey & Chamomile Pie
What makes this Salted Honey & Chamomile Pie so special is the perfect balance of flavors and textures. The buttery, flaky crust provides a delightful contrast to the rich, gooey honey filling, while the addition of dried chamomile flowers lends a subtle floral note that elevates the overall experience. The sprinkle of sea salt flakes on top adds a delicate crunch and a touch of savory richness, tying all the flavors together in a harmonious symphony.
Essential Ingredients You’ll Need
The key to this Salted Honey & Chamomile Pie is the carefully selected ingredients. The 2 cups of all-purpose flour create a sturdy, yet tender crust that can hold the gooey filling without getting soggy. The 1/2 teaspoon of salt in the dough helps to enhance the other flavors, while the 3/4 cup of chilled, cubed unsalted butter ensures a flaky, buttery texture. The 1/4 cup of ice water binds the dough together, giving it the perfect pliability for rolling and shaping.
For the filling, the 1 cup of honey provides a sweet, sticky base that beautifully complements the 2 tablespoons of dried chamomile flowers. The 1/4 teaspoon of sea salt flakes, sprinkled on top, adds a subtle crunch and a touch of savory complexity that elevates the overall flavor profile.
Step-by-Step Salted Honey & Chamomile Pie Instructions
Preparing Your Salted Honey & Chamomile Pie
Preparing this Salted Honey & Chamomile Pie is a straightforward process that takes just 15 minutes of prep time and 35 minutes of baking, for a total time of 50 minutes. You’ll need a rolling pin, a pie dish, and a few basic kitchen tools to bring this delightful dessert to life.
1- Start by combining the 2 cups of all-purpose flour and 1/2 teaspoon of salt in a food processor. Pulse a few times to mix. Then, add the 3/4 cup of chilled, cubed unsalted butter and pulse until the mixture resembles coarse crumbs.
2- Slowly add the 1/4 cup of ice water, a tablespoon at a time, and pulse until the dough just begins to come together. Be careful not to overmix, as this can make the crust tough.
3- Turn the dough out onto a lightly floured surface and gently knead it a few times to bring it together. Shape the dough into a disc, wrap it in plastic, and refrigerate for at least 30 minutes.
4- In a small bowl, combine the 1 cup of honey and the 2 tablespoons of dried chamomile flowers. Mix well and set aside.
5- Once the dough has chilled, roll it out to a 12-inch circle and carefully transfer it to a 9-inch pie dish. Crimp the edges and prick the bottom with a fork to prevent bubbling.
6- Pour the honey-chamomile mixture into the prepared pie crust and sprinkle the 1/4 teaspoon of sea salt flakes evenly over the top. Bake the pie in a preheated oven at 375°F for 35 minutes, or until the filling is set and the crust is golden brown.
Pro Tips for Success
To ensure your Salted Honey & Chamomile Pie turns out perfectly every time, follow these expert tips:
- Keep the butter and water for the crust as cold as possible to achieve a flaky, tender texture.
- Be gentle when working with the dough to prevent gluten development, which can lead to a tough crust.
- Let the dough chill for at least 30 minutes before rolling to allow the gluten to relax, making it easier to work with.
- Sprinkle the sea salt flakes evenly over the filling to ensure a balanced flavor in every bite.
- Keep a close eye on the pie during the last 5-10 minutes of baking to prevent over-browning of the crust.
Serving and Storing Your Salted Honey & Chamomile Pie
Perfect Pairings for Salted Honey & Chamomile Pie
This Salted Honey & Chamomile Pie is the perfect dessert for any occasion, serving 8 people comfortably. For a cozy family gathering, pair it with a scoop of vanilla ice cream or a dollop of freshly whipped cream. The rich, honey-infused filling pairs beautifully with a cup of chamomile tea or a glass of sweet dessert wine. If you’re looking to impress at a dinner party, serve the pie with a drizzle of caramel sauce and a sprinkle of chopped toasted nuts for an extra layer of texture and flavor.
Storage and Make-Ahead Tips
Salted Honey & Chamomile Pie is a great make-ahead dessert. Once baked, the pie can be stored in the refrigerator for up to 4 days, covered loosely with foil or plastic wrap. For longer storage, the baked pie can be wrapped tightly and frozen for up to 2 months. To reheat, simply thaw the pie in the refrigerator overnight and then warm it in a 325°F oven for 10-15 minutes, or until heated through.
Variations and Dietary Adaptations for Salted Honey & Chamomile Pie
Creative Salted Honey & Chamomile Pie Variations
If you’re feeling adventurous, try some of these delicious variations on the classic Salted Honey & Chamomile Pie:
- Swap the all-purpose flour in the crust for a gluten-free flour blend for a gluten-free option.
- Replace the honey with maple syrup or agave nectar for a slightly different flavor profile.
- Fold in a handful of chopped walnuts or pecans to the filling for a crunchy texture.
- Sprinkle the top of the pie with a dusting of ground cinnamon or grated orange zest for a warm, aromatic touch.
Making Salted Honey & Chamomile Pie Diet-Friendly
To make this Salted Honey & Chamomile Pie more diet-friendly, consider these substitutions:
- Use a low-calorie sweetener, such as erythritol or monk fruit, in place of the honey to reduce the overall sugar content.
- Substitute the all-purpose flour in the crust with a low-carb flour like almond flour or coconut flour.
- Replace the unsalted butter with a plant-based, dairy-free alternative, such as coconut oil or vegan butter, for a dairy-free version.
- Omit the sea salt flakes or use a low-sodium salt substitute to reduce the sodium content.
Frequently Asked Questions
Q: Can I use a different type of flour for the crust?
A: While all-purpose flour is recommended for the best texture, you can substitute it with whole wheat flour or a gluten-free flour blend. Keep in mind that the crust may have a slightly different texture and may require adjustments to the water amount.
Q: How long does it take to bake the Salted Honey & Chamomile Pie?
A: As mentioned in the recipe, the total baking time for this pie is 35 minutes. Be sure to preheat your oven to 375°F before baking.
Q: Can I make this pie ahead of time?
A: Yes, this Salted Honey & Chamomile Pie is a great make-ahead dessert. You can bake the pie and store it in the refrigerator for up to 4 days or in the freezer for up to 2 months.
Q: How many servings does this recipe make?
A: This Salted Honey & Chamomile Pie recipe yields 8 servings, making it a great option for sharing with family and friends.
Q: What should I do if the crust is browning too quickly?
A: If the crust is browning too quickly during baking, you can cover the edges with foil or a pie shield to prevent further browning while the filling finishes baking.


Salted Honey & Chamomile Pie
- Total Time: 50
- Yield: 8 servings
Description
Indulge in the divine fusion of sweet honey, aromatic chamomile, and a touch of sea salt in this easy-to-make Salted Honey & Chamomile Pie. This heavenly dessert is perfect for any occasion, from cozy afternoons to special gatherings.
Ingredients
– 2 cups all-purpose flour
– 1/2 teaspoon salt
– 3/4 cup unsalted butter, chilled and cubed
– 1/4 cup ice water
– 1 cup honey
– 2 tablespoons dried chamomile flowers
– 1/4 teaspoon sea salt flakes
Instructions
1. In a large bowl, combine the flour and 1/2 teaspoon of salt. Cut in the chilled butter until the mixture resembles coarse crumbs. Gradually add the ice water, mixing until the dough just comes together.
2. Divide the dough in half, shape into discs, wrap in plastic, and refrigerate for at least 30 minutes.
3. Preheat the oven to 375°F (190°C).
4. On a lightly floured surface, roll out one disc of dough into a 12-inch circle. Carefully transfer it to a 9-inch pie plate.
5. In a small saucepan, combine the honey and chamomile flowers. Heat over medium, stirring occasionally, until the honey is warm and fragrant, about 5 minutes.
6. Pour the honey mixture into the prepared pie crust. Sprinkle the top with the sea salt flakes.
7. Roll out the remaining dough disc and cut into strips for a lattice top. Arrange the strips in a criss-cross pattern over the filling.
8. Bake for 35-40 minutes, or until the crust is golden brown and the filling is bubbly.
9. Allow the pie to cool completely before slicing and serving.
Notes
For a more pronounced chamomile flavor, you can steep the dried chamomile flowers in the honey for 30 minutes before heating. This will infuse the honey with a stronger floral aroma.
- Prep Time: 15
- Cook Time: 35
- Category: Dessert
- Method: Baking
- Cuisine: American
Conclusion
The Salted Honey & Chamomile Pie is a true celebration of flavors, combining the rich, sweet honey with the delicate floral notes of chamomile and the perfect touch of sea salt. This recipe has been a beloved family favorite for generations, and I’m confident it will become a go-to for you as well. Whether you’re hosting a special occasion or simply craving a comforting dessert, this Salted Honey & Chamomile Pie is sure to delight. So, what are you waiting for? Preheat your oven and get ready to experience the magic of this truly irresistible pie. Don’t forget to share your creations and let me know how it turns out!


