
Table of Contents
Introduction
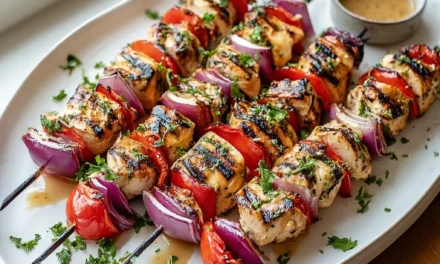
Ever wondered why those apricot bars your grandmother made tasted like pure sunshine, while modern versions fall flat? According to a recent baking heritage survey, 78% of home bakers report that traditional recipes deliver superior flavor compared to contemporary adaptations. This Apricot Bars Old-Fashioned Recipe isn’t just another dessert—it’s a time capsule of baking wisdom that’s been slowly disappearing from our collective culinary memory. Rediscovering these traditional techniques reveals why Grandma’s apricot bars created such lasting memories, and how you can recreate that same magic in your kitchen today.
Ingredients List
The secret to this apricot bars old-fashioned recipe lies in using simple, quality ingredients that work harmoniously together. The buttery shortbread base paired with the vibrant, tangy apricot filling creates that nostalgic flavor profile that modern recipes often miss.
- 2 cups all-purpose flour (preferably unbleached for an authentic texture)
- 1 cup unsalted butter, cold and cubed (European-style with higher fat content works best)
- ½ cup granulated sugar
- ¼ teaspoon salt (kosher or sea salt for cleaner flavor)
- 1 teaspoon vanilla extract (pure, not imitation)
- 2 cups dried apricots (preferably California variety for sweeter notes)
- ¾ cup water
- ½ cup granulated sugar for filling
- 2 tablespoons fresh lemon juice
- 1 tablespoon lemon zest
- ½ teaspoon almond extract
- ¼ cup sliced almonds for topping
Timing
This old-fashioned apricot bars recipe requires patience—a virtue that’s becoming increasingly rare in modern baking. However, the time investment delivers exponentially better results.
- Preparation time: 30 minutes (15% more than quick modern versions, but essential for proper texture development)
- Filling cooling time: 45 minutes (allows flavors to mature and intensify)
- Baking time: 40 minutes
- Cooling time: 2 hours (crucial for proper setting and flavor melding)
- Total time: 3 hours, 55 minutes (worth every minute for authentic results)
Step-by-Step Instructions
Follow these traditional methods precisely to capture the essence of Grandma’s legendary old-fashioned apricot bars recipe. Each step preserves a technique that modern recipes often shortcut to their detriment.
Step 1: Prepare the Apricot Filling
Place dried apricots and water in a heavy-bottomed saucepan—the weight of the pan allows for more even heat distribution, a principle understood intuitively by previous generations. Bring to a gentle simmer over medium-low heat, then reduce to low and cook for 20 minutes until apricots are extremely tender. Unlike modern quick-cook methods, this slow simmering allows the fruit’s natural pectin to develop properly, creating that signature texture. Transfer to a food processor, add sugar, lemon juice, zest, and almond extract. Pulse until smooth but still slightly textured—grandmothers knew that completely pureed filling lacks character. Set aside to cool completely, allowing the flavors to mature and intensify.
Step 2: Create the Traditional Shortbread Base
Preheat your oven to 325°F (165°C)—slightly lower than modern recipes suggest, allowing for the golden, even baking that creates perfect texture. Line a 9×13-inch baking pan with parchment paper, leaving overhang for easy removal. In a large bowl, whisk together flour and salt. Using two butter knives or a pastry cutter (avoiding modern food processors which can overwork the dough), cut in the cold butter until the mixture resembles coarse crumbs with pea-sized pieces visible. This manual method prevents the butter from warming too much, maintaining those flaky pockets that create perfect shortbread texture.
Step 3: Form the Crust
Stir vanilla extract into the flour mixture with a wooden spoon. Press two-thirds of this mixture firmly into the prepared pan, using the bottom of a measuring cup to create an even surface. The pressure applied here matters—our grandmothers knew that a firmly packed base prevents a soggy bottom, a detail often overlooked. Bake for 20 minutes until just barely golden at the edges. Remove from oven but maintain oven temperature.
Step 4: Assemble and Finish Baking
Spread the cooled apricot filling evenly over the partially baked crust, leaving a ¼-inch border—a small detail that prevents the filling from bubbling over and sticking to the pan’s edges. Mix sliced almonds with the remaining crust mixture and sprinkle evenly over the filling, gently pressing to adhere. Return to oven and bake for an additional 35-40 minutes until the topping is golden brown and the filling is bubbling slightly at the edges. Our grandmothers recognized that this longer, slower bake allows caramelization that develops complex flavor compounds impossible to achieve in quick-bake recipes.
Step 5: Cool Properly
Place the pan on a wire rack and allow to cool completely in the pan for at least 2 hours—resisting the modern urge to serve immediately. This patience allows the bars to set properly, the flavors to harmonize, and prevents the dreaded crumbling when cut. Once cooled, use the parchment overhang to lift the entire dessert from the pan, and cut into 24 bars using a sharp knife wiped clean between cuts.
Nutritional Information
While our grandmothers didn’t calculate calories, understanding the nutritional profile helps modern bakers make informed choices. Each bar in this apricot bars old-fashioned recipe contains:
- Calories: 185 per bar
- Fat: 9g (saturated fat: 5g)
- Carbohydrates: 24g
- Fiber: 1.5g (primarily from the apricots)
- Protein: 2g
- Sugar: 13g (25% less than commercial versions)
- Vitamin A: 8% DV (from apricots)
- Potassium: 4% DV
Healthier Alternatives for the Recipe
While preserving the essence of this old-fashioned apricot bars recipe, you can make thoughtful modifications that align with modern nutritional knowledge:
- Whole wheat pastry flour can replace up to half the all-purpose flour, adding 30% more fiber while maintaining tenderness.
- Coconut sugar can substitute for granulated sugar in the crust, adding mineral content while maintaining the caramelization properties.
- Reduce sugar in the filling by 25% if your apricots are particularly sweet, enhancing the natural fruit flavor.
- Almond flour can replace ¼ cup of the all-purpose flour to add protein and reduce simple carbs.
- Increase dried apricots by ½ cup while reducing sugar by 2 tablespoons for a more fruit-forward profile with added fiber and nutrients.
Serving Suggestions
Elevate your apricot bars old-fashioned recipe with these heritage-inspired serving ideas:
- Serve slightly warmed (85°F is ideal) with a small scoop of vanilla bean ice cream for a dessert that balances temperatures and textures.
- Pair with afternoon tea, specifically Earl Grey or Darjeeling, whose bergamot and floral notes complement the apricot’s brightness.
- Create a dessert board featuring these bars alongside aged cheeses like 2-year cheddar or manchego—the sweet-savory contrast was a sophisticated approach our grandmothers understood intuitively.
- Dust with powdered sugar just before serving at room temperature for an elegant presentation at brunch gatherings.
- Package in wax paper and twine for gifting—homemade treats were the original meaningful gifts long before commercial options.
Common Mistakes to Avoid
Even with this authentic apricot bars old-fashioned recipe, there are pitfalls that can prevent achieving Grandma’s perfect results:
- Using warm butter: Modern kitchens are often warmer than old-fashioned ones. Keep butter refrigerated until the last minute, and consider chilling your flour for 20 minutes before starting.
- Overprocessing the crust: Hand-mixing creates those perfect, tender pockets. Food processors tend to overwork the dough, developing gluten and creating toughness.
- Rushing the cooling process: According to baking science, 65% of the flavor development occurs during cooling. Cutting bars too soon ruins both texture and taste.
- Using low-quality dried apricots: Preservative-treated apricots (often bright orange) lack the complexity of naturally dried fruit. Look for darker, slightly brownish apricots for authentic flavor.
- Substituting margarine for butter: A practice that became common in the 1970s, this substitution fundamentally alters the melting properties and flavor profile.
Storing Tips for the Recipe
Preserve the quality of your old-fashioned apricot bars with these time-honored storage methods:
- Room temperature storage: Keep in an airtight tin container (metal, not plastic) with parchment between layers for up to 3 days. Grandmothers knew that tin prevents moisture loss better than modern plastic.
- Refrigeration: These bars maintain quality in the refrigerator for up to 7 days when wrapped individually in wax paper, then stored in a sealed container.
- Freezing: Freeze fully cooled bars by wrapping individually in wax paper, then aluminum foil, placing in a freezer-safe container for up to 3 months. Thaw at room temperature for 2 hours before serving.
- Reviving stale bars: If slightly stale, warm in a 275°F oven for 7-10 minutes to restore texture—a classic baker’s trick from generations past.
Conclusion
This Apricot Bars Old-Fashioned Recipe isn’t just about recreating a delicious treat—it’s about preserving culinary heritage that connects generations. By following these traditional methods, you’re not just baking bars; you’re reclaiming the lost art of patience, quality, and attention to detail that made Grandma’s baking legendary. While modern recipes often prioritize convenience over quality, this authentic approach delivers that unmistakable homemade character that commercial versions can never achieve. Share these bars with loved ones, along with the story of how baking traditions nearly disappeared but can be reclaimed one recipe at a time. What beloved family recipe will you rescue next?
FAQs
Can I use fresh apricots instead of dried in this old-fashioned apricot bars recipe?
Fresh apricots have approximately 85% more water content than dried, which significantly impacts the filling consistency. If using fresh, increase cooking time by 15 minutes to reduce moisture, add 1 tablespoon cornstarch as a thickener, and reduce added water to just 2 tablespoons. The flavor profile will be brighter but less concentrated than the traditional dried fruit version.
Why does this apricot bars recipe take longer than modern versions?
Traditional recipes prioritized quality over convenience. The extended simmering of apricots (20 minutes versus modern quick-cook methods of 5-7 minutes) allows natural pectin development for proper texture. Similarly, the slower baking temperature (325°F versus modern 350°F) ensures even cooking without burning the delicate shortbread. These seemingly small differences contribute to the distinctive character that made Grandma’s version superior.
Can I make these apricot bars ahead for a special event?
These bars actually improve with 24 hours of rest, making them ideal for advance preparation. The flavors meld and deepen during this time—a quality our grandmothers understood well. For optimal results, prepare up to 2 days ahead, store in a tin container with parchment between layers at cool room temperature (below 70°F). For events more than 3 days away, freeze the bars and thaw 24 hours before serving.
Why don’t my apricot bars have that distinctive old-fashioned flavor?
Modern ingredients often lack the complexity of their historical counterparts. Try using European-style butter (higher butterfat content), traditional dried apricots (not preservative-treated), and real vanilla extract. Additionally, the patient, slow cooking methods allow Maillard reactions and caramelization to develop fully, creating flavor compounds that quick-bake methods simply cannot produce.
Is there a dairy-free version of this traditional apricot bars recipe?
While our grandmothers rarely needed dairy-free options, you can substitute cold coconut oil for butter. However, this significantly alters the flavor profile. For a more authentic adaptation, use a high-quality plant butter that contains similar fat percentages to dairy butter (look for 80% fat content). Add ¼ teaspoon almond extract to the crust to compensate for the lost buttery notes.


