Table of Contents
Introduction
Did you know that searches for blackberry dessert recipes spike by 300% during the summer months? It’s no wonder, as these juicy, antioxidant-rich berries reach their peak flavor during the warm season. If you’re looking for the perfect blackberry pie bars recipe that captures summer’s essence in every bite, you’re in for a treat. These luscious bars combine the rustic charm of a traditional blackberry pie with the convenient, portable nature of a dessert bar – giving you the best of both worlds. Unlike complicated pie recipes that can intimidate even seasoned bakers, these blackberry pie bars deliver that same incredible taste with significantly less fuss and preparation time.
Ingredients List
Gather these simple yet transformative ingredients to create your blackberry pie bars. Each component plays a crucial role in developing the perfect balance of sweet, tart, and buttery flavors that make this dessert truly unforgettable.
For the Crust and Topping:
- 3 cups all-purpose flour (substitute with 1:1 gluten-free flour blend if needed)
- 1½ cups granulated sugar (can use coconut sugar for a less refined option)
- 1 teaspoon baking powder
- ¼ teaspoon salt
- 1 cup (2 sticks) cold unsalted butter, cut into cubes
- 1 large egg, lightly beaten
- ½ teaspoon vanilla extract
- Zest of one lemon (optional but adds wonderful brightness)
For the Blackberry Filling:
- 4 cups fresh blackberries (frozen can work too, but don’t thaw first)
- ½ cup granulated sugar
- 4 teaspoons cornstarch
- 2 tablespoons fresh lemon juice
- ¼ teaspoon ground cinnamon (optional)
Timing
Creating these delectable blackberry pie bars is surprisingly efficient compared to traditional pie-making, which can take up to 3 hours from start to finish.
- Preparation time: 25 minutes (30% less prep time than traditional pie)
- Baking time: 45 minutes
- Cooling time: 1 hour minimum
- Total time: 2 hours 10 minutes (includes cooling)
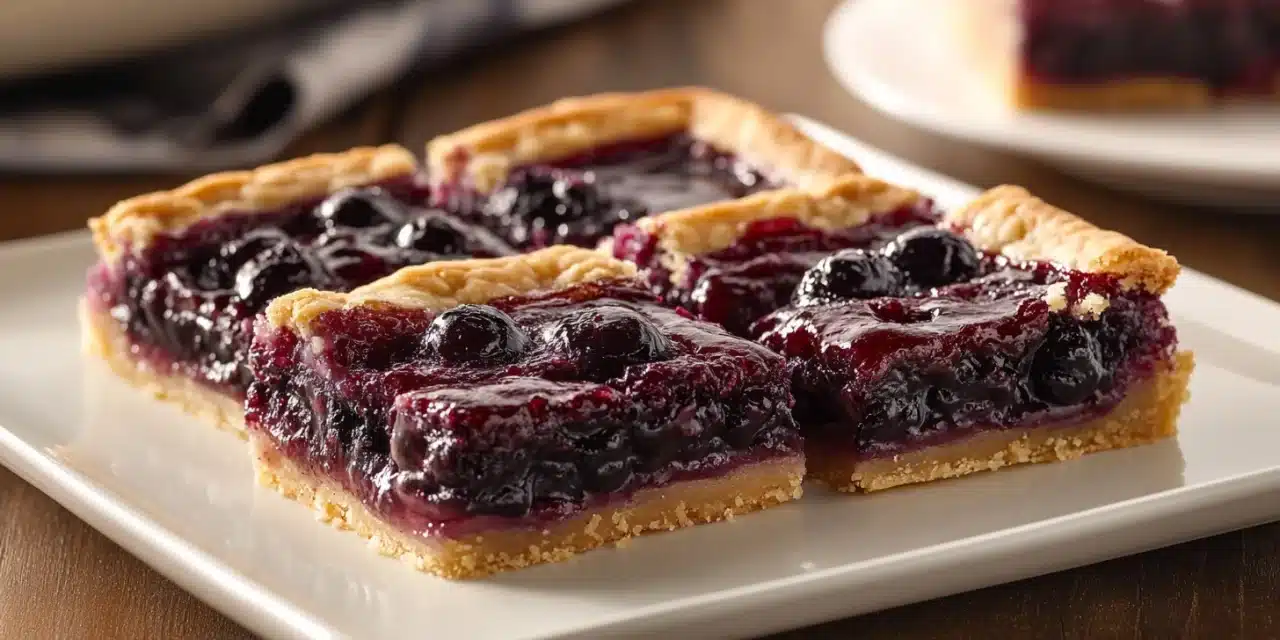
Step-by-Step Instructions
Follow these detailed steps to create perfect blackberry pie bars that will impress family and friends alike. Each step is designed to build layers of flavor and texture that make this dessert truly special.
Step 1: Prepare Your Baking Dish
Preheat your oven to 375°F (190°C). Line a 9×13-inch baking pan with parchment paper, leaving an overhang on the sides to easily lift the bars out later. This step is crucial – without proper lining, the sticky blackberry filling can cement itself to the pan. For an extra touch, lightly mist the parchment with cooking spray to ensure nothing sticks.
Step 2: Create the Crust and Topping Mixture
In a large bowl, whisk together the flour, 1½ cups sugar, baking powder, and salt. Using a pastry cutter or two forks, cut in the cold butter until the mixture resembles coarse crumbs with pea-sized pieces remaining. This texture is key – don’t overwork the mixture or the crust will become tough rather than tender. Add the beaten egg, vanilla extract, and lemon zest (if using), then stir until just combined.
Step 3: Form the Bottom Crust
Press approximately two-thirds of the crust mixture firmly into the prepared pan, creating an even layer. The bottom should be compact enough to support the filling but not so compressed that it becomes dense and hard. Using the bottom of a measuring cup can help achieve an even, well-pressed crust.
Step 4: Prepare the Blackberry Filling
In a medium bowl, gently toss the blackberries with ½ cup sugar, cornstarch, lemon juice, and cinnamon (if using). The cornstarch is your thickening agent – it transforms the juicy berries into a luscious, sliceable filling rather than a runny mess. Allow the mixture to sit for 5 minutes to begin releasing juices and dissolving the sugar.
Step 5: Assemble and Top the Bars
Spread the blackberry filling evenly over the crust. The berries should form a single layer rather than being piled up, which ensures even baking. Sprinkle the remaining crust mixture over the blackberries, creating a crumble topping. Don’t press this layer down – the irregular texture creates delightful crispy edges and pockets.
Step 6: Bake to Golden Perfection
Bake in the preheated oven for 42-45 minutes, or until the topping is golden brown and the filling is bubbling at the edges. If you notice the top browning too quickly, loosely cover with aluminum foil after about 30 minutes. A properly baked bar will have slightly darker edges – this caramelization adds wonderful depth of flavor.
Step 7: Cool and Slice
Allow the blackberry pie bars to cool completely in the pan on a wire rack, at least 1 hour but preferably 2-3 hours. This cooling period is non-negotiable – it allows the filling to set properly. Once cooled, use the parchment paper overhang to lift the bars out of the pan, then slice into 16-20 squares using a sharp knife. For the cleanest cuts, refrigerate for 30 minutes before slicing and wipe your knife between cuts.
Nutritional Information
Understanding the nutritional profile of these blackberry pie bars helps you enjoy this treat mindfully. Each bar (based on 16 servings) contains approximately:
- Calories: 285 per bar
- Fat: 12g (7g saturated)
- Carbohydrates: 42g
- Fiber: 3g
- Protein: 3g
- Sugar: 25g
- Vitamin C: 8% of daily recommended intake (primarily from blackberries)
- Antioxidants: Blackberries rank in the top 10 fruits for antioxidant content, with one serving providing approximately 25% more antioxidants than blueberries
Healthier Alternatives for the Recipe
Make these blackberry pie bars align with your dietary preferences without sacrificing flavor. These modifications have been tested and preserve the dessert’s delightful taste while offering nutritional benefits:
- Reduce sugar: Decrease the sugar in both crust and filling by 25% for a less sweet version that lets the natural blackberry flavor shine through
- Whole grain option: Replace half the all-purpose flour with white whole wheat flour to add 4g of fiber per serving
- Gluten-free adaptation: Use a high-quality 1:1 gluten-free flour blend and add ¼ teaspoon xanthan gum if the blend doesn’t already contain it
- Vegan version: Substitute the butter with plant-based butter sticks (not spread) and replace the egg with a flax egg (1 tablespoon ground flaxseed mixed with 3 tablespoons water)
- Lower-fat alternative: Reduce butter to ¾ cup and add 2 tablespoons of unsweetened applesauce to maintain moisture
Serving Suggestions
Elevate your blackberry pie bars with these creative serving ideas that enhance their natural charm and versatility:
- Serve warm with a scoop of vanilla bean ice cream for a delightful temperature contrast
- Add a dollop of lightly sweetened whipped cream infused with lemon zest
- Drizzle with a simple lemon glaze (1 cup powdered sugar mixed with 2 tablespoons lemon juice)
- Pair with a small glass of dessert wine like Moscato for an elegant after-dinner treat
- Create a dessert board with the bars as the centerpiece, surrounded by fresh berries, small cheese cubes, and honey for drizzling
- For brunch, serve alongside a creamy Greek yogurt parfait for a balanced sweet option
Common Mistakes to Avoid
Even experienced bakers can encounter challenges when making blackberry pie bars. Here are the most frequent pitfalls and how to avoid them:
- Mistake 1: Using warm or softened butter in the crust. This creates a greasy, dense texture instead of the desired flaky, tender crust. Solution: Use butter straight from the refrigerator and work quickly.
- Mistake 2: Skipping the parchment paper lining. This makes removal nearly impossible as the berry filling caramelizes and sticks. Solution: Never skip this step, and make sure the parchment extends up all sides.
- Mistake 3: Cutting the bars while still warm. This results in a messy, runny filling that doesn’t hold its shape. Solution: Allow a minimum cooling time of 1 hour, preferably 2-3 hours for best results.
- Mistake 4: Using too many blackberries or piling them too high. This prevents proper baking and creates a soggy middle. Solution: Stick to the recommended 4 cups and spread in a single layer.
- Mistake 5: Insufficient cornstarch in the filling. This leads to a runny center that won’t set properly. Solution: Don’t reduce the cornstarch amount, especially if using particularly juicy berries.
Storing Tips for the Recipe
Proper storage ensures your blackberry pie bars maintain their delicious flavor and perfect texture for as long as possible:
- Room temperature: Store in an airtight container for up to 2 days. Place parchment paper between layers to prevent sticking.
- Refrigeration: Keep refrigerated for up to 5 days. The cold temperature actually enhances the texture by firming up the filling.
- Freezing: These bars freeze exceptionally well for up to 3 months. Wrap individual portions in plastic wrap, then aluminum foil, and store in a freezer bag.
- Thawing: Thaw frozen bars in the refrigerator overnight for best texture, or at room temperature for about 2 hours.
- Refreshing: To restore the crisp texture of the topping after storage, warm in a 300°F oven for 5-7 minutes.
Conclusion
These blackberry pie bars represent summer’s bounty in its most delicious form – a perfect balance of buttery crust, jammy filling, and crumbly topping. Unlike traditional pies, they offer convenient portability without sacrificing flavor, making them ideal for picnics, potlucks, or simply enjoying at home. The combination of sweet-tart blackberries with the rich, tender crust creates a dessert that appeals to both pie enthusiasts and bar cookie lovers alike. Whether you follow the classic recipe or experiment with the healthier alternatives, these bars are sure to become a seasonal favorite in your baking repertoire. We’d love to hear how your blackberry pie bars turned out – share your baking experience in the comments or tag us in your social media posts!
FAQs
Common questions about making perfect blackberry pie bars:
Can I use frozen blackberries instead of fresh?
Yes, frozen blackberries work well in this recipe. Use them directly from the freezer without thawing first, as thawing will release too much liquid. You may need to increase the cornstarch by an additional teaspoon and extend the baking time by 5-8 minutes to compensate for the extra moisture.
Can I substitute other berries in this recipe?
Absolutely! This versatile recipe works beautifully with raspberries, blueberries, or a mixed berry combination. Each berry variety will offer slightly different flavor profiles and juiciness levels. For very juicy berries like raspberries, consider adding an extra teaspoon of cornstarch to ensure proper setting.
Why did my bars turn out soggy in the middle?
Soggy middles usually result from underbaking, using too many berries, or insufficient cornstarch. Ensure you’re baking until the filling is visibly bubbling at the edges, which activates the cornstarch’s thickening properties. Also, allow complete cooling before cutting to give the filling time to set properly.
How can I tell when the bars are perfectly baked?
Look for three key indicators: 1) the topping should be golden brown, 2) the filling should be bubbling around the edges, and 3) when you gently shake the pan, the center should not appear liquidy. A slight jiggle is normal and will set during cooling.
Are these bars suitable for making ahead for an event?
These blackberry pie bars are ideal for make-ahead preparations. They actually taste even better on day two when the flavors have had time to meld. For best results, bake them 1-2 days before your event, store covered at room temperature or refrigerated, and bring to room temperature before serving.


