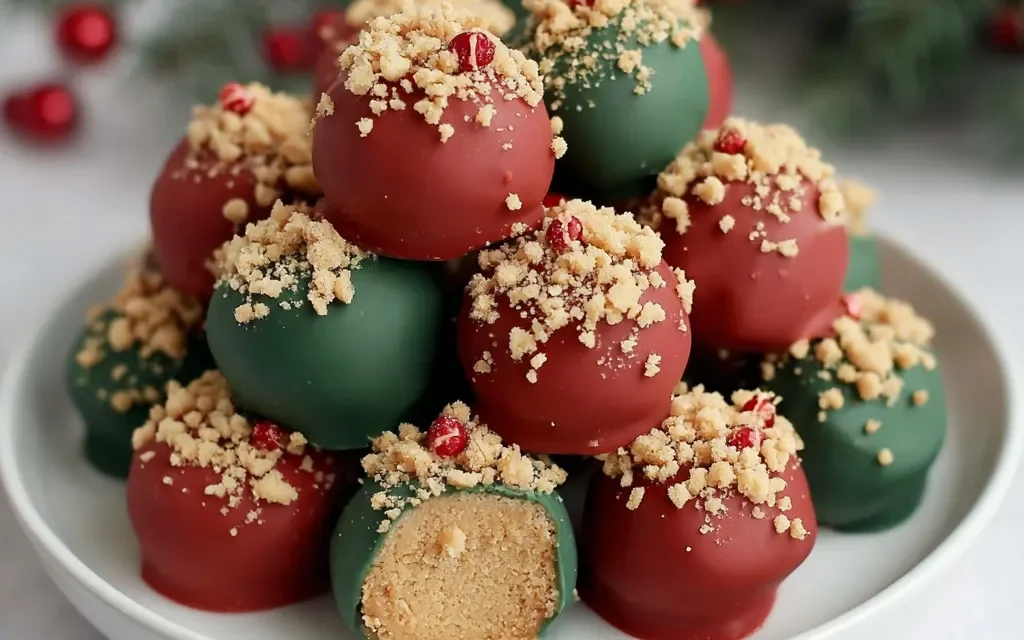
It’s the most wonderful time of the year, and you know what that means? It’s time to break out the Christmas Butterfinger Balls! Growing up, my grandma would make these every single holiday season, and let me tell you, they were the talk of the town. The buttery, creamy texture combined with the crunch of the Butterfinger bits and the rich chocolate coating – it’s a flavor explosion that will have you coming back for more.
Now, I know what you’re thinking – “Christmas Butterfinger Balls? Sounds a little…complicated.” But let me tell you, this recipe is an absolute breeze to make, and the end result is worth every single minute. Trust me, once you try these, they’re going to become your new go-to holiday treat.
Table of Contents
Why This Christmas Butterfinger Balls Recipe Will Become Your Go-To
The Secret Behind Perfect Christmas Butterfinger Balls
The secret to these Christmas Butterfinger Balls is in the perfect balance of flavors and textures. The chopped Butterfinger candy bars give you that irresistible crunch, while the melted butter and confectioners’ sugar create a silky-smooth, melt-in-your-mouth center. And let’s not forget the rich, velvety chocolate coating – it’s the perfect finishing touch that really makes these balls shine.
But what sets this recipe apart is the attention to detail. From the precise measurements to the careful timing, every step is carefully crafted to ensure you end up with the most delicious Christmas Butterfinger Balls imaginable. Trust me, once you taste these, you’ll be hooked for life.
Essential Ingredients You’ll Need
Now, let’s talk about the key ingredients that make these Christmas Butterfinger Balls so special:
- 10 full-size Butterfinger candy bars, chopped: This is the star of the show, folks. The crunchy, peanut-y Butterfinger bits add so much flavor and texture to these balls.
- 1 cup (2 sticks) unsalted butter, melted: The butter is what gives these balls their rich, creamy texture. Make sure to use high-quality, unsalted butter for the best results.
- 3 cups confectioners’ sugar: This is the secret to getting that perfect, smooth consistency. The confectioners’ sugar dissolves seamlessly into the melted butter, creating a dreamy, fudgy center.
- 1 teaspoon vanilla extract: A little splash of vanilla is all it takes to elevate the flavor profile of these Christmas Butterfinger Balls.
- 1 (12 oz) package semi-sweet chocolate chips: The chocolate coating is the cherry on top, adding that irresistible chocolate flavor that ties the whole thing together.
Step-by-Step Christmas Butterfinger Balls Instructions
Preparing Your Christmas Butterfinger Balls
Ready to get started? This Christmas Butterfinger Balls recipe is a breeze to make, with a prep time of just 15 minutes and a cook time of 10 minutes, for a total time of 25 minutes. All you’ll need is a medium-sized bowl, a spoon, and a baking sheet lined with parchment paper.
1- Start by chopping up those 10 full-size Butterfinger candy bars into small, bite-sized pieces. You want them to be evenly distributed throughout the balls, so take your time and make sure they’re all roughly the same size.
2- In a separate bowl, melt the 1 cup (2 sticks) of unsalted butter in the microwave or on the stovetop. Once it’s completely melted, let it cool for a minute or two.
3- Add the 3 cups of confectioners’ sugar and the 1 teaspoon of vanilla extract to the melted butter, and stir everything together until the mixture is smooth and creamy.
4- Gently fold in the chopped Butterfinger pieces, making sure they’re evenly distributed throughout the mixture. The end result should have a soft, fudgy consistency.
5- Using a small cookie scoop or spoon, portion out the mixture into 24 equal-sized balls, placing them on the prepared baking sheet as you go.
6- Finally, melt the 1 (12 oz) package of semi-sweet chocolate chips in the microwave or on the stovetop, and use a fork or dipping tool to coat each ball in the melted chocolate. Place the coated balls back on the baking sheet and let them cool completely before serving.
Pro Tips for Success
Now, let me share a few pro tips to help you make the best Christmas Butterfinger Balls ever:
- Make sure your butter is fully melted before adding the other ingredients. This will help ensure a smooth, creamy texture.
- Don’t overmix the Butterfinger pieces – you want them to be evenly distributed, but you don’t want to crush them.
- Use a small cookie scoop or spoon to get uniform-sized balls. This will help them cook evenly and look their best.
- Let the chocolate-coated balls cool completely before serving. This will help the chocolate set and create a nice, glossy finish.
Serving and Storing Your Christmas Butterfinger Balls
Perfect Pairings for Christmas Butterfinger Balls
These Christmas Butterfinger Balls are the perfect sweet treat to serve at any holiday gathering. They pair beautifully with a hot cup of coffee or a glass of eggnog, and they also make a great addition to a holiday dessert buffet. With 24 balls in this recipe, you’ll have more than enough to share with family and friends.
Storage and Make-Ahead Tips
The great thing about these Christmas Butterfinger Balls is that they keep really well. Once the chocolate has set, you can store them in an airtight container in the refrigerator for up to 1 week. They also freeze beautifully – just place them in a single layer on a baking sheet and freeze until solid, then transfer to an airtight container or freezer bag. They’ll keep in the freezer for up to 3 months.
When you’re ready to serve, simply thaw the balls at room temperature for about 30 minutes, or pop them in the microwave for 10-15 seconds to soften the chocolate. Trust me, these Christmas Butterfinger Balls are just as delicious straight from the fridge or freezer as they are fresh out of the kitchen.
Variations and Dietary Adaptations for Christmas Butterfinger Balls
Creative Christmas Butterfinger Balls Variations
While the classic Christmas Butterfinger Balls are hard to beat, there are plenty of ways to put your own spin on this holiday treat. Try swapping out the Butterfinger for another crunchy candy, like Snickers or Heath bars. Or, for a festive twist, use peppermint-flavored chocolate chips instead of the semi-sweet.
You could also try rolling the balls in crushed candy canes or topping them with a sprinkle of sea salt for a sweet-and-salty combo. The possibilities are endless – get creative and have fun with it!
Making Christmas Butterfinger Balls Diet-Friendly
If you’re watching your waistline this holiday season, don’t worry – you can still enjoy these delicious Christmas Butterfinger Balls with a few simple tweaks. Try using sugar-free Butterfinger bars and sugar-free chocolate chips to cut down on the added sugars. You can also use a lower-calorie butter substitute, like coconut oil or applesauce, to reduce the overall fat content.
For a gluten-free version, simply swap out the Butterfinger bars for a gluten-free crunchy candy. And for our vegan friends, you can use dairy-free chocolate chips and coconut oil in place of the butter. The end result may not be exactly the same, but it will still be a delicious and indulgent holiday treat.
Frequently Asked Questions
Q: Can I use a different type of candy bar instead of Butterfinger?
A: Absolutely! While the Butterfinger is the star of this recipe, you can easily swap it out for another crunchy candy bar like Snickers, Heath, or even Reese’s Peanut Butter Cups.
Q: How long does it take to make these Christmas Butterfinger Balls?
A: This recipe has a total time of 25 minutes, with 15 minutes of prep time and 10 minutes of cooking time. It’s a quick and easy holiday treat that comes together in no time.
Q: Can I make these Christmas Butterfinger Balls ahead of time?
A: Yes, these balls keep really well! You can store them in the refrigerator for up to 1 week, or in the freezer for up to 3 months. Just make sure to let them thaw at room temperature for about 30 minutes before serving.
Q: How many Christmas Butterfinger Balls does this recipe make?
A: This recipe yields 24 balls, so it’s perfect for sharing with family and friends at your holiday gatherings.
Q: What if my Christmas Butterfinger Balls don’t turn out right?
A: If you run into any issues, like the balls not holding their shape or the chocolate not setting properly, try adding a bit more confectioners’ sugar to the mixture or letting the chocolate cool a bit longer before dipping. With a little troubleshooting, you’ll be able to get these Christmas Butterfinger Balls perfect every time.


Christmas Butterfinger Balls
- Total Time: 25
- Yield: 24 balls
Description
Indulge in the irresistible crunch and creamy chocolate of these easy, no-bake Christmas Butterfinger Balls! This quick and simple recipe creates a delectable holiday treat that’s perfect for parties, gifts, or satisfying your sweet tooth.
Ingredients
– 10 full-size Butterfinger candy bars, chopped
– 1 cup (2 sticks) unsalted butter, melted
– 3 cups confectioners’ sugar
– 1 teaspoon vanilla extract
– 1 (12 oz) package semi-sweet chocolate chips
Instructions
1. In a large bowl, combine the chopped Butterfinger candy bars, melted butter, confectioners’ sugar, and vanilla extract. Mix well until fully incorporated.
2. Using a cookie scoop or your hands, form the mixture into 1-inch balls and place them on a parchment-lined baking sheet.
3. In a double boiler or microwave, melt the semi-sweet chocolate chips, stirring frequently until smooth.
4. Using a fork or dipping tool, carefully dip each Butterfinger ball into the melted chocolate, coating it completely.
5. Transfer the chocolate-coated balls back to the parchment-lined baking sheet and refrigerate for at least 30 minutes, or until the chocolate is set.
6. Serve chilled and enjoy!
Notes
– For a festive touch, you can sprinkle crushed Butterfinger or holiday sprinkles on top of the chocolate-coated balls.
– Store the Christmas Butterfinger Balls in an airtight container in the refrigerator for up to 1 week.
- Prep Time: 15
- Cook Time: 10
- Category: Cookies, Bars & Brownies
- Method: No-Bake
- Cuisine: American
Conclusion
These Christmas Butterfinger Balls are the ultimate holiday indulgence – they’re rich, decadent, and downright addictive. With their perfect balance of crunchy, creamy, and chocolatey goodness, it’s no wonder they’ve become a Christmas staple in so many households.
Trust me, once you try this recipe, you’ll be hooked. These balls are sure to impress your family and friends, and they make a great homemade gift for the holidays. So what are you waiting for? Grab those Butterfinger bars and get baking – your taste buds (and your loved ones) will thank you!
