It was the most wonderful time of the year – Christmas. The house was filled with the sweet scent of cinnamon and spices, and the twinkling lights on the tree cast a warm glow throughout the room. As I stepped into the kitchen, I couldn’t help but feel a sense of excitement and anticipation. You see, this year, I had a secret weapon up my sleeve – a Christmas Duck that was destined to become the star of the show.
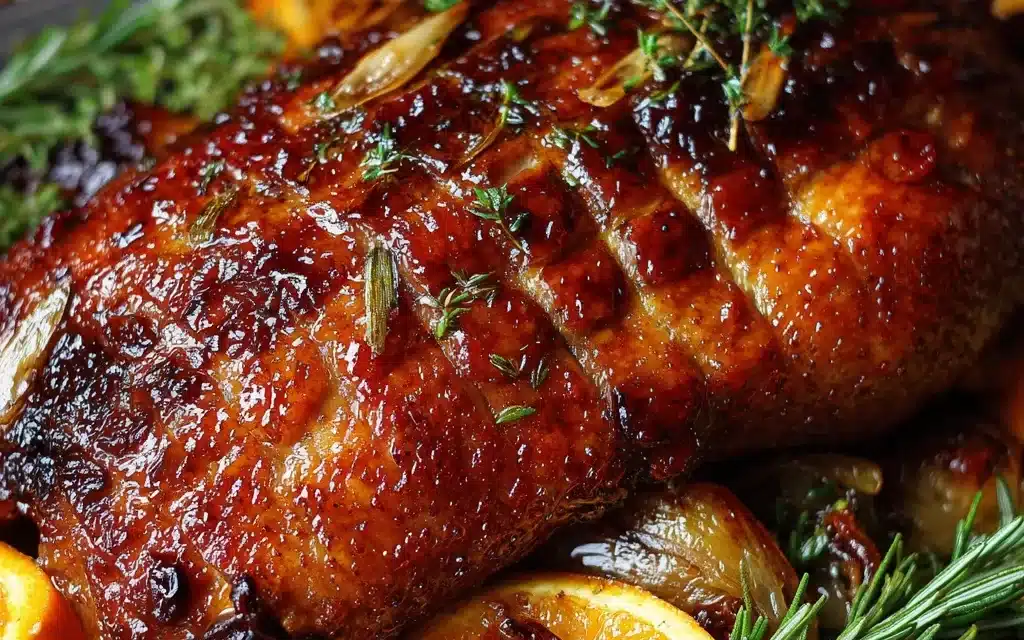
I remember the day I stumbled upon this recipe, completely by chance. I was scrolling through endless pages of Christmas recipes, feeling a little overwhelmed by the traditional options. That’s when I came across it – a beautifully golden-brown Christmas Duck, glistening with a crispy skin and surrounded by a medley of roasted vegetables. I knew in that moment that this was the dish that would make my Christmas dinner truly special.
From the first bite, I was hooked. The rich, juicy meat of the Christmas Duck melted in my mouth, complemented perfectly by the savory herbs and spices that had infused every morsel. It wasn’t just a meal – it was an experience, a celebration of the season that brought my family together in a way I hadn’t seen in years. And let me tell you, there wasn’t a single scrap left on the plate!
Table of Contents
Why This Christmas Duck Recipe Will Become Your Go-To
The Secret Behind Perfect Christmas Duck
Now, I know what you’re thinking – how can I possibly recreate that magic in my own kitchen? Well, my friend, I’m here to share the secret. This Christmas Duck recipe is the result of years of experimentation and fine-tuning, and I can say with confidence that it’s a game-changer. The key lies in the combination of a few simple, yet expertly executed techniques that will transform your Christmas Duck into a culinary masterpiece.
Essential Ingredients You’ll Need
At the heart of this recipe are a few carefully selected ingredients that work together to create the perfect balance of flavors. First, you’ll need a whole duck, of course – preferably a fresh, high-quality bird that’s been raised with care. Next, a blend of aromatic herbs like rosemary, thyme, and sage, along with garlic and shallots, will infuse the duck with a depth of flavor that will have your guests swooning. And let’s not forget the secret weapon – a touch of orange zest and juice, which adds a subtle sweetness and brightness that complements the rich, savory meat.
Step-by-Step Christmas Duck Instructions
Preparing Your Christmas Duck
Cooking the perfect Christmas Duck is a bit of an art form, but with this step-by-step guide, you’ll be a pro in no time. The total preparation and cooking time is around 3 hours, and you’ll need a roasting pan, a sharp knife, and a meat thermometer to ensure your duck is cooked to perfection.
1- Start by thoroughly patting the duck dry with paper towels, making sure to remove any excess moisture. This will help the skin crisp up beautifully in the oven.
2- In a small bowl, combine the chopped herbs, garlic, shallots, orange zest, and a generous pinch of salt and pepper. Gently rub this flavorful mixture all over the duck, making sure to get it into every nook and cranny.
3- Truss the duck with kitchen string, tying the legs together and tucking the wings under the body. This will help the duck retain its shape and cook evenly.
4- Place the duck, breast-side up, in a roasting pan and roast it in a preheated oven at 375°F for about 2 hours, basting it every 30 minutes with the accumulated juices.
5- Keep a close eye on the duck, and when the skin is a deep, golden-brown and the juices run clear when pierced with a fork, it’s time to remove it from the oven.
6- Let the Christmas Duck rest for about 15 minutes before carving and serving. This allows the juices to redistribute, ensuring a perfectly moist and flavorful dish.
Pro Tips for Success
To ensure your Christmas Duck turns out beautifully every time, here are a few pro tips to keep in mind:
– Basting the duck regularly is key to achieving that crispy, golden-brown skin. Don’t be afraid to get in there and baste it often.
– Use a meat thermometer to check the internal temperature of the duck. You’re aiming for an internal temperature of 165°F in the thickest part of the thigh.
– If the skin starts to brown too quickly, you can loosely cover the duck with foil to prevent it from burning.
– Let the duck rest for at least 15 minutes before carving. This allows the juices to redistribute, resulting in a more tender and flavorful final dish.
Serving and Storing Your Christmas Duck
Perfect Pairings for Christmas Duck
Now that you’ve mastered the art of cooking the perfect Christmas Duck, it’s time to think about the perfect accompaniments. A classic pairing is roasted potatoes and a medley of seasonal vegetables, such as Brussels sprouts, carrots, and parsnips. For a festive touch, you can even toss the vegetables with a bit of the rendered duck fat for extra flavor.
And let’s not forget the beverages! A bold, full-bodied red wine, such as a Cabernet Sauvignon or Merlot, would be a heavenly match for the rich, savory flavors of the Christmas Duck. Or, for a more refreshing option, a crisp, dry cider would be a delightful complement.
Storage and Make-Ahead Tips
One of the best things about this Christmas Duck recipe is that it can be prepared ahead of time, making your holiday hosting duties a breeze. Simply roast the duck a day in advance, let it cool completely, and then carve it and store the meat in an airtight container in the refrigerator. When it’s time to serve, simply reheat the duck in the oven or on the stovetop until heated through.
As for leftovers, the Christmas Duck will keep in the fridge for up to 4 days. You can enjoy it cold in salads or sandwiches, or reheat it gently to serve it as a main course again. And don’t forget to use the leftover bones and scraps to make a delicious duck broth for soups or stews!
Variations and Dietary Adaptations for Christmas Duck
Creative Christmas Duck Variations
While this classic Christmas Duck recipe is sure to be a hit, there’s always room for a little creativity. For a festive twist, you could try stuffing the duck with a savory bread stuffing or a wild rice and cranberry mixture. Or, for a touch of sweetness, glaze the duck with a mixture of honey, mustard, and orange juice during the last 30 minutes of cooking.
Making Christmas Duck Diet-Friendly
For those with dietary restrictions, fear not – this Christmas Duck can be easily adapted to suit your needs. For a gluten-free version, simply use gluten-free bread crumbs or omit the stuffing altogether. And for a low-carb or keto-friendly option, you can serve the duck with roasted vegetables and a side of cauliflower mash instead of traditional potatoes.
Frequently Asked Questions
Q: Can I substitute the duck with a different type of poultry, like a turkey or chicken?
A: While you can certainly use a different type of poultry, the cooking time and technique may vary significantly. The rich, succulent flavor of the Christmas Duck is really the star of this dish, so I would recommend sticking with the duck for the best results.
Q: How do I know when the Christmas Duck is fully cooked?
A: The best way to ensure your Christmas Duck is cooked to perfection is to use a meat thermometer. You’re aiming for an internal temperature of 165°F in the thickest part of the thigh. Additionally, the juices should run clear when you pierce the duck with a fork.
Q: Can I make this Christmas Duck recipe ahead of time?
A: Absolutely! This dish is actually a great make-ahead option. You can roast the duck a day in advance, let it cool completely, and then carve and store the meat in the refrigerator. When it’s time to serve, simply reheat the duck in the oven or on the stovetop until heated through.
Q: How many people does this Christmas Duck recipe serve?
A: This recipe is designed to serve 4-6 people, depending on the size of your duck and the appetites of your guests. If you’re feeding a larger crowd, you can simply scale up the recipe and roast two ducks side-by-side.


Classic Christmas Duck
- Total Time: 170
- Yield: 6-8 servings
Description
Indulge in the rich, flavorful goodness of this Classic Christmas Duck recipe. Featuring a tender, juicy duck infused with a blend of aromatic herbs and spices, this dish is the ultimate holiday centerpiece.
Ingredients
– 1 (5-6 lb) whole duck
– 1 orange, zested and juiced
– 3 sprigs fresh rosemary
– 2 sprigs fresh thyme
– 2 tsp salt
– 1 tsp black pepper
– 1 tbsp olive oil
Instructions
1. 1. Preheat your oven to 375°F (190°C).
2. 2. Pat the duck dry with paper towels and place it breast-side up on a roasting rack set in a large, shallow roasting pan.
3. 3. In a small bowl, combine the orange zest, rosemary, thyme, salt, and pepper. Rub this seasoning blend all over the surface of the duck, including the cavity.
4. 4. Squeeze the orange juice over the top of the duck and brush with the olive oil.
5. 5. Roast the duck for 2-2.5 hours, basting every 30 minutes, until the internal temperature reaches 165°F (75°C) in the thickest part of the thigh.
6. 6. Let the duck rest for 15-20 minutes before carving and serving.
Notes
For a crispy skin, be sure to pat the duck dry thoroughly before seasoning. You can also try trussing the legs together for a more even cooking. Serve the Christmas Duck with your favorite holiday sides, such as roasted potatoes, Brussels sprouts, and cranberry sauce.
- Prep Time: 20
- Cook Time: 150
- Category: Main Course
- Method: Roasting
- Cuisine: American
Conclusion
There you have it, my friends – the secret to creating a Christmas Duck that will have your guests raving. This recipe is the result of years of culinary experimentation and a deep love for the flavors of the holiday season. So, what are you waiting for? Gather your ingredients, fire up your oven, and get ready to create a Christmas feast that will be the talk of the town. Bon appétit, and Merry Christmas!


