As the air turned crisp and the days grew shorter, I knew it was time to break out the Christmas fudge recipe. You see, making Christmas fudge has been a beloved tradition in my family for as long as I can remember. It all started with my grandma, who would spend hours in the kitchen, stirring and tempering the rich, creamy chocolate until it reached the perfect consistency.
Every year, as the holiday season approached, the aroma of Christmas fudge would waft through the house, beckoning us to the kitchen. My siblings and I would eagerly await the moment when Grandma would let us lick the spoon, savoring the decadent sweetness that melted on our tongues. It was a moment of pure joy, a chance to connect with our family’s history and the warm memories that Christmas fudge evoked.
As I grew older, I continued the tradition, learning the secrets from my grandma and perfecting the recipe over the years. Now, I take great pride in sharing this Christmas fudge with my own family and friends, knowing that it’s not just a dessert – it’s a piece of our family’s legacy, a tangible way to celebrate the magic of the holiday season.
Table of Contents
Why This Christmas Fudge Recipe Will Become Your Go-To
The Secret Behind Perfect Christmas Fudge
What sets this Christmas fudge recipe apart is the perfect balance of rich chocolate, creamy texture, and just the right amount of sweetness. The secret lies in the careful tempering of the chocolate, a technique that ensures a smooth, glossy finish and a melt-in-your-mouth experience with every bite. Plus, the addition of a touch of vanilla and a pinch of salt elevates the flavors, creating a truly unforgettable treat.
Essential Ingredients You’ll Need
– Chocolate: A high-quality dark chocolate or a combination of dark and milk chocolate will give you the perfect balance of bitterness and sweetness.
– Sweetened Condensed Milk: This ingredient is the key to the creamy, luscious texture of the Christmas fudge.
– Butter: A small amount of butter adds richness and a silky mouthfeel.
– Vanilla Extract: A dash of vanilla enhances the overall flavor profile.
– Salt: A pinch of salt helps to balance the sweetness and brings out the depth of the chocolate.
Step-by-Step Christmas Fudge Instructions
Preparing Your Christmas Fudge
Making Christmas fudge is a straightforward process, but it does require a bit of patience and attention to detail. With the right steps, you’ll be able to create a batch of rich, velvety fudge that’s sure to impress your guests. The total preparation time is around 30 minutes, and you’ll need a saucepan, a spatula, and a baking dish or pan to get started.
1- Begin by lining a 9×9-inch baking pan with parchment paper, leaving some overhang on the sides to make the fudge easy to remove later.
2- In a medium-sized saucepan, combine the chopped chocolate, sweetened condensed milk, and butter. Heat the mixture over medium-low heat, stirring constantly, until the chocolate is fully melted and the mixture is smooth and creamy.
3- Remove the saucepan from the heat and stir in the vanilla extract and a pinch of salt. Continue stirring until the ingredients are well combined.
4- Pour the Christmas fudge mixture into the prepared baking pan, smoothing the top with a spatula to create an even layer.
5- Refrigerate the fudge for at least 2 hours, or until it is firm and set.
6- Once the fudge is set, lift it out of the pan using the parchment paper overhang and cut it into small squares. Serve and enjoy your homemade Christmas fudge!
Pro Tips for Success
– Make sure to use high-quality chocolate for the best flavor and texture.
– Take your time when melting the chocolate to prevent it from seizing or burning.
– Avoid overbeating the fudge mixture, as this can cause it to become grainy.
– Refrigerate the fudge for at least 2 hours to ensure it sets properly before cutting.
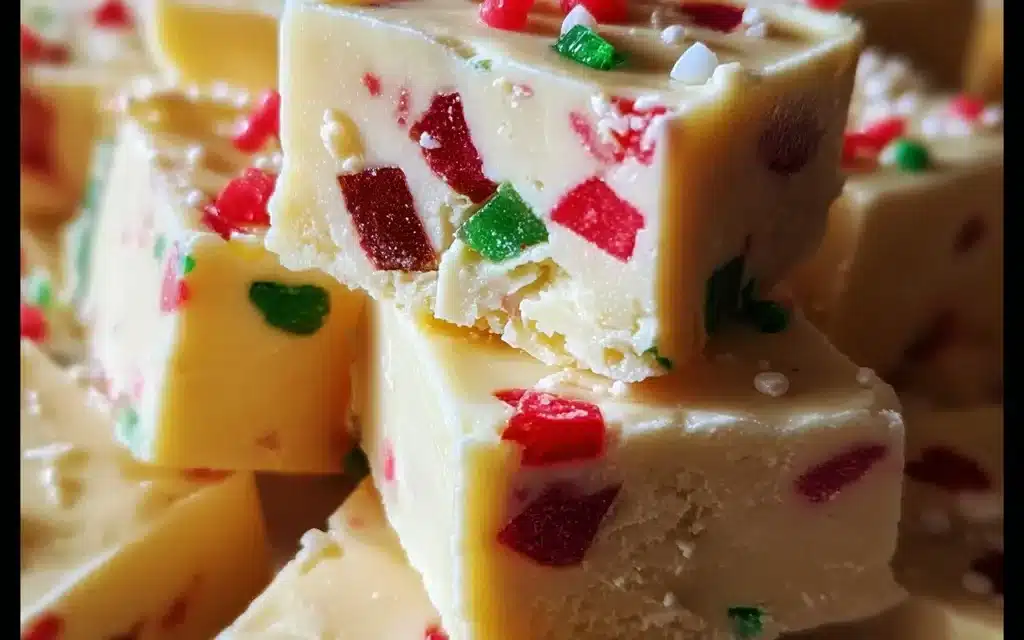
– For a decorative touch, sprinkle the top of the fudge with chopped nuts, crushed candy canes, or a dusting of cocoa powder.
Serving and Storing Your Christmas Fudge
Perfect Pairings for Christmas Fudge
Christmas fudge is a decadent treat that pairs beautifully with a variety of beverages and accompaniments. Serve it alongside a steaming mug of hot chocolate or a rich, creamy cup of eggnog for a classic holiday pairing. It also makes a wonderful addition to a holiday dessert spread, complementing other seasonal treats like gingerbread, peppermint bark, or a festive Christmas cake.
Storage and Make-Ahead Tips
Christmas fudge is a fantastic make-ahead dessert that can be stored for up to 2 weeks. Once the fudge has set, you can cut it into squares and store them in an airtight container in the refrigerator. For longer-term storage, the fudge can also be frozen for up to 3 months. When ready to serve, simply thaw the fudge at room temperature for a few minutes before enjoying.
Variations and Dietary Adaptations for Christmas Fudge
Creative Christmas Fudge Variations
If you’re feeling adventurous, there are endless possibilities for customizing your Christmas fudge. Try swirling in a layer of peanut butter or hazelnut spread for a nutty twist. Add a sprinkle of crushed candy canes or a drizzle of white chocolate for a festive touch. You can also experiment with different types of chocolate, such as milk, white, or even flavored varieties like peppermint or salted caramel.
Making Christmas Fudge Diet-Friendly
For those with dietary restrictions, you can easily adapt this Christmas fudge recipe to suit your needs. To make it gluten-free, simply ensure that all the ingredients you use are certified gluten-free. For a vegan version, substitute the butter with coconut oil or a plant-based butter alternative, and use dairy-free chocolate and sweetened condensed coconut milk. If you’re following a low-carb or keto diet, you can use sugar-free chocolate and a sugar-free sweetened condensed milk substitute.
Frequently Asked Questions
Q: Can I use milk chocolate instead of dark chocolate?
A: Absolutely! While dark chocolate provides a richer, more intense flavor, you can certainly use milk chocolate or a combination of milk and dark chocolate to create a sweeter, more approachable Christmas fudge.
Q: How long does it take for the fudge to set?
A: The fudge needs to be refrigerated for at least 2 hours to set properly. However, for best results, it’s recommended to chill the fudge for 4-6 hours, or even overnight, to ensure it’s completely firm and ready to cut.
Q: Can I make the fudge in advance?
A: Yes, Christmas fudge is an excellent make-ahead dessert. Once the fudge has set, you can store it in an airtight container in the refrigerator for up to 2 weeks. You can also freeze the fudge for up to 3 months, making it a convenient option for holiday meal prep.
Q: How many pieces of fudge does this recipe make?
A: This recipe yields approximately 16-20 squares of Christmas fudge, depending on how you cut it. The exact number may vary slightly based on the size of your baking pan and the thickness of the fudge.
Q: What should I do if the fudge turns out grainy or crumbly?
A: If your Christmas fudge develops a grainy or crumbly texture, it’s likely due to overheating or overcooking the chocolate. Next time, be sure to melt the chocolate over low heat, stirring constantly to prevent seizing. If the texture is already off, you can try reheating the fudge gently and adding a small amount of additional sweetened condensed milk to help smooth it out.


Christmas Fudge
- Total Time: 15
- Yield: 16
Description
Indulge in the rich, creamy, and irresistible taste of homemade Christmas fudge. This quick and easy recipe delivers a decadent holiday treat that’s perfect for sharing with family and friends.
Ingredients
– 2 cups semisweet chocolate chips
– 1 (14 oz) can sweetened condensed milk
– 1 teaspoon vanilla extract
– 1/4 teaspoon salt
– 1/2 cup chopped pecans or walnuts (optional)
– Red and green sprinkles or crushed candy canes (optional)
Instructions
1. – Line an 8×8-inch baking pan with parchment paper, leaving some overhang on the sides for easy removal.
2. – In a medium saucepan, combine the chocolate chips and sweetened condensed milk. Heat over low, stirring constantly, until the chocolate is completely melted and the mixture is smooth, about 5 minutes.
3. – Remove from heat and stir in the vanilla extract and salt. If using, fold in the chopped nuts.
4. – Pour the fudge mixture into the prepared pan and spread it out evenly. Top with red and green sprinkles or crushed candy canes, if desired.
5. – Refrigerate for at least 2 hours, or until firm.
6. – Lift the fudge out of the pan using the parchment paper overhang. Cut into squares and serve.
Notes
– For a richer fudge, use semi-sweet or dark chocolate chips.
– Customize the flavor by adding 1-2 teaspoons of peppermint extract or ground cinnamon.
– Store the fudge in an airtight container in the refrigerator for up to 2 weeks.
- Prep Time: 10
- Cook Time: 5
- Category: Dessert
- Method: Stovetop
- Cuisine: American
Conclusion
Christmas fudge is a timeless holiday treat that’s sure to bring joy and nostalgia to your festive celebrations. With this foolproof recipe, you can create a batch of rich, creamy fudge that will have your family and friends asking for more. So, what are you waiting for? Grab your ingredients, put on your apron, and get ready to make some unforgettable Christmas fudge memories. Don’t forget to share your creations with us in the comments below!


