I can still remember the first time I made Fruity Pebbles Rice Krispie Treats. I was in college, craving a sweet and colorful snack that would transport me back to my childhood. As I stood in the kitchen, the familiar aroma of the Fruity Pebbles cereal wafting through the air, I couldn’t wait to get started.
It was a rainy afternoon, and I had a few friends coming over to catch up. I knew this recipe would be the perfect pick-me-up. The vibrant colors of the Fruity Pebbles, combined with the gooey marshmallows and crispy rice, just seemed like the ultimate indulgence. Let me tell you, the result was nothing short of magical.
My friends were blown away by the burst of fruity flavor and the satisfying texture. We sat around the table, sharing stories and laughing, each of us savoring every bite of those Fruity Pebbles Rice Krispie Treats. It was in that moment that I knew I had discovered a recipe that would become a staple in my repertoire.
Table of Contents
Why This Fruity Pebbles Rice Krispie Treats Recipe Will Become Your Go-To
The Secret Behind Perfect Fruity Pebbles Rice Krispie Treats
What makes this Fruity Pebbles Rice Krispie Treats recipe so special is the perfect balance of sweet, fruity, and crunchy. The secret lies in the combination of the Fruity Pebbles cereal and the classic rice krispies. The Fruity Pebbles provide the vibrant colors and fruity flavor, while the rice krispies add that satisfying crunch.
But the real magic happens when you melt the butter and marshmallows together. This creates a gooey, sticky base that seamlessly binds the cereals, resulting in a treat that’s both indulgent and irresistible. The key is to work quickly and not over-mix the ingredients, so the cereal pieces retain their individual texture.
Essential Ingredients You’ll Need
To make these Fruity Pebbles Rice Krispie Treats, you’ll need just a few simple ingredients:
- 3 tablespoons unsalted butter: This provides the rich, creamy foundation for the treats.
- 4 cups miniature marshmallows: The melted marshmallows give the treats their signature gooey, sticky texture.
- 6 cups Fruity Pebbles cereal: These vibrant, fruit-flavored cereal pieces add the fun and colorful element to the treats.
- 3 cups rice krispies cereal: The classic rice krispies provide the perfect crunch to balance the soft, chewy texture.
Together, these ingredients come together to create a truly delightful and memorable treat.
Step-by-Step Fruity Pebbles Rice Krispie Treats Instructions
Preparing Your Fruity Pebbles Rice Krispie Treats
This Fruity Pebbles Rice Krispie Treats recipe is incredibly quick and easy, with a prep time of just 5 minutes and a cook time of 5 minutes, for a total time of 10 minutes. All you’ll need is a large saucepan, a spatula, and a 9×13 inch baking pan.
1- Start by melting the 3 tablespoons of unsalted butter in a large saucepan over medium heat. Once the butter is completely melted, add the 4 cups of miniature marshmallows and stir constantly until the marshmallows are fully melted and the mixture is smooth and creamy.
2- Remove the saucepan from the heat and immediately add the 6 cups of Fruity Pebbles cereal and the 3 cups of rice krispies cereal. Use a spatula to gently fold the cereals into the melted marshmallow mixture, ensuring everything is evenly coated.
3- Work quickly to transfer the Fruity Pebbles Rice Krispie Treat mixture into the prepared 9×13 inch baking pan. Use your spatula to spread the mixture evenly and press it down firmly to create a compact, even layer.
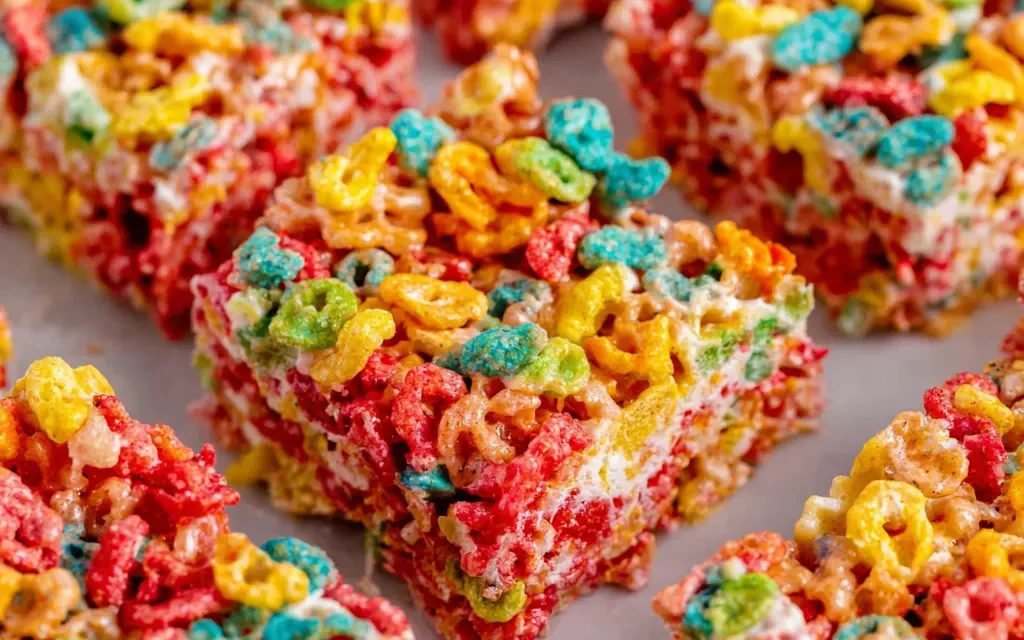
4- Allow the treats to cool for about 5 minutes, or until the mixture has set and you can see the vibrant colors of the Fruity Pebbles peeking through.
5- Once cooled, use a sharp knife to cut the Fruity Pebbles Rice Krispie Treats into 16 equal-sized squares.
6- Serve the colorful and delicious treats immediately, or store them in an airtight container for up to 5 days.
Pro Tips for Success
- Be sure to work quickly when adding the cereals to the melted marshmallow mixture. This will help prevent the cereal pieces from becoming too soft and losing their texture.
- Generously grease the baking pan before adding the treat mixture. This will make it much easier to remove the treats from the pan once they’ve cooled.
- For an extra burst of flavor, try adding a teaspoon of vanilla extract to the melted marshmallow mixture.
- Experiment with different types of cereal, such as Cocoa Krispies or Cinnamon Toast Crunch, to create unique flavor variations.
Serving and Storing Your Fruity Pebbles Rice Krispie Treats
Perfect Pairings for Fruity Pebbles Rice Krispie Treats
These Fruity Pebbles Rice Krispie Treats are the perfect snack to enjoy on their own, but they also pair beautifully with a variety of beverages and side dishes. Serve them alongside a cold glass of milk or a refreshing fruit punch for a classic childhood treat. For a more grown-up pairing, try them with a cup of hot coffee or a glass of chilled white wine.
These colorful and fun treats are also great for sharing at parties, picnics, or as a special after-school snack. With 16 servings per batch, there’s enough to satisfy a crowd.
Storage and Make-Ahead Tips
Fruity Pebbles Rice Krispie Treats can be stored in an airtight container at room temperature for up to 5 days. If you want to make them ahead of time, simply prepare the treats as directed, cut them into squares, and store them in a single layer in the container.
For longer-term storage, you can also freeze the treats. To do this, place the squares in a single layer on a baking sheet and freeze for 2-3 hours, or until completely firm. Then, transfer the frozen treats to an airtight, freezer-safe container or resealable bag. They’ll keep in the freezer for up to 3 months. When ready to serve, simply thaw the treats at room temperature for 30 minutes before enjoying.
Variations and Dietary Adaptations for Fruity Pebbles Rice Krispie Treats
Creative Fruity Pebbles Rice Krispie Treats Variations
While the classic Fruity Pebbles Rice Krispie Treats are already a delightful treat, there are plenty of ways to put a twist on this recipe. For a seasonal twist, try using different colored Fruity Pebbles, such as the red, white, and blue version for a patriotic dessert. You could also add a layer of melted chocolate or drizzle it on top for an extra indulgent treat.
Another fun variation is to press the Fruity Pebbles Rice Krispie Treat mixture into a muffin tin, creating individual servings that are perfect for on-the-go snacking. You could even top them with a dollop of whipped cream or a sprinkle of chopped nuts.
Making Fruity Pebbles Rice Krispie Treats Diet-Friendly
If you’re looking to make your Fruity Pebbles Rice Krispie Treats a bit more diet-friendly, there are a few simple substitutions you can try. For a gluten-free version, use gluten-free rice cereal in place of the traditional rice krispies. To make them vegan, swap the unsalted butter for a plant-based alternative, such as coconut oil or vegan margarine, and use vegan marshmallows.
For a lower-carb option, you can replace the Fruity Pebbles with a sugar-free cereal and use a calorie-free sweetener, such as erythritol or stevia, in place of the marshmallows. Just keep in mind that these substitutions may slightly alter the texture and flavor, but they’ll still provide that satisfying Fruity Pebbles Rice Krispie Treat experience.
Frequently Asked Questions
Q: Can I use a different type of cereal instead of Fruity Pebbles?
A: Absolutely! Feel free to experiment with other types of brightly colored, fruit-flavored cereals, such as Froot Loops or Trix. Just be sure to use the same total volume of 6 cups of cereal.
Q: How long do these Fruity Pebbles Rice Krispie Treats take to make?
A: This recipe is incredibly quick and easy, with a prep time of just 5 minutes and a cook time of 5 minutes, for a total time of 10 minutes.
Q: Can I make these treats ahead of time?
A: Yes, you can! Fruity Pebbles Rice Krispie Treats can be stored in an airtight container at room temperature for up to 5 days. They can also be frozen for up to 3 months.
Q: How many servings does this recipe make?
A: This Fruity Pebbles Rice Krispie Treats recipe yields 16 servings.
Q: What should I do if my treats are too sticky or too dry?
A: If the treats are too sticky, you may have overcooked the marshmallow mixture. Next time, be sure to remove the pan from the heat as soon as the marshmallows are fully melted. If the treats are too dry, you can try adding a tablespoon or two of melted butter to the mixture before pressing it into the pan.


Fruity Pebbles Rice Krispie Treats
- Total Time: 10
- Yield: 16 servings
Description
Indulge in the vibrant, crunchy goodness of these Fruity Pebbles Rice Krispie Treats – a quick, no-bake recipe that’s perfect for parties, snacks, or anytime cravings. Bursting with fruity flavor and a pop of color, these treats are sure to become a new favorite!
Ingredients
– 3 tablespoons unsalted butter
– 4 cups miniature marshmallows
– 6 cups Fruity Pebbles cereal
– 3 cups rice krispies cereal
Instructions
1. In a large saucepan, melt the butter over medium heat.
2. Add the marshmallows and stir continuously until completely melted and smooth.
3. Remove the pan from the heat and stir in the Fruity Pebbles and rice krispies cereals until well combined.
4. Press the mixture evenly into a 9×13-inch baking pan.
5. Allow to cool completely before cutting into squares.
Notes
For a more vibrant color, use slightly less rice krispies and add an extra 1/2 cup of Fruity Pebbles. Store the treats in an airtight container at room temperature for up to 1 week.
- Prep Time: 5
- Cook Time: 5
- Category: Cookies, Bars & Brownies
- Method: No-Bake
- Cuisine: American
Conclusion
Fruity Pebbles Rice Krispie Treats are a true nostalgic delight that will transport you back to your childhood. With their vibrant colors, fruity flavor, and satisfying texture, these treats are sure to become a new family favorite.
What are you waiting for? Gather your ingredients, follow the simple steps, and get ready to create a batch of these irresistible Fruity Pebbles Rice Krispie Treats. Trust me, your taste buds and your loved ones will thank you. Don’t forget to share your creations with me in the comments below!


