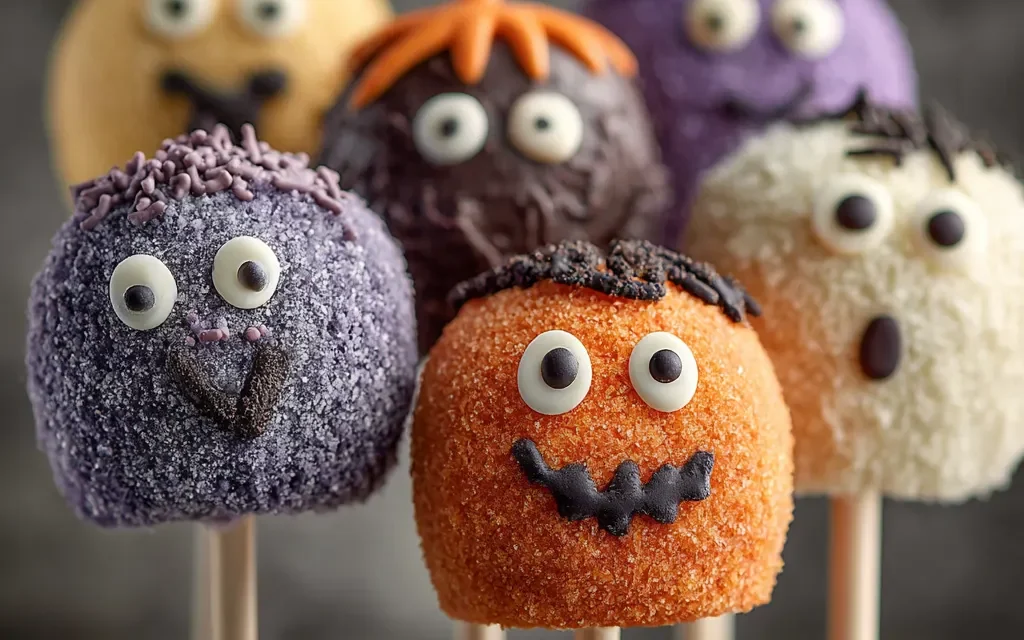
It was the night before Halloween, and I was in the kitchen, whipping up a batch of my famous Halloween Cake Pops. The air was thick with the scent of warm chocolate and the sound of the mixer whirring as I combined the crumbled cake and frosting. This was a tradition I’d been upholding for years, and it never failed to fill me with a sense of excitement and nostalgia.
As a kid, I always looked forward to Halloween with unbridled enthusiasm. The costumes, the trick-or-treating, the spooky decorations – it was all part of the magic. But my favorite part was always the treats, and my mom’s Halloween Cake Pops were the pièce de résistance. She’d spend hours painstakingly shaping the cake into perfectly round balls, dipping them in chocolate, and decorating them with all sorts of festive toppings. I can still remember the way they’d melt in my mouth, the rich flavor mingling with the crunchy sprinkles or the chewy caramel.
So, when I grew up and started hosting my own Halloween parties, I knew I had to carry on the tradition. And let me tell you, these Halloween Cake Pops are always a hit! The guests can’t get enough of them, and I love seeing the delight on their faces as they bite into that first creamy, chocolatey confection.
Table of Contents
Why This Halloween Cake Pops Recipe Will Become Your Go-To
The secret behind these perfect Halloween Cake Pops lies in the attention to detail and the perfect balance of flavors. I’ve spent years perfecting the technique, and I can confidently say that this recipe is a surefire way to impress your friends and family. From the moist, flavorful cake base to the silky smooth chocolate coating, every element is designed to delight the senses.
The Secret Behind Perfect Halloween Cake Pops
What sets these Halloween Cake Pops apart is the way they melt in your mouth, with a delightful crunch from the decorations. I’ve developed a unique method of baking the cake, crumbling it to the perfect consistency, and then blending it with just the right amount of frosting to create a smooth, pliable dough. This ensures that the cake pops hold their shape perfectly, without being too dense or too crumbly.
Essential Ingredients You’ll Need
- Chocolate cake: The foundation of these Halloween Cake Pops is a rich, moist chocolate cake. I prefer to use a dark chocolate cake for a deeper, more intense flavor.
- Cream cheese frosting: This creamy, tangy frosting is the perfect complement to the chocolate cake, adding a delightful creaminess to the cake pops.
- Melting chocolate: High-quality melting chocolate is essential for achieving that glossy, professional-looking coating on the Halloween Cake Pops.
- Halloween sprinkles: No Halloween Cake Pops are complete without a festive array of Halloween-themed sprinkles, candies, and decorations.
Step-by-Step Halloween Cake Pops Instructions
Preparing Your Halloween Cake Pops
Making these Halloween Cake Pops is a fun and easy process that can be done in just a few simple steps. The total time, from start to finish, is about 2 hours, and you’ll need a few key pieces of equipment, including a baking sheet, a mixing bowl, and a small cookie scoop or melon baller.
1- Start by baking your chocolate cake according to the package instructions, or use your favorite homemade recipe. Allow the cake to cool completely before crumbling it into a large mixing bowl.
2- Add the cream cheese frosting to the crumbled cake and use your hands to knead the mixture until it forms a smooth, pliable dough.
3- Using a small cookie scoop or melon baller, portion out the cake dough into 1-inch balls and place them on a parchment-lined baking sheet.
4- Refrigerate the cake pops for at least 30 minutes to firm up.
5- Melt the chocolate in a double boiler or microwave, stirring frequently until smooth and glossy.
6- Dip each cake pop into the melted chocolate, using a fork or toothpick to gently roll it around until it’s fully coated. Tap off any excess chocolate and place the coated cake pops back on the baking sheet.
Pro Tips for Success
The key to perfect Halloween Cake Pops is all in the technique. Be sure to crumble the cake thoroughly and work the frosting in gently to avoid overworking the dough. And when it comes to the chocolate coating, work in small batches and keep the chocolate at the right temperature for a smooth, glossy finish.
Serving and Storing Your Halloween Cake Pops
Perfect Pairings for Halloween Cake Pops
These Halloween Cake Pops are the perfect treat for any festive gathering, whether it’s a Halloween party, a cozy family gathering, or even a spooky movie night. They pair beautifully with a mug of hot apple cider or a glass of red wine, and they make a delightful addition to a spread of other Halloween-themed snacks and desserts.
Storage and Make-Ahead Tips
The great thing about these Halloween Cake Pops is that they can be made in advance and stored for up to a week. Once the chocolate coating has set, simply transfer the cake pops to an airtight container and refrigerate. When you’re ready to serve them, you can take them out and let them come to room temperature for about 30 minutes before enjoying.
Variations and Dietary Adaptations for Halloween Cake Pops
Creative Halloween Cake Pops Variations
If you’re feeling adventurous, you can try out different variations of these Halloween Cake Pops. For example, you could use a spice cake or a pumpkin cake as the base, or experiment with different chocolate coatings, like white chocolate or dark chocolate with a hint of cinnamon. You can also get creative with the decorations, using edible Halloween-themed sprinkles, candies, or even drizzles of colored chocolate.
Making Halloween Cake Pops Diet-Friendly
If you’re looking to make these Halloween Cake Pops a little healthier, there are a few substitutions you can try. Instead of using a traditional chocolate cake, you could use a gluten-free or grain-free cake recipe. And for the frosting, you could try a dairy-free or low-sugar option. Just be sure to adjust the texture of the cake dough accordingly to ensure the cake pops hold their shape.
Frequently Asked Questions
Q: Can I use a store-bought cake mix instead of homemade?
A: Absolutely! A store-bought cake mix is a perfectly acceptable shortcut for these Halloween Cake Pops. Just be sure to follow the instructions on the package for baking the cake.
Q: How long do the cake pops need to chill in the fridge?
A: The cake pops should chill in the fridge for at least 30 minutes before dipping in the chocolate. This helps them hold their shape and ensures a smooth, even coating.
Q: Can I make the cake pops ahead of time?
A: Yes, you can absolutely make the Halloween Cake Pops in advance. Once the chocolate coating has set, store them in an airtight container in the fridge for up to 1 week.
Q: How many cake pops does this recipe make?
A: This recipe yields approximately 24 Halloween Cake Pops, depending on the size of the balls.
Q: What if the chocolate coating cracks or gets streaky?
A: If you encounter any issues with the chocolate coating, it’s likely due to the temperature of the chocolate or the cake pops. Make sure the chocolate is at the right consistency, and try dipping the cake pops when they’re slightly chilled but not too cold.


Halloween Cake Pops
- Total Time: 55
- Yield: 30
Description
Indulge in these devilishly delicious Halloween Cake Pops – a fun and festive dessert that’s perfect for parties, gatherings, or satisfying your sweet tooth. Packed with flavor and easy to make, these bite-sized treats are sure to be a hit.
Ingredients
– 1 box chocolate cake mix
– 1 can (16 oz) chocolate frosting
– 1 bag (12 oz) candy melts or chocolate chips
– Halloween-themed sprinkles, candies, and decorations
Instructions
1. 1. Bake the cake according to the package instructions and let it cool completely.
2. 2. Crumble the baked cake into a large bowl and mix in the chocolate frosting until well combined.
3. 3. Roll the cake mixture into 1-inch balls and place them on a parchment-lined baking sheet.
4. 4. Melt the candy melts or chocolate chips according to the package instructions.
5. 5. Dip each cake ball into the melted chocolate, allowing any excess to drip off.
6. 6. Quickly add your desired Halloween-themed sprinkles, candies, or decorations to the coated cake pops before the chocolate sets.
7. 7. Refrigerate the cake pops for at least 30 minutes to allow the chocolate to fully harden.
8. 8. Enjoy your spooktacular Halloween Cake Pops!
Notes
Store the cake pops in an airtight container in the refrigerator for up to 1 week.
- Prep Time: 30
- Cook Time: 25
- Category: Dessert
- Method: Baking
- Cuisine: American
Conclusion
There’s just something so delightful and whimsical about these Halloween Cake Pops. They’re the perfect way to celebrate the spookiest time of year, and I know you’re going to love them just as much as I do. So, what are you waiting for? Grab your mixing bowls and get ready to create a batch of these Halloween treats that will have your friends and family begging for more. Don’t forget to share your creations with me – I can’t wait to see how they turn out!


