I can still vividly remember the first time my grandma made Healthy Homemade Butterfingers for me as a child. The aroma of creamy peanut butter and crisp, golden caramel filled the kitchen, instantly transporting me to a world of pure indulgence. As I eagerly watched her carefully craft each individual Healthy Homemade Butterfinger, I couldn’t wait to sink my teeth into the perfect balance of salty-sweet goodness. And when I finally took that first bite, the flavors exploded in my mouth, leaving me in awe of how she had managed to create something so heavenly, yet so much better for me than the store-bought version. From that day on, Healthy Homemade Butterfingers became a cherished tradition in our family, a treat that we would all look forward to with unbridled excitement.
Table of Contents
Why This Healthy Homemade Butterfingers Recipe Will Become Your Go-To
The Secret Behind Perfect Healthy Homemade Butterfingers
This recipe for Healthy Homemade Butterfingers is truly special because it allows you to enjoy the classic candy bar flavor without all the guilt. By using simple, wholesome ingredients and a unique technique, you can create 12 servings of decadent, craveable Healthy Homemade Butterfingers that are sure to satisfy your sweet tooth while nourishing your body. The secret lies in the perfect balance of creamy peanut butter, rich honey, and a touch of vanilla, all coming together to form a delightfully crisp and flavorful exterior that melts in your mouth.
Essential Ingredients You’ll Need
To make these 12 servings of Healthy Homemade Butterfingers, you’ll need:
- 1 cup creamy peanut butter
- 1/2 cup honey
- 1 teaspoon vanilla extract
- 1/4 teaspoon sea salt
- 2 cups crisp rice cereal
Step-by-Step Healthy Homemade Butterfingers Instructions
Preparing Your Healthy Homemade Butterfingers
This recipe takes 35 minutes total – 5 minutes for prep and 0 minutes for cooking. You’ll need a mixing bowl, a baking sheet, and parchment paper to get started. Let’s dive in!
1- In a large mixing bowl, combine the 1 cup of creamy peanut butter, 1/2 cup of honey, 1 teaspoon of vanilla extract, and 1/4 teaspoon of salt. Mix until the ingredients are fully incorporated and the mixture is smooth.
2- Stir in the 2 cups of rolled oats and 1 cup of unsweetened shredded coconut, making sure to evenly distribute the dry ingredients throughout the peanut butter mixture.
3- Using a tablespoon or small cookie scoop, portion the mixture into 12 equal-sized balls and place them on a parchment-lined baking sheet.
4- Gently press each ball into a flat, rectangular shape, resembling a classic butterfinger bar. The mixture should hold its shape nicely.
5- Refrigerate the Healthy Homemade Butterfingers for at least 30 minutes to allow them to firm up.
6- Once chilled, carefully transfer the 12 Healthy Homemade Butterfingers to a serving plate or container, and enjoy!
Pro Tips for Success
To ensure your Healthy Homemade Butterfingers turn out perfectly, be sure to use creamy peanut butter for the smoothest texture. Avoid using crunchy peanut butter, as it can result in an uneven consistency. Additionally, be mindful not to overmix the batter, as this can cause the oats to become too dense and chewy. Finally, remember to refrigerate the Healthy Homemade Butterfingers for at least 30 minutes to allow them to firm up and achieve that classic butterfinger crunch.
Serving and Storing Your Healthy Homemade Butterfingers
Perfect Pairings for Healthy Homemade Butterfingers
These 12 servings of Healthy Homemade Butterfingers are the perfect treat to enjoy on their own, but they also pair beautifully with a variety of beverages and side dishes. Consider serving them alongside a tall glass of cold milk or a steaming mug of hot chocolate for a classic flavor combination. For a more indulgent pairing, try them with a scoop of vanilla ice cream or a drizzle of melted dark chocolate. And for a healthier option, they make a great accompaniment to a fresh fruit salad or a cup of yogurt.
Storage and Make-Ahead Tips
Healthy Homemade Butterfingers are best stored in an airtight container in the refrigerator for up to 1 week. They can also be frozen for up to 3 months, making them a great make-ahead treat. When ready to enjoy, simply thaw the Healthy Homemade Butterfingers at room temperature for about 30 minutes before serving.
Variations and Dietary Adaptations for Healthy Homemade Butterfingers
Creative Healthy Homemade Butterfingers Variations
While the classic Healthy Homemade Butterfingers are undoubtedly delicious, you can also get creative with a variety of flavor twists. For a festive touch, try adding a sprinkle of cinnamon or a dash of pumpkin pie spice. For a chocolatey twist, melt some dark chocolate and dip the Healthy Homemade Butterfingers in it. You can even experiment with different nut butters, such as almond or cashew, to create unique flavor profiles.
Making Healthy Homemade Butterfingers Diet-Friendly
To make these Healthy Homemade Butterfingers suitable for various dietary needs, you can try a few simple substitutions. For a gluten-free version, simply use certified gluten-free rolled oats. For a vegan option, replace the honey with an equal amount of maple syrup or agave nectar. And for a low-carb adaptation, you can swap the rolled oats for finely chopped nuts or seeds, such as almonds or sunflower seeds.
Frequently Asked Questions
Q: Can I use crunchy peanut butter instead of creamy?
A: While you can use crunchy peanut butter, we recommend using creamy for the smoothest and most consistent texture in your Healthy Homemade Butterfingers. Crunchy peanut butter may result in an uneven consistency.
Q: How many servings does this recipe make?
A: This recipe makes exactly 12 servings, with each serving being 1 butterfinger.
Q: Can I make these Healthy Homemade Butterfingers in advance?
A: Yes! These Healthy Homemade Butterfingers can be made ahead of time and stored in the refrigerator for up to 1 week or in the freezer for up to 3 months. Just be sure to thaw them at room temperature for about 30 minutes before serving.
Q: What can I do if my Healthy Homemade Butterfingers don’t hold their shape?
A: If the mixture seems too soft to hold its shape, try refrigerating it for a bit longer, or add a tablespoon or two of extra rolled oats to help it firm up.


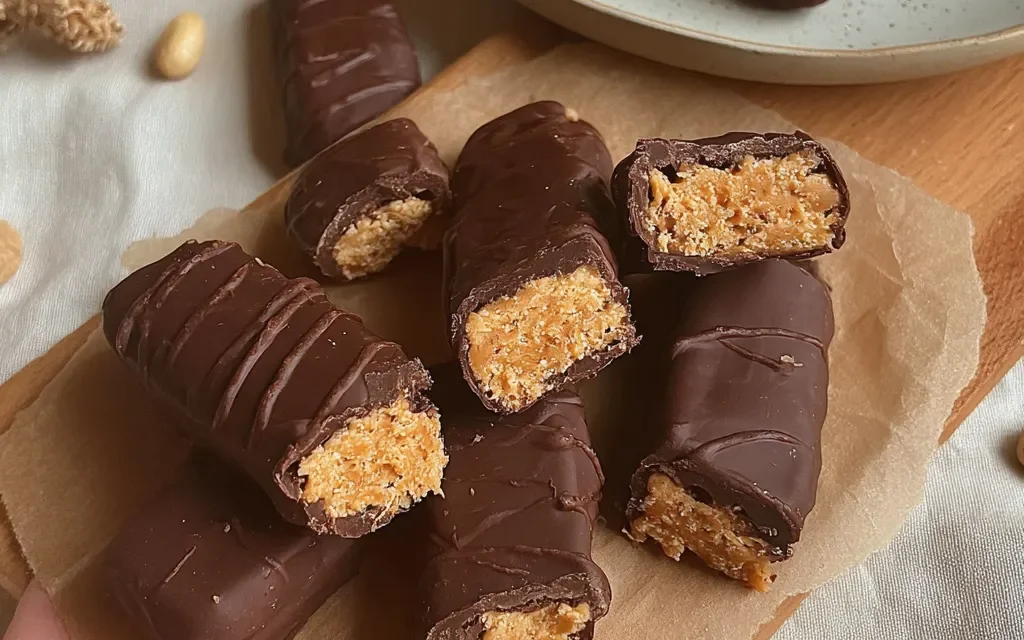
Healthy Homemade Butterfingers
- Total Time: 35
- Yield: 12 servings
Description
Satisfy your sweet tooth with these delectable Healthy Homemade Butterfingers – a guilt-free twist on the classic candy! Made with just a few simple ingredients, these no-bake treats are easy to prepare and perfectly chewy and creamy.
Ingredients
– 1 cup creamy peanut butter
– 1/2 cup honey
– 1 teaspoon vanilla extract
– 1/4 teaspoon sea salt
– 2 cups crisp rice cereal
Instructions
1. 1. In a medium bowl, combine the peanut butter, honey, vanilla extract, and salt. Stir until well combined.
2. 2. Gently fold in the crisp rice cereal, making sure to coat each piece evenly.
3. 3. Using a spoon or your hands, form the mixture into bite-sized balls or bars.
4. 4. Place the Healthy Homemade Butterfingers on a parchment-lined baking sheet and refrigerate for at least 30 minutes to set.
5. 5. Enjoy your guilt-free treats! Store any leftovers in an airtight container in the refrigerator for up to 1 week.
Notes
For a chunkier texture, use creamy peanut butter with some peanut pieces. You can also try using different types of nut butters or swap the honey for maple syrup or agave nectar.
- Prep Time: 5
- Category: Cookies, Bars & Brownies
- Method: No-Bake
- Cuisine: American
Conclusion
Healthy Homemade Butterfingers are a delightful and guilt-free way to satisfy your sweet cravings. With their perfect balance of creamy peanut butter, crisp texture, and just the right amount of sweetness, these 12 servings are sure to become your new go-to treat. So why not give this recipe a try and let the nostalgia and joy of homemade Healthy Homemade Butterfingers fill your kitchen and your heart? I can’t wait to hear how you and your loved ones enjoy this recipe!

