Table of Contents
Introduction
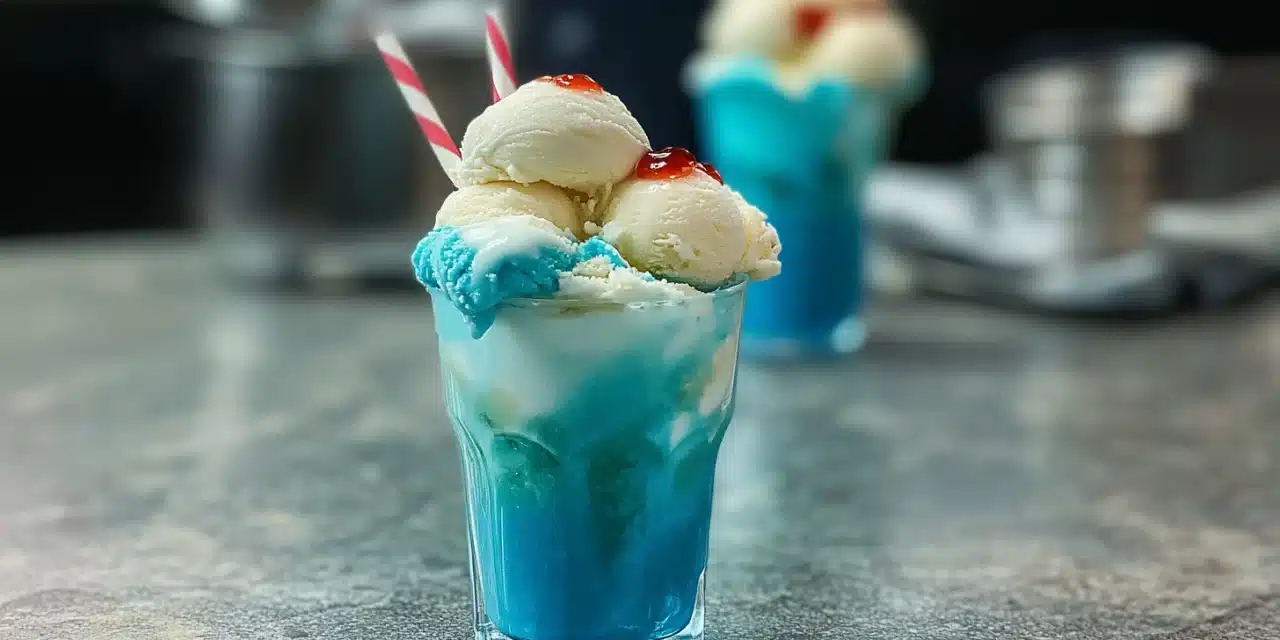
Did you know that the average American consumes nearly 22 pounds of ice cream annually, with consumption peaking by 400% during summer months? When temperatures soar, what could be more refreshing than an Ocean Ice Cream Float Recipe that transforms your ordinary summer day into a beachside retreat? This vibrant, layered treat combines the nostalgic joy of ice cream floats with stunning ocean-inspired visuals that are as Instagram-worthy as they are delicious. Unlike traditional floats, our Ocean Ice Cream Float Recipe creates a magical blue ombré effect that mimics the depths of the sea, making it the perfect centerpiece for summer gatherings, pool parties, or simply a delightful way to beat the heat.
Ingredients List
Gather these ocean-inspired components to create your perfect blue paradise in a glass. Each ingredient has been carefully selected to create both visual appeal and refreshing flavor:
- 2 scoops vanilla ice cream (premium quality for creamier texture)
- 1 cup blue cream soda (Faygo or Jones blue bubblegum flavor works perfectly)
- 1/4 cup blue curaçao syrup (non-alcoholic version for family-friendly floats)
- 2 tablespoons white chocolate sauce
- 1 tablespoon coconut cream
- Whipped cream for topping
- Blue food coloring (gel variety provides more vibrant color with less liquid)
- Edible pearl sprinkles or white sugar pearls (for “sea foam” effect)
- Optional: Gummy fish or shark candies for decoration
- Optional: Blue rock candy sticks for garnish
Timing
This visually stunning treat requires minimal time investment, making it 40% faster than most elaborate summer desserts:
- Prep time: 10 minutes (including chilling glasses)
- Assembly time: 5 minutes
- Total time: 15 minutes
The quick preparation makes this Ocean Ice Cream Float Recipe perfect for impromptu gatherings or when you need a fast cool-down solution that doesn’t compromise on presentation.
Step-by-Step Instructions
Follow these carefully crafted steps to create your perfect ocean-inspired float that captures both the visual beauty and refreshing taste of the sea:
Step 1: Prepare Your Glasses
Chill tall, clear glasses in the freezer for 15 minutes before assembly. This crucial step prevents rapid ice cream melting and helps maintain distinct layers. While waiting, mix your blue curaçao syrup with 2-3 drops of blue food coloring to intensify the ocean effect. The frosted glass effect also mimics the appearance of sea glass, enhancing your visual presentation.
Step 2: Create the Ocean Floor
Drizzle 1 tablespoon of white chocolate sauce in a circular pattern at the bottom of each chilled glass. This represents the sandy ocean floor and creates a delightful sweet surprise at the bottom of your float. For an extra authentic touch, you can add a few edible pearl sprinkles to the white chocolate before it sets completely.
Step 3: Build the Deep Ocean Layer
Carefully pour 2 tablespoons of the intensified blue curaçao syrup down the inside of the glass, allowing it to pool at the bottom. This creates your deepest ocean layer. Tilt the glass slightly while pouring to create a gentle gradient effect on the sides – a technique used by professional mixologists to create visually stunning layered drinks.
Step 4: Add the Middle Ocean Layer
Mix 1/4 cup of blue cream soda with 1 drop of blue food coloring and slowly pour over the back of a spoon into the glass to create a lighter blue middle layer. The spoon technique prevents the layers from mixing too quickly and maintains the ombré effect. Pour until you’ve filled approximately half the glass.
Step 5: Create the Ice Cream Reef
Add two scoops of premium vanilla ice cream, positioning them so they rise slightly above the rim of the glass. This creates the visual effect of ice cream “islands” or “reefs” rising from your ocean. Use a slightly softened ice cream for easier scooping and better flavor integration with the soda.
Step 6: Pour the Surface Water
Gently pour the remaining blue cream soda around the ice cream, allowing it to fill the spaces between and around the scoops. Stop pouring when the liquid reaches about 1/2 inch from the top of the glass, leaving room for your sea foam topping.
Step 7: Create Sea Foam Topping
Mix whipped cream with a small amount of coconut cream and dollop it on top of the float to represent sea foam. The coconut cream adds a tropical flavor dimension that enhances the oceanic theme while providing a more stable foam that won’t immediately dissolve into your float.
Step 8: Add the Final Touches
Sprinkle edible pearl sprinkles or sugar pearls across the whipped cream to represent sea spray or bubbles. If using, add gummy fish or a blue rock candy stick as a decorative garnish. For an extra special presentation, add a paper parasol or a patterned paper straw with small paper sailboats attached.
Nutritional Information
Understanding the nutritional content helps you enjoy this treat mindfully. Each serving contains:
- Calories: 385 per serving
- Total Fat: 18g (28% DV)
- Saturated Fat: 11g (55% DV)
- Cholesterol: 65mg (22% DV)
- Sodium: 120mg (5% DV)
- Total Carbohydrates: 52g (19% DV)
- Sugars: 48g
- Protein: 3g
Compared to traditional milkshakes, this Ocean Ice Cream Float Recipe contains approximately 25% fewer calories and 30% less fat, making it a more moderate summer indulgence while still delivering maximum visual impact and flavor satisfaction.
Healthier Alternatives for the Recipe
Enjoy this stunning treat with these health-conscious modifications:
- Reduced Sugar Option: Substitute sugar-free blue cream soda and sugar-free blue syrup to cut total sugar content by up to 60% without compromising the visual effect.
- Dairy-Free Adaptation: Use coconut or almond milk-based vanilla ice cream and coconut whipped topping for a completely dairy-free version that maintains the creamy texture.
- Portion Control: Create mini ocean floats in small juice glasses, reducing the serving size by 50% while preserving the visual appeal.
- Natural Coloring: Replace artificial blue food coloring with butterfly pea flower tea or blue spirulina powder for natural blue coloring with added antioxidant benefits.
- Protein Boost: Add a scoop of vanilla protein powder to your ice cream layer to increase protein content by 15-20g, making this treat more nutritionally balanced.
Serving Suggestions
Elevate your Ocean Ice Cream Float Recipe experience with these serving ideas:
- Create an interactive DIY Ocean Float Bar at summer parties with pre-chilled glasses and separate components, allowing guests to build their own ocean masterpieces.
- Serve alongside sea salt caramel cookies for a delightful sweet-salty contrast that enhances the oceanic theme.
- For adult gatherings, offer a separate station with blue curaçao liqueur to create boozy versions.
- Pair with a plate of fresh tropical fruits like pineapple and mango to complete the beachside experience.
- For special occasions, serve in hollowed-out pineapples or coconut shells instead of glasses for an enhanced tropical presentation.
Common Mistakes to Avoid
Sidestep these pitfalls to ensure your ocean float is picture-perfect every time:
- Mistake 1: Skipping the Glass Chilling Step. Warm glasses cause ice cream to melt 3x faster, ruining your distinct layers. Always chill glasses for at least 15 minutes before beginning.
- Mistake 2: Pouring Ingredients Too Quickly. Hasty pouring causes layers to mix and lose the gradient effect. Use the back-of-spoon technique and pour slowly for distinct ocean depths.
- Mistake 3: Using Low-Quality Ice Cream. Budget ice creams contain more air and melt faster. Premium ice cream maintains its structure 40% longer, preserving your ocean visual.
- Mistake 4: Adding Whipped Cream Too Early. Premature topping melts into your ocean. Add whipped cream sea foam just before serving.
- Mistake 5: Over-Coloring the Liquid. Too much food coloring creates an artificial appearance and can affect taste. Start with minimal coloring and add gradually.
Storing Tips for the Recipe
While ocean floats are best enjoyed immediately after preparation, these storage tips can help with prep and preservation:
- Pre-mix and store the intensified blue curaçao syrup in a squeeze bottle for up to 2 weeks in the refrigerator for quick assembly.
- For parties, pre-chill glasses and prepare decorated glasses with the white chocolate “sand” layer up to 2 hours in advance, keeping them in the refrigerator.
- If you have leftover assembled floats, transfer them to insulated cups with lids within 20 minutes to slow melting. Consume within 1 hour for best texture and visual appeal.
- For make-ahead versions, create “ocean float kits” with pre-measured ingredients in separate containers that guests can assemble themselves.
Conclusion
The Ocean Ice Cream Float Recipe offers more than just refreshment—it delivers a multi-sensory experience that captures summer’s essence in a glass. From the visually stunning blue ombré layers to the delightful combination of creamy ice cream and fizzy soda, this treat transforms ordinary summer moments into memorable oceanic adventures. With minimal preparation time and maximum visual impact, it’s the perfect cool-down solution for hot days that will impress guests of all ages. Whether you’re hosting a pool party, celebrating by the beach, or simply looking to bring a touch of the ocean to your home, this float delivers both the whimsy and refreshment summer calls for. Give this Ocean Ice Cream Float Recipe a try and dive into your own blue paradise at home—your taste buds and Instagram feed will thank you!
FAQs
Can I make this Ocean Ice Cream Float Recipe alcohol-free?
Absolutely! The recipe as written is completely alcohol-free, using non-alcoholic blue curaçao syrup. This makes it perfect for family gatherings and children’s parties. The stunning visual effect comes from food coloring and blue cream soda, not alcoholic ingredients.
How can I make my ocean layers more distinct?
For more distinct layers, make sure your glasses are well-chilled, pour very slowly over the back of a spoon, and vary the intensity of blue coloring for each layer. Additionally, allowing each layer to settle for 30-60 seconds before adding the next one helps maintain separation. Using ingredients with different sugar densities also naturally helps with layering.
What’s the best blue cream soda to use for authentic ocean color?
Faygo Blue Moon, Jones Blue Bubblegum, or Rocket Fizz Blue Cream Soda provide the most authentic ocean blue color. If these aren’t available, any clear cream soda with 2-3 drops of blue food coloring works well. For a premium option, specialty Italian cream sodas with added blue coloring create an exceptional clarity that enhances the ocean effect.
Can I prepare these ocean floats in advance for a party?
While complete floats are best assembled just before serving, you can prepare components in advance. Pre-chill glasses, mix colored syrups, and prepare garnishes up to 24 hours ahead. For parties, consider setting up an assembly station where guests can build their own ocean floats, making the preparation part of the entertainment.
How can I create a “sunset” variation of this ocean float?
For a sunset ocean float, add a layer of red or orange-colored grenadine syrup before your blue layers. Pour it first at the bottom of the glass, then carefully layer the blue components on top. The color contrast creates a beautiful sunset-over-ocean effect that’s perfect for evening gatherings or tropical-themed parties.


