
Baking up a batch of apple crisp bars is one of my all-time favorite fall traditions. There’s just something so cozy and comforting about that irresistible combination of buttery crumbly topping and sweet, tender apples. It reminds me of the chilly afternoons I used to spend with my grandma, crowded around her tiny kitchen table, watching her pull a fresh pan of apple crisp bars straight out of the oven. The aroma would fill the entire house, making our mouths water in anticipation. We’d have to wait patiently for them to cool just a bit before diving in, but it was always worth it. Those first warm, gooey bites were pure bliss – the perfect balance of tart and sweet, with a satisfying crunch from the topping. Grandma’s apple crisp bars were legendary, and I’ve been trying to recreate that nostalgic flavor and texture ever since.
Table of Contents
Why This Apple Crisp Bars Will Become Your Go-To
The Secret Behind Perfect apple crisp bars
Well, I’m excited to share that I’ve finally perfected my own version of this classic fall dessert. This recipe for apple crisp bars is truly special – it’s the result of years of experimentation and a little help from Grandma’s sage advice. What sets these apple crisp bars apart is the combination of techniques I use to achieve the perfect texture. First, I toss the apple chunks in a blend of warm spices that infuses them with cozy fall flavors. Then, the crumble topping is made with just the right ratio of oats, flour, and brown sugar to create an irresistibly crispy, buttery layer. And the secret ingredient? A touch of cinnamon-sugar that gets sprinkled on top, adding an extra layer of sweetness and a lovely golden color. Trust me, one bite and you’ll be hooked!


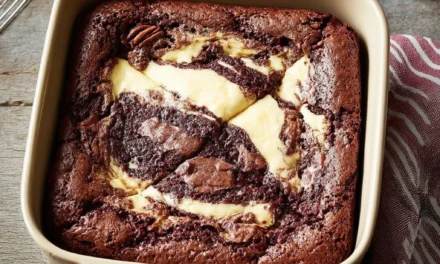
Old-Fashioned Apple Crisp Bars
- Total Time: 50
- Yield: 9
Description
Enjoy the classic flavors of autumn with these irresistible apple crisp bars. A buttery, crunchy crumble topping complements the soft, caramelized apple filling for a delightful dessert that’s perfect for sharing.
Ingredients
– 4 cups peeled and sliced Granny Smith apples
– 3/4 cup all-purpose flour
– 3/4 cup old-fashioned oats
– 3/4 cup packed brown sugar
– 1/2 cup unsalted butter, softened
– 1 teaspoon ground cinnamon
– 1/4 teaspoon ground nutmeg
Instructions
1. – Preheat oven to 350°F. Grease an 8×8-inch baking dish.
2. – Arrange the sliced apples in the prepared baking dish.
3. – In a medium bowl, combine the flour, oats, brown sugar, butter, cinnamon, and nutmeg. Mix until the mixture resembles coarse crumbs.
4. – Sprinkle the crumble topping evenly over the apples.
5. – Bake for 30-35 minutes, or until the topping is golden brown and the apples are tender.
6. – Allow to cool for 10 minutes before serving.
Notes
For a delicious variation, try adding a handful of chopped pecans or walnuts to the crumble topping. Serve warm with a scoop of vanilla ice cream for an extra indulgent treat.
- Prep Time: 15
- Cook Time: 35
- Category: Dessert
- Method: Baking
- Cuisine: American
Essential Ingredients You’ll Need
To make these amazing apple crisp bars, you’ll need:
- Apples – I recommend using a mix of sweet and tart apples, like Honeycrisp and Granny Smith, for the best flavor balance.
- Brown sugar – This adds caramel-y sweetness to the filling and topping.
- Flour – All-purpose flour helps bind the crumble topping.
- Oats – Old-fashioned oats give the topping a delightful chewy texture.
- Butter – Unsalted butter is the key to that rich, indulgent flavor.
- Cinnamon – Ground cinnamon enhances the warm spices in the filling.
- Vanilla extract – For a boost of aromatic vanilla flavor.
Step-by-Step apple crisp bars Instructions
Preparing Your apple crisp bars
Baking up a batch of homemade apple crisp bars is surprisingly easy, and the end result is so worth it. The whole process takes about an hour, start to finish, and the only equipment you’ll need is a sharp knife, a mixing bowl, and a baking pan. Let’s dive in!
1- Preheat your oven to 350°F and grease a 9×13-inch baking dish. Peel, core, and chop the apples into 1-inch pieces, then toss them with brown sugar, flour, cinnamon, and a pinch of salt in a large bowl.
2- In a separate bowl, make the crumble topping by combining more brown sugar, flour, oats, butter, and a dash of cinnamon. Use your fingertips to work the mixture until it forms coarse crumbs.
3- Spread the apple filling evenly into the prepared baking dish, then sprinkle the crumble topping over the top. Bake for 30-35 minutes, until the apples are tender and the topping is golden brown.
4- Keep an eye on the bars as they bake – you want the edges to be nicely crisped up, but avoid over-browning. The center should still be a bit soft and gooey when you pull them from the oven.
5- Let the apple crisp bars cool for at least 15 minutes before cutting into squares. This helps the filling set up and makes for cleaner slices.
6- Serve the apple crisp bars warm, perhaps with a scoop of vanilla ice cream or a dollop of freshly whipped cream. Enjoy!
Pro Tips for Success
Here are a few expert tips to ensure your apple crisp bars turn out perfectly every time:
– For the best texture, use a mix of tart and sweet apples. Granny Smith, Honeycrisp, and Gala are all great options.
– Don’t skip the cinnamon-sugar topping – it adds an irresistible crunch and caramelized flavor.
– Be careful not to overbake the bars. They should be golden brown on top but still slightly soft in the center.
– Let the bars cool completely before cutting for clean, neat slices. Warm bars will be very delicate.
– Avoid using a food processor to make the crumble topping, which can make it too fine. Use your fingers to get that perfect coarse texture.
Serving and Storing Your apple crisp bars
Perfect Pairings for apple crisp bars
These apple crisp bars are the ultimate fall dessert, and they pair beautifully with all sorts of cozy accompaniments. A scoop of vanilla ice cream or a dollop of whipped cream is a classic complement, providing a cool, creamy contrast to the warm, spiced apples. For a special touch, try drizzling the bars with caramel sauce or a dusting of powdered sugar.
They also make a wonderful addition to any autumn-themed spread, like a Thanksgiving feast or a harvest-inspired brunch. Serve them alongside pumpkin pie, gingerbread, or hot mulled cider for a truly comforting spread.
Storage and Make-Ahead Tips
Luckily, these apple crisp bars keep very well, so you can make them in advance to save time. Once the bars have cooled completely, simply cover the baking dish tightly with foil or plastic wrap and store it at room temperature for up to 3 days. You can also freeze the bars for longer storage – just cut them into squares, place them in a single layer on a baking sheet, and freeze until solid. Then transfer the frozen bars to an airtight container or resealable bag and freeze for up to 3 months.
When you’re ready to serve, simply thaw the bars at room temperature or reheat them in a 350°F oven for 10-15 minutes until warmed through. The texture may soften a bit after freezing, but they’ll still be absolutely delicious.
Variations and Dietary Adaptations for apple crisp bars
Creative apple crisp bars Variations
While this classic apple crisp bars recipe is hard to beat, there are so many ways to put your own spin on it. For a seasonal twist, try using pears or a mix of apples and pears in the filling. You could also experiment with different spice blends, like adding a touch of ginger or nutmeg.
Another fun variation is to swap the apples for other fruits, like peaches, plums, or blackberries. The possibilities are endless! You could even layer the fruit filling with a cream cheese or custard base for an extra indulgent treat.
Making apple crisp bars Diet-Friendly
To make these apple crisp bars a bit more diet-friendly, there are a few simple swaps you can try. For a gluten-free version, substitute gluten-free all-purpose flour and use certified gluten-free oats in the topping. You can also reduce the sugar in the filling by using a calorie-free sweetener like erythritol or monk fruit.
For a vegan take, replace the butter with coconut oil or vegan margarine, and use unsweetened applesauce instead of eggs to bind the topping. This will give you all the same delicious flavors without the dairy. Just be sure to adjust the baking time and temperature as needed.
Frequently Asked Questions
Q: Can I use a different type of fruit instead of apples?
A: Absolutely! Feel free to experiment with pears, peaches, plums, or even a mix of fruits. Just keep the overall quantity of fruit filling the same.
Q: How do I know when the apple crisp bars are done baking?
A: Look for the topping to be golden brown and crispy, and the filling to be bubbling around the edges. You can also test the apples with a fork – they should be tender but still hold their shape.
Q: Can I make the apple crisp bars ahead of time?
A: Yes, these bars keep very well. You can store them at room temperature for up to 3 days, or freeze them for longer storage. Just be sure to let them cool completely before cutting and serving.
Q: How do I reheat the apple crisp bars?
A: If they’re fresh, you can simply warm the bars in a 350°F oven for 10-15 minutes. For frozen bars, thaw them at room temperature first, then reheat in the oven.
Q: Why are my apple crisp bars soggy?
A: A few possible reasons – you may have used too many apples, didn’t let the bars cool completely before cutting, or overbaked them. Next time, try using just 4-5 cups of apple chunks and keeping a close eye on the baking time.
Conclusion
There you have it – my foolproof recipe for irresistible apple crisp bars that are sure to become a new family favorite. The sweet, spiced apples paired with that buttery, crunchy topping is an unbeatable combination. I hope this recipe helps you recreate the comforting flavors of my grandma’s legendary apple crisp bars in your own kitchen.
So what are you waiting for? Gather up your ingredients and get baking! I can’t wait to hear how your apple crisp bars turn out. Be sure to leave a comment below and let me know how they were received. Enjoy!


