A No-Bake Dessert That Will Steal Hearts & Satisfy Souls
“Sometimes the most magical treats come from the simplest ingredients. These little spheres of joy prove that perfection doesn’t require complexity – just love, patience, and really good chocolate.”
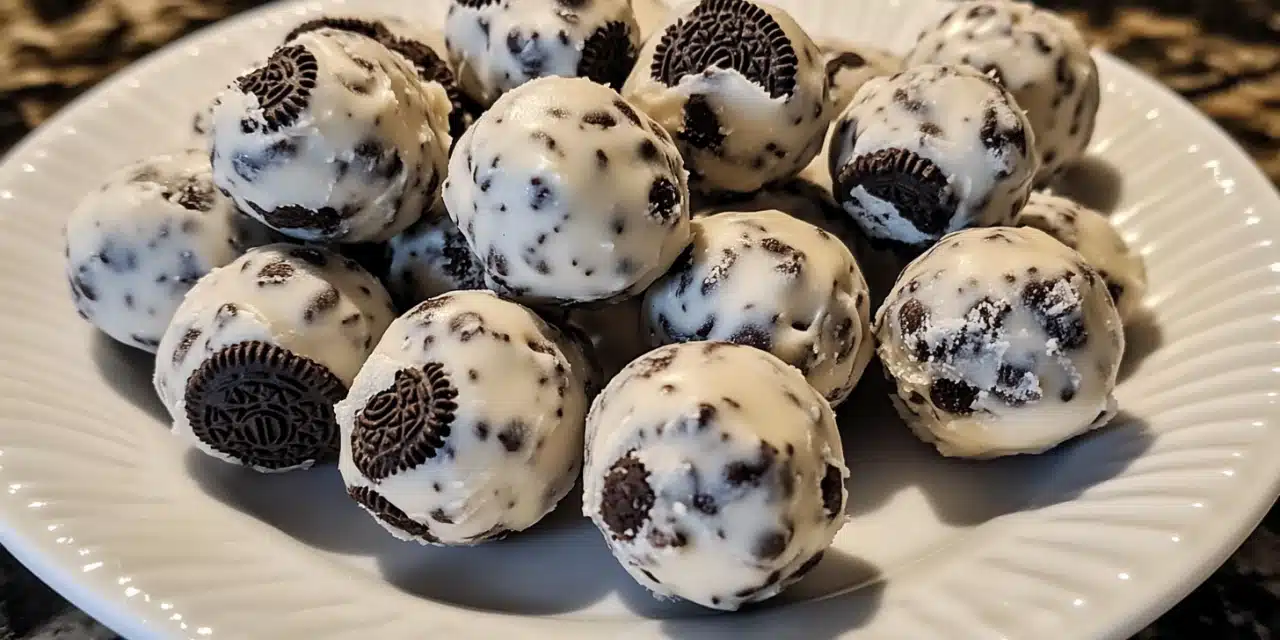
When life calls for something sweet, something indulgent, something that makes people close their eyes and smile after the first bite… that’s when you need Peanut Butter Oreo Cookie Balls. These aren’t just any ordinary treats – they’re edible happiness, rolled into perfect little spheres and dipped in chocolate dreams.
Quick Stats:
- Prep Time: 15 minutes
- Chill Time: 30 minutes
- Total Time: 45 minutes
- Yield: 12 divine little spheres
- Difficulty: Beginner-friendly
Table of Contents
The Perfect Marriage of Flavors
Why This Combination is Pure Magic
Picture this: the beloved crunch of chocolate sandwich cookies meeting the velvety embrace of peanut butter, all wrapped in a glossy chocolate coat that catches the light just so. This isn’t just a dessert – it’s an experience.
The Symphony of Textures:
- Oreo Crumbs → The foundation that brings chocolate depth & delightful texture
- Peanut Butter → The creamy, nutty soul that binds everything with love
- Powdered Sugar → The sweet whisper that perfects the balance
- Chocolate Coating → The elegant finale that makes hearts skip beats
Chef’s Secret: The magic happens in the contrast – that satisfying crack of the chocolate shell giving way to the soft, flavor-packed center. It’s textural poetry in edible form.
Essential Ingredients and Their Roles
Every Element Has a Purpose
THE FANTASTIC FOUR:
1. Oreo Cookies (1 full package)
- The star of the show
- Choose regular Oreos for classic appeal
- Must be crushed to fine, uniform crumbs
- Pro Tip: Save a few cookies for snacking – you’ve earned it!
2. Peanut Butter (½ cup)
- The heart and soul
- Smooth variety works best
- Acts as both flavor and binding agent
- Note: Natural PB lovers – you can substitute, but expect slight texture changes
3. Powdered Sugar (¼ cup)
- The sweet stabilizer
- Adds necessary sweetness
- Helps achieve perfect rolling consistency
- Insider Tip: Sift it for ultra-smooth results
4. Chocolate Chips (1 cup)
- The grand finale
- Semi-sweet is classic perfection
- Quality matters – choose chips you’d eat solo
- Options: Milk chocolate (sweeter), Dark chocolate (sophisticated)
Step-by-Step Preparation Method
Follow the Yellow Brick Road to Cookie Ball Paradise
Phase 1: The Foundation
Step 1: Crush and Conquer
- Place Oreos in food processor
- Pulse until fine, uniform crumbs form
- Alternative Method: Seal cookies in plastic bag + rolling pin therapy
- Target Texture: Fine enough to bind, coarse enough for character
Important Note: Don’t over-process! We want crumbs, not Oreo flour.
Step 2: The Great Mixing
- Combine cookie crumbs + peanut butter + powdered sugar
- Mix with love until completely integrated
- Consistency Check: Should hold together when pressed
- Fix-It Tips: Too dry? Add PB by teaspoons. Too wet? More powdered sugar.
Phase 2: The Shaping
Step 3: Roll Call
- Portion mixture using small cookie scoop (or clean hands)
- Roll between palms into walnut-sized spheres
- Pro Move: Slightly damp hands prevent sticking
- Place on parchment-lined baking sheet
Step 4: The Chill Session
- Freeze for exactly 30 minutes
- Why This Matters: Firm balls = successful chocolate coating
- Use This Time: Prep your chocolate station, clean up, maybe dance a little
Phase 3: The Transformation
Step 5: Chocolate Alchemy
- Melt chocolate chips your preferred way
- Microwave Method: 30-second intervals, stirring between
- Double Boiler Method: Gentler, more controlled
- Perfect Temperature: Flows smoothly, not scalding hot
Step 6: The Dipping Dance
- Work quickly with chilled balls
- Dip using fork or dipping tool
- Let excess chocolate drip off gracefully
- Batch Strategy: Work in small groups for best results
Step 7: The Final Rest
- Place on clean parchment
- Allow 15 minutes to set at room temperature
- Speed Option: Refrigerate for faster setting
- Patience Pays: Resist the urge to touch too soon!
Creative Variations and Personal Touches
Make Them Uniquely Yours
Flavor Adventures:
- Golden Oreos → Vanilla dreams
- Mint Oreos → Refreshing twist
- Birthday Cake Oreos → Party in your mouth
- Almond Butter Swap → Nutty alternative
Coating Creativity:
- Roll in chopped nuts while chocolate is wet
- Sprinkle magic with colorful sprinkles
- Coconut snow for tropical vibes
- Crushed candy canes for holiday cheer
Seasonal Styles:
- Halloween: Orange-tinted white chocolate
- Christmas: Red & green drizzles
- Valentine’s: Pink chocolate + heart sprinkles
- Easter: Pastel coatings + mini eggs
Creative Note: These are YOUR cookie balls – let your personality shine through the decorations!
Storage and Serving Recommendations
Keeping the Magic Fresh
Storage Solutions:
- Short-term: Airtight container in fridge (up to 2 weeks)
- Long-term: Freezer friendly (up to 3 months)
- Layer Hack: Parchment paper between layers prevents sticking
- Gift-Ready: Beautiful in decorative boxes or cellophane bags
Serving Suggestions:
- Temperature Tip: Let chilled balls sit 10 minutes before serving
- Presentation Ideas:
- Mini cupcake liners
- Tiered serving stands
- Vintage doilies
- Elegant small plates
Perfect Occasions:
- Birthday parties • Holiday gatherings • Bake sales • Teacher gifts • Date nights • “Just because” treats
Troubleshooting Common Issues
When Things Don’t Go According to Plan
Common Challenges and Solutions:
Mixture Too Wet/Won’t Hold?
- Fix: Gradually add more powdered sugar
- Prevention: Measure ingredients precisely
Mixture Too Dry/Crumbly?
- Fix: Add peanut butter, 1 teaspoon at a time
- Test: Should hold together when pressed
Chocolate Too Thick?
- Fix: Add tiny amount of coconut oil or shortening
- Prevention: Don’t overheat chocolate
Balls Losing Shape During Coating?
- Fix: Re-chill balls, check chocolate temperature
- Rule: Cold balls + warm (not hot) chocolate = success
Streaky/Dull Chocolate Coating?
- Cause: Overheated chocolate or water contact
- Solution: Start fresh, keep everything dry
Remember: Even “failed” cookie balls taste amazing. Don’t stress – just enjoy the process!
Frequently Asked Questions
All Your Burning Questions, Answered
Can I make these ahead of time?
Answer: Absolutely! They’re actually better after flavors meld. Make up to 2 weeks ahead (refrigerated) or 3 months (frozen). Perfect for stress-free entertaining!
What’s the secret to perfectly crushed Oreos?
Answer: Food processor gives most consistent results, but the “bag + rolling pin” method works great too. Pulse, don’t blend continuously – you want crumbs with character, not powder!
Can I use natural peanut butter?
Answer: Yes, but expect slight texture differences. Natural PB is less sweet and may need extra powdered sugar. The oil separation might also affect consistency – stir well first!
Why is freezing absolutely necessary?
Answer: Think of it as giving your cookie balls a spa treatment! Freezing firms them up so they keep their beautiful shape when meeting warm chocolate. Skip this step, and you’ll have cookie ball soup!
Can I experiment with different chocolates?
Answer: Please do! White chocolate creates stunning contrast, milk chocolate brings extra sweetness, and dark chocolate adds sophistication. Life’s too short for boring chocolate choices!
How do I know my chocolate is the perfect temperature?
Answer: It should flow like silk off a spoon but not be scalding hot. Test: if you can briefly touch the chocolate without discomfort, you’re golden. Too hot = melted cookie balls. Too cool = lumpy coating.
Can I add extra goodies to the mixture?
Answer: Your creativity is the limit! Mini chocolate chips, chopped nuts, or candy pieces work beautifully. Just don’t go overboard – too many add-ins can affect the binding. Start small and adjust!
Help! My chocolate coating looks terrible!
Answer: Deep breath! Streaky or dull chocolate usually means overheating or water contamination. Start fresh with new chocolate, keep everything bone dry, and heat gently. You’ve got this!
Final Thoughts
The Sweet Conclusion
Creating Peanut Butter Oreo Cookie Balls isn’t just about following a recipe – it’s about creating moments of joy, one perfect sphere at a time. Whether you’re making them for a special occasion or just because Tuesday needs more chocolate, these little gems never fail to bring smiles.
Remember: The best ingredient you can add is love. Every stir, every roll, every careful dip in chocolate is an act of care for whoever will enjoy these treats. And yes, that includes you – the chef deserves the first taste!
Parting Wisdom: “Perfection is overrated. Deliciousness is everything. These cookie balls will be amazing, even if they’re not Instagram-perfect. The love you put in is what makes them truly special.”
Happy cooking, sweet friend!


Peanut Butter Oreo Cookie Balls
- Total Time: 55 minutes
- Yield: 12 servings
- Diet: Vegetarian
Description
A decadent, sweet no-bake treat made with crushed Oreos, creamy peanut butter, and a rich chocolate coating. These cookie balls are easy to make and perfect for parties, holidays, or anytime indulgence.
Ingredients
- 1 package Oreo cookies (36 cookies)
- 1/2 cup peanut butter
- 1/4 cup powdered sugar
- 1 cup chocolate chips (white or semi-sweet, for coating)
Instructions
- Crush the Oreos:
Add Oreo cookies to a food processor and pulse until fine crumbs form. Alternatively, place in a sealed plastic bag and crush with a rolling pin.
- Mix the filling:
In a bowl, combine the crushed Oreos, peanut butter, and powdered sugar. Mix until fully combined and a dough forms.
- Shape and freeze:
Roll the mixture into small balls (about 1 inch in diameter). Place on a lined baking sheet and freeze for 30 minutes to firm up.
- Coat in chocolate:
Melt the chocolate chips in the microwave or using a double boiler until smooth. Dip each frozen ball into the melted chocolate using a fork or toothpick, then place back on the lined tray.
- Set and serve:
Let the coated balls cool at room temperature or refrigerate until the chocolate is set. Serve chilled or at room temperature.
Notes
- You can use white, milk, or dark chocolate chips depending on preference.
- Store in an airtight container in the fridge for up to 1 week, or freeze for longer storage.
- Prep Time: 15 minutes
- Cook Time: 10 minutes (for melting chocolate)
- Category: Dessert, Snack
- Method: No-Bake, Frozen
- Cuisine: American


