Growing up, I always looked forward to the annual family wedding in the countryside. The event was a whirlwind of love, laughter, and of course, the most delectable Pistachio Wedding Cookies. My grandma, the master baker, would spend weeks perfecting her signature recipe, meticulously shaping each cookie and dusting them with the perfect amount of powdered sugar. The aroma of roasted pistachios and buttery goodness would waft through the air, drawing everyone to the dessert table like moths to a flame.
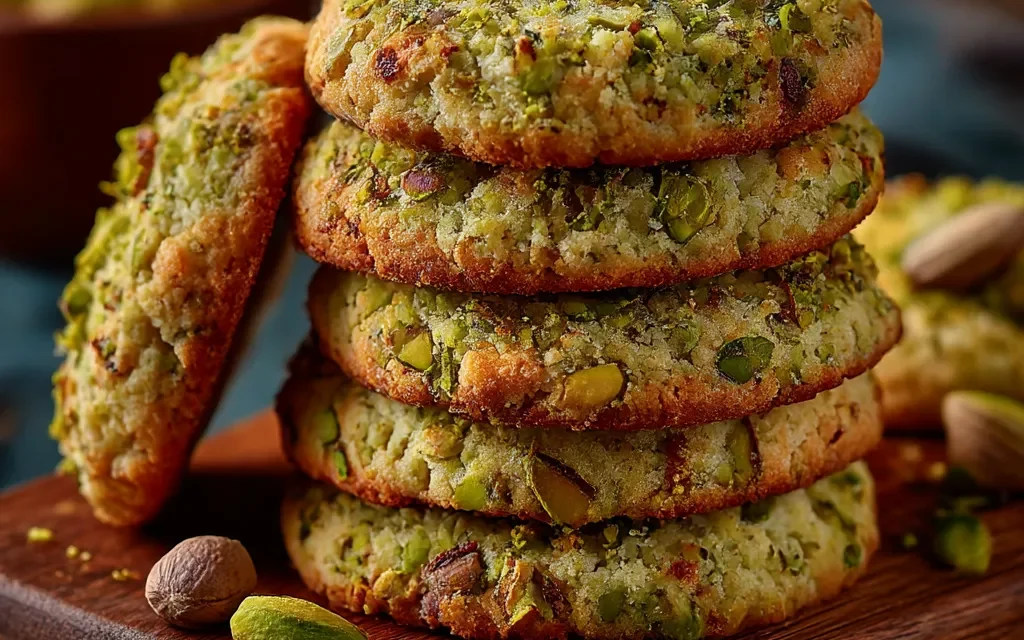
As a child, I’d watch in awe as my grandma effortlessly piped the dough into delicate crescents, their vibrant green hue a testament to the quality of the pistachios she used. I’d sneak a few warm cookies, my lips instantly coated in a sugary white blanket, and savor the perfect balance of salty and sweet. Those Pistachio Wedding Cookies were more than just a dessert – they were a connection to my heritage, a symbol of the love and traditions that bound our family together.
Now, as an adult, I’ve carried on the Pistachio Wedding Cookies legacy, making them for my own family’s special occasions. And let me tell you, this recipe is an absolute showstopper. It’s not just a cookie – it’s a work of art, a delicious representation of the love and care that goes into every bite.
Table of Contents
Why This Pistachio Wedding Cookies Recipe Will Become Your Go-To
The secret behind these perfect Pistachio Wedding Cookies lies in the quality of the ingredients and the attention to detail in the preparation. Using the freshest, most flavorful pistachios, combined with a rich, buttery dough and a dusting of powdery confectioner’s sugar, creates a cookie that’s both visually stunning and melt-in-your-mouth delicious. Plus, the unique crescent shape and vibrant green hue make these cookies a true standout on any dessert table.
The Secret Behind Perfect Pistachio Wedding Cookies
What sets this Pistachio Wedding Cookies recipe apart is the careful toasting of the pistachios, which brings out their natural oils and intensifies their nutty flavor. The dough is also chilled before baking, which helps the cookies maintain their shape and develop a delicate, crisp exterior with a soft, tender interior. And the final touch of the powdered sugar coating? It’s the perfect finishing touch, adding a delightful sweetness and a beautiful, snowy appearance.
Essential Ingredients You’ll Need
- 1 cup unsalted butter, softened
- 1 cup granulated sugar
- 1 egg
- 1 teaspoon vanilla extract
- 2 1/4 cups all-purpose flour
- 1 teaspoon baking powder
- 1/4 teaspoon salt
- 1 cup shelled, roasted, and chopped pistachios
Step-by-Step Pistachio Wedding Cookies Instructions
Preparing Your Pistachio Wedding Cookies
Making these Pistachio Wedding Cookies is a truly rewarding experience. The process is straightforward, with a total time of around 1 hour and 15 minutes, including chilling and baking. You’ll need a few basic tools, such as a stand mixer, a baking sheet, and a piping bag, to ensure the cookies are shaped to perfection.
1- Preheat your oven to 350°F (175°C) and line a baking sheet with parchment paper.
2- In a food processor, pulse the pistachios until they’re finely chopped, being careful not to over-process them into a paste.
3- In a stand mixer fitted with the paddle attachment, cream the butter and sugar together until light and fluffy, about 3-4 minutes.
4- Add the vanilla extract and mix until well combined.
5- Gradually add the all-purpose flour, mixing on low speed until a dough forms.
6- Fold in the chopped pistachios, being gentle to avoid breaking them down further.
7- Scoop the dough into a piping bag fitted with a large open star tip.
8- Pipe the dough onto the prepared baking sheet, forming crescent shapes.
9- Chill the shaped cookies in the refrigerator for 30 minutes to help them hold their shape.
10- Bake the chilled cookies for 12-14 minutes, or until they’re lightly golden around the edges.
11- Remove the cookies from the oven and let them cool on the baking sheet for 5 minutes before transferring them to a wire rack.
12- Once cooled, generously dust the Pistachio Wedding Cookies with powdered sugar, making sure to coat them evenly.
Pro Tips for Success
- Toasting the pistachios beforehand enhances their flavor and crunch.
- Chilling the dough is crucial for maintaining the cookie’s shape during baking.
- Piping the dough into crescent shapes creates a beautiful, uniform appearance.
- Dusting the cookies with powdered sugar at the very end helps the sugar adhere better.
- Be careful not to overmix the dough, as this can lead to tough, dense cookies.
Serving and Storing Your Pistachio Wedding Cookies
Perfect Pairings for Pistachio Wedding Cookies
These Pistachio Wedding Cookies are the perfect accompaniment to a cup of fragrant, freshly brewed coffee or a warm mug of rich hot chocolate. Their delicate sweetness and nutty flavor also make them a delightful addition to any tea party or as a special treat at a wedding or holiday gathering.
Storage and Make-Ahead Tips
The Pistachio Wedding Cookies can be stored in an airtight container at room temperature for up to 5 days. For longer-term storage, they can be frozen for up to 3 months. To freeze, simply place the cooled cookies in a single layer on a baking sheet, then transfer them to a freezer-safe bag or container. When ready to serve, thaw the cookies at room temperature for about 30 minutes before dusting with powdered sugar.
Variations and Dietary Adaptations for Pistachio Wedding Cookies
Creative Pistachio Wedding Cookies Variations
While the classic Pistachio Wedding Cookies are a true delight, you can also experiment with different flavor twists. Try adding a touch of lemon zest or almond extract to the dough for a subtle flavor boost. For a festive touch, you can also roll the baked cookies in crushed candy canes or drizzle them with a white chocolate glaze.
Making Pistachio Wedding Cookies Diet-Friendly
To make these Pistachio Wedding Cookies gluten-free, simply substitute the all-purpose flour with a high-quality gluten-free flour blend. For a vegan version, replace the butter with a plant-based alternative, such as coconut oil or vegan margarine, and use a non-dairy milk in the dough. And for a lower-carb option, you can reduce the amount of sugar and substitute a keto-friendly sweetener.
Frequently Asked Questions
Q: Can I use salted pistachios instead of roasted, salted ones?
A: While you can use salted pistachios, I recommend using roasted, salted ones for the best flavor and texture. The roasting process helps to bring out the natural oils and enhance the nutty flavor of the pistachios.
Q: How do I know when the cookies are done baking?
A: The Pistachio Wedding Cookies are done when they’re lightly golden around the edges and the centers are still slightly soft. Be careful not to overbake, as this can lead to dry, crumbly cookies.
Q: Can I make the dough ahead of time?
A: Absolutely! The dough can be made and chilled in the refrigerator for up to 3 days before shaping and baking. This actually helps the flavors develop and makes the dough easier to work with.
Q: What’s the best way to store the leftover cookies?
A: Store the cooled Pistachio Wedding Cookies in an airtight container at room temperature for up to 5 days. For longer-term storage, you can freeze the cookies for up to 3 months.
Q: Why did my cookies spread too much during baking?
A: If your cookies spread excessively, it’s likely that the dough was too warm when it went into the oven. Make sure to chill the shaped cookies for the full 30 minutes before baking to help them hold their shape.


Pistachio Wedding Cookies
- Total Time: 75
- Yield: 24
Description
Pistachio Wedding Cookies are a delightful and easy-to-make treat that are perfect for any occasion. These buttery, melt-in-your-mouth cookies are infused with the rich flavor of roasted pistachios and coated in a light glaze, making them irresistible.
Ingredients
– 1 cup unsalted butter, softened
– 1 cup granulated sugar
– 1 egg
– 1 teaspoon vanilla extract
– 2 1/4 cups all-purpose flour
– 1 teaspoon baking powder
– 1/4 teaspoon salt
– 1 cup shelled, roasted, and chopped pistachios
Instructions
1- Preheat your oven to 350°F (175°C) and line a baking sheet with parchment paper.
2- In a food processor, pulse the pistachios until they’re finely chopped, being careful not to over-process them into a paste.
3- In a stand mixer fitted with the paddle attachment, cream the butter and sugar together until light and fluffy, about 3-4 minutes.
4- Add the vanilla extract and mix until well combined.
5- Gradually add the all-purpose flour, mixing on low speed until a dough forms.
6- Fold in the chopped pistachios, being gentle to avoid breaking them down further.
7- Scoop the dough into a piping bag fitted with a large open star tip.
8- Pipe the dough onto the prepared baking sheet, forming crescent shapes.
9- Chill the shaped cookies in the refrigerator for 30 minutes to help them hold their shape.
10- Bake the chilled cookies for 12-14 minutes, or until they’re lightly golden around the edges.
11- Remove the cookies from the oven and let them cool on the baking sheet for 5 minutes before transferring them to a wire rack.
12- Once cooled, generously dust the Pistachio Wedding Cookies with powdered sugar, making sure to coat them evenly.
Notes
For a more uniform appearance, you can roll the dough into balls before baking. You can also drizzle the cooled cookies with a simple glaze made from powdered sugar and milk.
- Prep Time: 60
- Cook Time: 15
- Category: Dessert
- Method: Baking
- Cuisine: American
Conclusion
These Pistachio Wedding Cookies are a true labor of love, but the end result is well worth the effort. The combination of buttery, nutty goodness and the delicate, crescent-shaped design makes them a showstopper on any dessert table. Whether you’re baking them for a special occasion or just because, I guarantee these cookies will become a cherished family tradition. So gather your ingredients, preheat your oven, and get ready to create a batch of these irresistible Pistachio Wedding Cookies. I can’t wait to hear about your experience and see your beautiful creations! Don’t forget to share your photos and tag me – I love seeing the delicious results.

