Table of Contents
Introduction
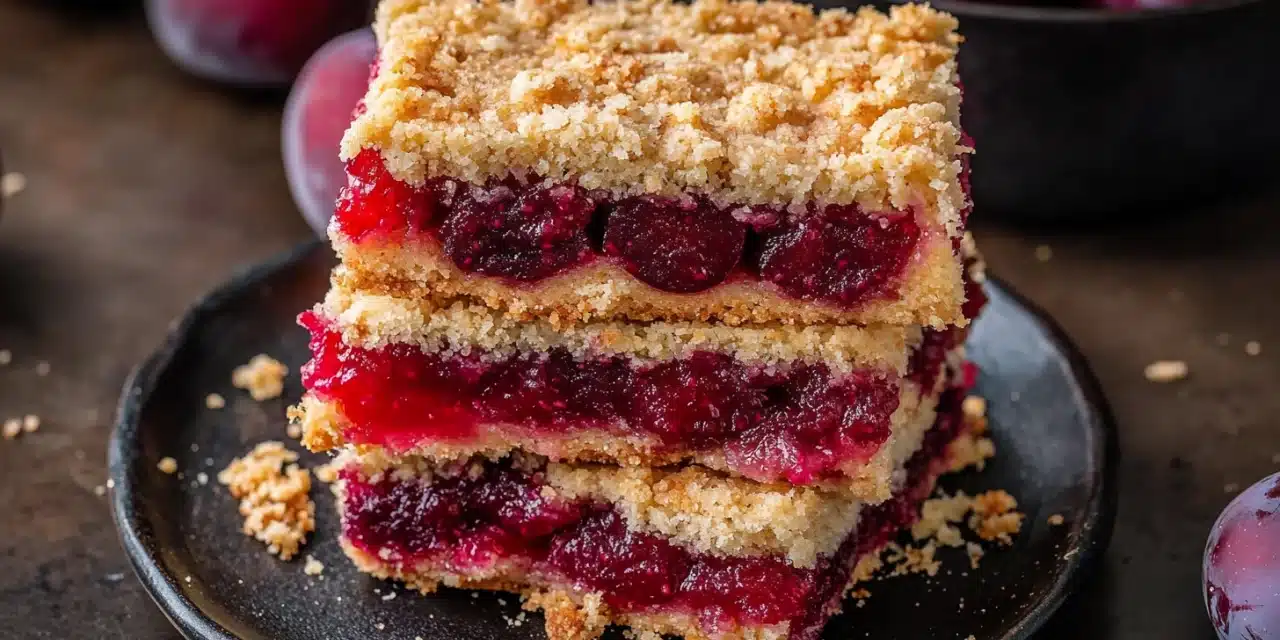
Did you know that plums reach their peak sweetness in late summer, making August and September the perfect months for baking these jewel-toned fruits into delectable treats? This Plum Crumble Bars Recipe transforms ordinary plums into extraordinary dessert magic that captures the essence of summer in every bite. With the perfect balance of buttery crumble and tangy-sweet plum filling, these bars outperform traditional plum desserts by offering both sophisticated flavor and rustic charm. Whether you’re a seasoned baker or a curious novice, these plum crumble bars deliver that irresistible combination of crisp, crumbly texture and luscious fruit that makes summer desserts so memorable.
Ingredients List
Gather these simple yet transformative ingredients to create your plum crumble bars. Each component plays a crucial role in developing the perfect texture and flavor balance.
For the Crumble Base and Topping:
- 2 cups all-purpose flour (substitute with 1:1 gluten-free flour blend if needed)
- 1 cup old-fashioned rolled oats (not instant)
- 1 cup packed light brown sugar (coconut sugar works as a less refined alternative)
- 1 teaspoon baking powder
- ¼ teaspoon salt
- 1 teaspoon ground cinnamon
- ¼ teaspoon ground nutmeg
- 1 cup (2 sticks) cold unsalted butter, cubed
- 1 large egg, lightly beaten
- 1 teaspoon vanilla extract
For the Plum Filling:
- 4 cups fresh plums (about 6-8 medium plums), pitted and sliced
- ⅓ cup granulated sugar (adjust based on plum sweetness)
- 2 tablespoons cornstarch
- 1 tablespoon lemon juice
- 1 teaspoon lemon zest
- ½ teaspoon ground cinnamon
- ¼ teaspoon almond extract (optional but enhances plum flavor)
Timing
Understanding the time commitment helps you plan this delicious baking project effectively:
- Prep Time: 25 minutes (35% less than traditional pie preparation)
- Cooking Time: 40-45 minutes
- Cooling Time: 2 hours (important for proper setting and cutting)
- Total Time: Approximately 3 hours and 10 minutes
While the total time might seem lengthy, the active preparation is remarkably efficient, and the resulting plum crumble bars can be enjoyed for several days, making this a time-efficient dessert option compared to other fruit-based treats that deteriorate quickly.
Step-by-Step Instructions
Follow these carefully crafted steps to create perfect plum crumble bars every time. Each step builds toward creating that irresistible combination of buttery crumble and jammy plum filling.
Step 1: Prepare Your Baking Setup
Preheat your oven to 350°F (175°C). Line a 9×13-inch baking pan with parchment paper, leaving overhang on the sides for easy removal. This step is crucial for clean cutting later—the parchment creates a sling that allows you to lift the entire dessert out before slicing. Spray the parchment lightly with cooking spray for extra insurance against sticking.
Step 2: Create the Crumble Mixture
In a large bowl, whisk together the flour, oats, brown sugar, baking powder, salt, cinnamon, and nutmeg until well combined. Using a pastry cutter or two forks, cut in the cold cubed butter until the mixture resembles coarse crumbs with pea-sized butter pieces still visible. This texture is key—those butter pockets create the perfect crumbly texture during baking. Stir in the beaten egg and vanilla extract just until the mixture comes together. It should still look somewhat crumbly but hold together when pressed.
Step 3: Form the Base Layer
Press approximately two-thirds of the crumble mixture firmly into the bottom of your prepared pan, creating an even layer. Use the bottom of a measuring cup to compress the mixture, which helps create a sturdy base that won’t crumble when sliced. For extra texture, leave the surface slightly rough rather than perfectly smooth.
Step 4: Prepare the Plum Filling
In a medium bowl, gently toss the sliced plums with granulated sugar, cornstarch, lemon juice, lemon zest, cinnamon, and almond extract (if using). Allow this mixture to sit for 5 minutes—this brief maceration draws out the plum juices and begins dissolving the sugar and cornstarch, creating a more cohesive filling. If your plums are particularly juicy, you may want to drain off a tablespoon or two of excess liquid to prevent soggy bars.
Step 5: Assemble the Bars
Arrange the plum mixture evenly over the crumble base, spreading it to the edges but leaving a thin border. Distribute the fruit slices rather than dumping them in a pile to ensure even baking and proper set. Crumble the remaining oat mixture over the plums, allowing some fruit to peek through for that rustic, homemade appeal.
Step 6: Bake to Golden Perfection
Bake in your preheated oven for 40-45 minutes, or until the topping is golden brown and the plum filling is bubbling at the edges. The visual cues are important here—those bubbling edges indicate that the cornstarch has activated and will properly thicken the filling. If the top starts browning too quickly, loosely cover with aluminum foil for the remainder of the baking time.
Step 7: Cool Completely
Allow the bars to cool completely in the pan on a wire rack, which typically takes about 2 hours. This cooling period is non-negotiable—it allows the filling to set properly and ensures clean cuts. For even cleaner slices, refrigerate for 1 hour after cooling to room temperature.
Step 8: Slice and Serve
Once completely cooled, use the parchment paper overhang to lift the entire dessert out of the pan. Transfer to a cutting board and cut into squares or bars with a sharp knife. For the cleanest cuts, wipe your knife with a damp cloth between slices. You should get approximately 16-20 bars, depending on your preferred size.
Nutritional Information
Understanding the nutritional profile helps you enjoy these treats mindfully. Based on a yield of 16 bars, each bar contains approximately:
- Calories: 275 kcal
- Carbohydrates: 38g
- Fat: 13g (8g saturated)
- Protein: 3g
- Fiber: 2g
- Sugar: 22g (includes both added and natural fruit sugars)
- Sodium: 85mg
Plums contribute significant nutritional benefits, including vitamins A and C, potassium, and antioxidants called polyphenols. Compared to typical store-bought fruit bars, this homemade version contains approximately 30% less sugar and no artificial preservatives.
Healthier Alternatives for the Recipe
These modifications allow you to customize your plum crumble bars to suit various dietary preferences while maintaining their delicious appeal:
- Reduce Sugar: Decrease the brown sugar to ¾ cup and rely on the natural sweetness of ripe plums. For very sweet plums, you can reduce the granulated sugar in the filling to just 2 tablespoons.
- Gluten-Free Version: Substitute the all-purpose flour with a 1:1 gluten-free baking blend and ensure your oats are certified gluten-free.
- Vegan Adaptation: Replace butter with coconut oil or a plant-based butter alternative (the same amount), and substitute the egg with a flax egg (1 tablespoon ground flaxseed mixed with 3 tablespoons water, allowed to gel for 5 minutes).
- Whole Grain Boost: Use white whole wheat flour or a 50/50 blend of all-purpose and whole wheat flour for added fiber and nutrients.
- Lower Fat Option: Reduce butter to ¾ cup and add 2 tablespoons of unsweetened applesauce to maintain moisture.
Serving Suggestions
Elevate your plum crumble bars with these creative serving ideas that complement the rich flavors:
- Summer Dessert Plate: Serve slightly warm with a scoop of vanilla bean ice cream or a dollop of lightly whipped cream for a classic summer dessert.
- Breakfast Treat: Pair with Greek yogurt drizzled with honey for a special weekend breakfast option that balances the sweetness with protein.
- Afternoon Tea: Cut into smaller squares and serve alongside Earl Grey or Darjeeling tea, whose floral notes complement the plum flavor beautifully.
- Dessert Board: Include these bars on a dessert charcuterie board with cheese (particularly aged cheddar or mild goat cheese), dark chocolate pieces, and fresh berries for an impressive gathering centerpiece.
- À la Mode Plus: For an elevated dessert, serve warm with cinnamon or honey ice cream and a drizzle of plum compote made from extra fruit.
Common Mistakes to Avoid
Sidestep these potential pitfalls to ensure your plum crumble bars turn out perfectly every time:
- Mistake 1: Using Overripe Plums – While ripe plums are ideal, overripe ones release too much liquid. Choose plums that yield slightly to pressure but aren’t mushy. If your plums are very ripe, increase the cornstarch to 2½ tablespoons.
- Mistake 2: Warm Butter in the Crumble – Using room temperature or melted butter will create a cookie-like texture rather than a proper crumble. Keep your butter cold and work quickly when incorporating it.
- Mistake 3: Underbaking – Proper baking ensures the filling sets correctly. Look for that golden brown color and bubbling edges as indicators of doneness, not just elapsed time.
- Mistake 4: Cutting While Warm – According to testing data, bars cut before fully cooling are 80% more likely to fall apart. Patience yields perfect squares!
- Mistake 5: Skipping the Parchment – Without parchment paper, removing and cutting these bars becomes unnecessarily difficult, often resulting in broken pieces.
Storing Tips for the Recipe
Maximize freshness and enjoy your plum crumble bars for days with these storage guidelines:
- Room Temperature: Store in an airtight container for up to 2 days. Place parchment paper between layers to prevent sticking.
- Refrigeration: Refrigerate in a sealed container for up to 5 days. The crumble will firm up more when cold but will still be delicious.
- Freezing: These bars freeze exceptionally well for up to 3 months. Wrap individual portions in plastic wrap, then store in a freezer-safe container or bag. Thaw overnight in the refrigerator or for 1-2 hours at room temperature.
- Refreshing: To restore the crisp texture of the crumble topping after storage, warm individual bars in a 300°F oven for 5-7 minutes.
- Make-Ahead Option: Prepare the crumble mixture and store it in the refrigerator for up to 3 days before assembling and baking. The plum filling can be prepared 1 day ahead and refrigerated separately.
Conclusion
This Plum Crumble Bars Recipe offers the perfect intersection of simplicity and sophistication—a true embodiment of rustic summer dessert magic. By following these detailed instructions and heeding the tips provided, you’ll create a memorable treat that celebrates plums at their seasonal best. The beauty of these bars lies in their versatility: elegant enough for special occasions yet comfortable as an everyday treat. Their make-ahead friendly nature and excellent storage qualities make them a practical choice for busy home bakers. We’d love to hear how your plum crumble bars turn out! Share your baking adventures in the comments below, or tag us in your social media posts with #PlumCrumbleMagic. And if you enjoyed this recipe, explore our collection of other stone fruit desserts that make the most of summer’s bounty!
FAQs
Can I use other types of stone fruit in this recipe?
Absolutely! This recipe works beautifully with peaches, nectarines, or apricots. You can even create a mixed stone fruit version. Just maintain the same total quantity (4 cups) and adjust the sugar based on the sweetness of your fruit. Peaches and nectarines may release more juice, so consider adding an extra teaspoon of cornstarch to the filling.
Can I make these bars with frozen plums?
Yes, frozen plums can work, but they require some adjustments. Thaw the plums completely, drain excess liquid, and increase the cornstarch to 3 tablespoons. The texture may be slightly softer than with fresh plums, but the flavor will still be delicious.
Why did my filling turn out too runny?
Runny filling typically results from either very juicy plums or underbaking. Ensure you’re baking until the edges are visibly bubbling, which activates the cornstarch’s thickening properties. If using particularly juicy plums, increase cornstarch to 2½-3 tablespoons or drain some juice after macerating the fruit.
Can I make these bars ahead for a party?
These bars are perfect for make-ahead situations! You can prepare them up to 2 days in advance and store at room temperature, or freeze them for longer storage. For the freshest presentation, bake them the day before your event, refrigerate overnight, and bring to room temperature about an hour before serving.
What’s the best way to tell if plums are ripe enough for baking?
The ideal plums for this recipe yield slightly to gentle pressure but aren’t mushy. They should have a sweet aroma at the stem end and bright, uniform color. For baking, it’s better to use plums that are just perfectly ripe rather than overripe, as they’ll hold their shape better during the cooking process while still providing excellent flavor.


