I’ll never forget the first time I made Red Velvet Earthquake Cake. It was my sister’s birthday, and I wanted to bake something truly special for her. As soon as I saw the recipe, I knew it was the one – a moist, chocolatey cake swirled with a creamy, dreamy cheesecake-like filling. The name “Earthquake Cake” just had me intrigued.
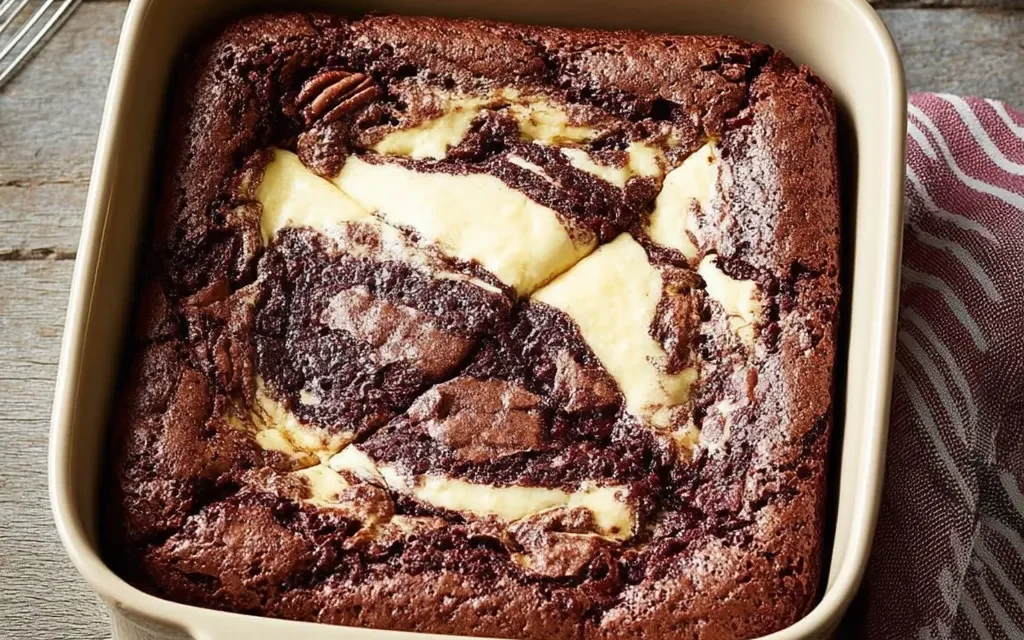
When I pulled the finished cake out of the oven, the aroma of rich cocoa and vanilla instantly filled the kitchen. As I sliced into it, the magnificent “earthquake” effect revealed itself, with the gooey, molten cheesecake center oozing out. It was love at first bite! My sister and the entire family were in awe, and it quickly became the talk of the party.
Table of Contents
Why This Red Velvet Earthquake Cake Recipe Will Become Your Go-To
The Secret Behind Perfect Red Velvet Earthquake Cake
This Red Velvet Earthquake Cake recipe is truly special. The key lies in the unique layering and baking technique that creates the iconic “earthquake” effect. By pouring the cheesecake filling over the red velvet cake batter and then baking, the two elements magically combine to form a decadent, molten center surrounded by moist, chocolatey cake. It’s a showstopper of a dessert that’s sure to impress.
Essential Ingredients You’ll Need
To make this Red Velvet Earthquake Cake, you’ll need a carefully curated list of ingredients:
- 2 cups all-purpose flour: The foundation of the cake, providing structure and a tender crumb.
- 2 cups granulated sugar: Sweetens the cake and enhances the rich cocoa flavor.
- 1/2 cup unsweetened cocoa powder: Gives the cake its distinctive red velvet hue and deep chocolate notes.
- 2 teaspoons baking soda: Helps the cake rise and achieve a light, airy texture.
- 1 teaspoon salt: Balances the sweetness and brings out the other flavors.
- 2 cups buttermilk: Adds moisture and a subtle tangy flavor to the cake.
- 2 large eggs: Binds the ingredients together and contributes to the cake’s structure.
- 2 tablespoons red food coloring: This is the secret to the vibrant red velvet color.
- 1 teaspoon vanilla extract: Enhances the overall flavor profile.
- 1 (8 ounce) package cream cheese, softened: Forms the creamy, cheesecake-like center.
- 1/2 cup unsalted butter, softened: Adds richness and creaminess to the filling.
- 3 cups confectioners’ sugar: Sweetens and thickens the cheesecake filling.
Step-by-Step Red Velvet Earthquake Cake Instructions
Preparing Your Red Velvet Earthquake Cake
Preparing this Red Velvet Earthquake Cake is a breeze, with a total time of just 45 minutes – 15 minutes of prep and 30 minutes of baking. You’ll need a 9×13-inch baking dish, a large mixing bowl, a hand mixer or stand mixer, and a spatula.
1- Preheat your oven to 350°F and grease the baking dish with butter or nonstick cooking spray.
2- In a large mixing bowl, whisk together the 2 cups of all-purpose flour, 2 cups of granulated sugar, 1/2 cup of unsweetened cocoa powder, 2 teaspoons of baking soda, and 1 teaspoon of salt until well combined.
3- In a separate bowl, beat the 2 cups of buttermilk, 2 large eggs, 2 tablespoons of red food coloring, and 1 teaspoon of vanilla extract until smooth and fully incorporated.
4- Slowly pour the wet ingredients into the dry ingredients, mixing on medium speed until a thick, velvety batter forms. Be careful not to overmix.
5- In a clean bowl, beat the 1 (8 ounce) package of softened cream cheese and 1/2 cup of softened unsalted butter until light and fluffy. Gradually add in the 3 cups of confectioners’ sugar, mixing until the filling is smooth and creamy.
6- Pour the red velvet cake batter into the prepared baking dish, then spoon the cheesecake filling over the top. Use a knife or skewer to swirl the filling into the batter, creating a beautiful marbled effect.
Pro Tips for Success
- Make sure all your ingredients are at room temperature for best results. This will ensure a smooth, even batter and filling.
- Don’t overmix the batter – this can lead to a tough, dense cake. Gently fold in the wet ingredients until just combined.
- For the perfect “earthquake” effect, be sure to pour the cheesecake filling over the batter, rather than mixing it in. This will allow the filling to sink and create those irresistible molten pockets.
- Keep a close eye on the cake during the 30-minute baking time. You want to pull it out of the oven as soon as the center is just set, to preserve that gooey, fudgy texture.
Serving and Storing Your Red Velvet Earthquake Cake
Perfect Pairings for Red Velvet Earthquake Cake
This decadent Red Velvet Earthquake Cake serves 12 and is the ultimate showstopper dessert. It pairs beautifully with a scoop of vanilla ice cream or a dollop of freshly whipped cream. For a fun, indulgent touch, you could also drizzle it with chocolate or caramel sauce. As for beverages, a cup of strong coffee or a glass of cold milk complement the rich flavors perfectly.
Storage and Make-Ahead Tips
Leftover Red Velvet Earthquake Cake can be stored in an airtight container in the refrigerator for up to 5 days. For longer storage, you can wrap the entire cake or individual slices tightly in plastic wrap and freeze for up to 2 months. To reheat, simply thaw the cake in the refrigerator overnight, then let it come to room temperature before serving.
You can also make this cake ahead of time. Prepare the batter and filling separately, then assemble and bake the day you plan to serve it. The unfilled cake can be stored in the refrigerator for up to 3 days before baking. Just be sure to let it come to room temperature before assembling and baking.
Variations and Dietary Adaptations for Red Velvet Earthquake Cake
Creative Red Velvet Earthquake Cake Variations
While the classic Red Velvet Earthquake Cake is a showstopper, you can get creative with fun variations. Try adding chopped pecans or walnuts to the cheesecake filling for a delightful crunch. For a seasonal twist, swirl in pumpkin puree or crushed peppermint candies. You could even experiment with different flavors, like substituting the cocoa powder for Dutch-processed cocoa or adding a hint of espresso powder for a mocha twist.
Making Red Velvet Earthquake Cake Diet-Friendly
To make this recipe more diet-friendly, you can try a few simple substitutions. For a gluten-free version, use a 1-to-1 gluten-free flour blend in place of the all-purpose flour. For a lower-carb option, replace the granulated sugar with your preferred granulated sugar substitute, and use a low-fat or Neufchatel cream cheese in the filling. To make it vegan, swap the eggs for aquafaba (the liquid from a can of chickpeas) and use dairy-free cream cheese and butter alternatives.
Frequently Asked Questions
Q: Can I use a different type of food coloring instead of red?
A: While the vibrant red color is iconic for red velvet, you can experiment with other hues. try using blue, green, or even purple food coloring for a fun twist. Just keep in mind that the flavor profile will remain the same.
Q: How long does the cake need to bake?
A: The total baking time for this Red Velvet Earthquake Cake is 30 minutes. Keep a close eye on it, as you want to pull it out of the oven as soon as the center is just set to preserve that gooey, fudgy texture.
Q: Can I make this cake in advance?
A: Absolutely! You can make the cake batter and cheesecake filling separately up to 3 days in advance, then assemble and bake the day you plan to serve it. This makes it a great option for entertaining.
Q: How many servings does this recipe make?
A: This Red Velvet Earthquake Cake recipe yields 12 servings. It’s a rich, decadent dessert, so a little goes a long way.
Q: What if my cake doesn’t have the classic “earthquake” effect?
A: If your cake doesn’t develop the signature molten center, it may be due to overbaking or overmixing the batter. Make sure to follow the instructions precisely and pull the cake out of the oven as soon as the center is just set.
Conclusion
Red Velvet Earthquake Cake is a true showstopper of a dessert that’s sure to wow your family and friends. With its moist, chocolatey cake and irresistible cheesecake-like center, it’s a delightful indulgence that’s worth every bite. I hope this recipe inspires you to get baking and create your own earthquake of flavor. Don’t forget to share your creations and let me know how it turns out!


