It’s that time of year again – the birds are chirping, the flowers are blooming, and my sweet little niece’s birthday is just around the corner. Every year, I make her a special Spring Birthday Cake, and it’s always the highlight of the celebration. There’s just something so cheerful and festive about a cake adorned with edible flowers and fresh spring flavors.
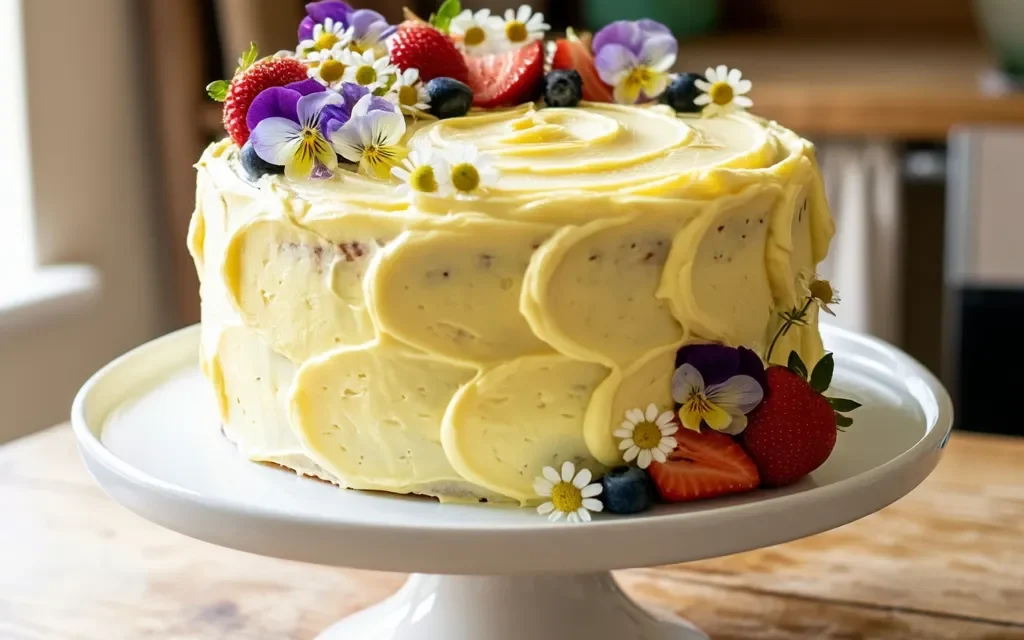
Last year, I went all out with a three-tier masterpiece covered in buttercream and topped with a cascade of vibrant pansies, daisies, and violets. The look on my niece’s face when she saw it was priceless – her eyes lit up, and she couldn’t wait to dig in. Of course, the real test was in the taste, and let me tell you, this Spring Birthday Cake did not disappoint. The moist, tender crumb and rich, creamy frosting had everyone going back for seconds (and thirds!).
That’s why I’m so excited to share my go-to recipe with you today. Whether you’re baking for a springtime birthday, a baby shower, or just because, this Spring Birthday Cake is guaranteed to be a showstopper.
Table of Contents
Why This Spring Birthday Cake Recipe Will Become Your Go-To
The Secret Behind Perfect Spring Birthday Cake
There are a few key things that make this Spring Birthday Cake recipe so special. First and foremost, the cake itself is an absolute dream – light and fluffy, with a delicate crumb that melts in your mouth. The secret? It all comes down to the perfect ratio of ingredients and a few clever baking techniques.
By whipping the butter and sugar together until light and airy, we’re able to create a cake batter that’s full of tiny air pockets. This gives the cake an irresistibly tender texture. And by alternating the addition of the dry and wet ingredients, we ensure that everything is evenly distributed, resulting in a beautifully even rise and no pesky tunnels or dense spots.
Essential Ingredients You’ll Need
Let’s talk about the all-star lineup of ingredients that make this Spring Birthday Cake so special:
- 2 cups all-purpose flour: The foundation of the cake, providing structure and a delicate crumb.
- 1 1/2 teaspoons baking powder: The leavening agent that gives the cake its lovely rise and airy texture.
- 1/2 teaspoon salt: A small but mighty ingredient that balances the sweetness and enhances the other flavors.
- 1/2 cup unsalted butter, softened: Responsible for the cake’s rich, tender mouthfeel and irresistible flavor.
- 1 1/2 cups granulated sugar: Sweetens the cake and contributes to the perfect crumb.
- 3 large eggs: Adds structure, moisture, and richness to the batter.
- 1 teaspoon vanilla extract: Provides a warm, aromatic background note that complements the spring flavors.
- 1 cup whole milk: Keeps the cake moist and tender.
- 2 cups buttercream frosting: A classic pairing that provides a creamy, dreamy contrast to the light, fluffy cake.
- Edible flowers, for decoration: The crowning touch that makes this cake truly fit for a springtime celebration.
Step-by-Step Spring Birthday Cake Instructions
Preparing Your Spring Birthday Cake
With a total time of just 45 minutes (15 minutes of prep and 30 minutes of baking), this Spring Birthday Cake comes together in a flash. You’ll need a few key pieces of equipment, like a stand mixer, a couple of mixing bowls, and a 9-inch round cake pan. Let’s get started!
1- Preheat your oven to 350°F and grease the cake pan with butter or nonstick cooking spray. In a medium bowl, whisk together the all-purpose flour, baking powder, and salt until well combined.
2- In the bowl of your stand mixer fitted with the paddle attachment, cream the softened butter and granulated sugar together on medium-high speed until light and fluffy, about 3-5 minutes. Scrape down the sides of the bowl as needed.
3- One at a time, add the eggs to the butter-sugar mixture, beating well after each addition. Then, stir in the vanilla extract until it’s fully incorporated.
4- Reduce the mixer speed to low and gradually add the flour mixture and milk in alternating additions, mixing just until combined. Be careful not to overmix, as this can result in a tough, dense cake.
5- Spoon the batter into the prepared cake pan, smoothing the top with a spatula. Bake for 30 minutes, or until a toothpick inserted into the center comes out clean.
6- Allow the cake to cool in the pan for 10 minutes, then invert it onto a wire rack to cool completely. Once cooled, frost the top and sides with the buttercream frosting and decorate with the edible flowers.
Pro Tips for Success
Now that you know the step-by-step process, here are a few pro tips to ensure your Spring Birthday Cake turns out perfectly every time:
- Use room-temperature ingredients for best results. This helps them incorporate more easily and evenly.
- Resist the urge to overmix the batter. Mixing too much can develop the gluten and result in a tough, dense cake.
- Don’t be afraid to get creative with the edible flower decorations. Try a mix of different blooms for a truly stunning presentation.
- For an extra-special touch, you can brush the cooled cake with a simple syrup flavored with lemon or vanilla before frosting.
Serving and Storing Your Spring Birthday Cake
Perfect Pairings for Spring Birthday Cake
This Spring Birthday Cake is the star of the show, but it also pairs beautifully with a variety of spring-inspired accompaniments. Serve it alongside a fresh fruit salad, a light and airy lemon meringue pie, or a refreshing strawberry-basil iced tea. And don’t forget the bubbly – a glass of chilled prosecco or sparkling rosé is the perfect way to celebrate.
Since this recipe yields 12 servings, it’s perfect for a small gathering like a baby shower, a bridal luncheon, or, of course, a spring birthday party. The bright, cheerful flavors and whimsical floral decoration make it a real showstopper.
Storage and Make-Ahead Tips
One of the best things about this Spring Birthday Cake is that it keeps beautifully. Once the cake is completely cooled, you can wrap it tightly in plastic wrap and store it at room temperature for up to 3 days. For longer storage, you can refrigerate the frosted cake for up to 1 week.
If you’d like to get a head start on your baking, you can also prepare the cake layers in advance. Bake the cakes, let them cool completely, then wrap them tightly and freeze for up to 2 months. When you’re ready to assemble, simply thaw the layers at room temperature, frost, and decorate.
Variations and Dietary Adaptations for Spring Birthday Cake
Creative Spring Birthday Cake Variations
While this classic Spring Birthday Cake is already a showstopper, there are plenty of ways to put your own spin on it. Try swapping out the vanilla extract for almond or lemon, or fold in some chopped fresh berries or citrus zest to the batter. You could even layer the cake with a spring-inspired filling like lemon curd or strawberry preserves.
For a truly eye-catching presentation, consider tinting the buttercream frosting with natural food coloring in pastel shades of pink, blue, or green. Or go for a more rustic, naked cake look by skipping the frosting and simply dusting the cake with powdered sugar and decorating with the edible flowers.
Making Spring Birthday Cake Diet-Friendly
If you or your guests have dietary restrictions, don’t worry – this Spring Birthday Cake can be easily adapted. For a gluten-free version, simply swap the all-purpose flour for a high-quality gluten-free flour blend. To make it dairy-free, use plant-based milk in place of the whole milk, and opt for a vegan buttercream frosting.
For a lower-carb take, you can use a sugar substitute like erythritol or monk fruit in place of the granulated sugar. Just be sure to adjust the measurements accordingly. And for a nut-free cake, simply leave out the optional chopped nuts or seeds in the frosting.
No matter how you choose to customize it, this Spring Birthday Cake is sure to be a hit with all your guests.
Frequently Asked Questions
Q: Can I use a different type of flour, like whole wheat or almond flour, instead of all-purpose?
A: While you can experiment with alternative flours, I’d recommend sticking with all-purpose for the best texture and rise. Whole wheat flour can make the cake denser, while almond flour may result in a heavier, more delicate crumb.
Q: How long does the cake need to bake, and how can I tell when it’s done?
A: The cake should bake for 30 minutes in a 350°F oven. You’ll know it’s done when a toothpick inserted into the center comes out clean, and the top is golden brown and springs back lightly when gently pressed.
Q: Can I make this cake in advance and freeze it?
A: Absolutely! You can bake the cake layers, let them cool completely, then wrap them tightly and freeze for up to 2 months. When you’re ready to assemble, simply thaw the layers at room temperature before frosting and decorating.
Q: How many servings does this Spring Birthday Cake recipe make?
A: This recipe yields 12 servings, making it perfect for a small to medium-sized gathering. You can easily scale the recipe up or down to suit your needs.
Q: What should I do if the cake doesn’t rise properly or has a dense texture?
A: If the cake doesn’t rise as expected, it could be due to overmixing the batter or using ingredients that aren’t at room temperature. Make sure to follow the mixing instructions carefully and let your ingredients come to temperature before starting. And be gentle when incorporating the dry and wet ingredients to avoid overworking the batter.
Conclusion
This Spring Birthday Cake is truly a showstopper, both in terms of its stunning appearance and its delectable flavor. With its moist, tender crumb and rich, creamy buttercream frosting, it’s sure to be the star of any springtime celebration. And thanks to the simple, foolproof instructions, you can have this bakery-worthy cake ready to serve in just 45 minutes.
So what are you waiting for? Gather your ingredients, preheat your oven, and get ready to wow your guests with this gorgeous and delicious Spring Birthday Cake. I can’t wait to see your creations – be sure to share your photos and tag me on social media. Enjoy!
