It was a crisp Thanksgiving morning, and the scent of freshly baked pumpkin pie filled the air. As I bustled around the kitchen, I couldn’t help but feel a sense of nostalgia. You see, Thanksgiving Cake Pops have always been a family tradition in our household. Ever since I was a little girl, I can remember standing on a stool beside my grandmother, carefully rolling the crumbly cake into perfect spheres and dipping them into the silky chocolate.
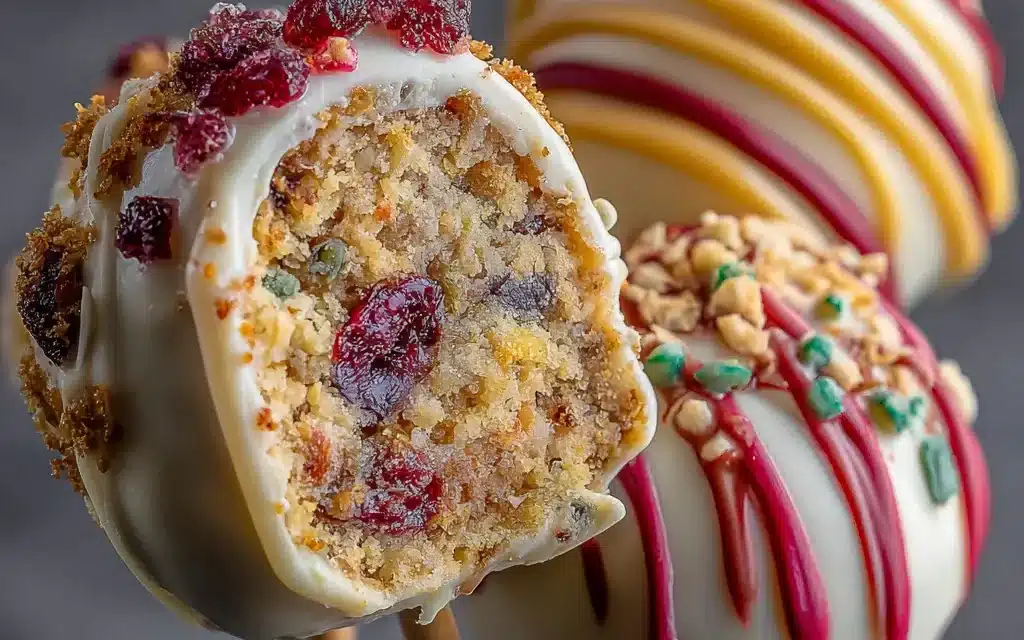
Those Thanksgiving Cake Pops were more than just a dessert – they were a way to bring our family together, to share stories, and to create lasting memories. And let me tell you, there’s nothing quite like biting into a Thanksgiving Cake Pop, the rich flavors of pumpkin and spice melting on your tongue, the crunch of the chocolate shell giving way to the soft, moist cake inside. It’s a taste of nostalgia that just can’t be beat.
Table of Contents
Why This Thanksgiving Cake Pops Recipe Will Become Your Go-To
The Secret Behind Perfect Thanksgiving Cake Pops
That’s why I’m so excited to share this Thanksgiving Cake Pops recipe with you. It’s not just any ordinary cake pop – it’s a labor of love, a recipe that’s been perfected over the years to capture the essence of the holiday season. From the perfectly spiced pumpkin cake to the silky smooth chocolate coating, every bite is a celebration of the flavors we all know and love.
Essential Ingredients You’ll Need
To make these Thanksgiving Cake Pops, you’ll need a few key ingredients: pumpkin puree, for that classic fall flavor; cream cheese, to create a rich and creamy texture; and spices like cinnamon, nutmeg, and ginger, to give the cake pops that warm, comforting taste. Of course, you’ll also need high-quality chocolate for the coating, as well as a few other pantry staples like flour, sugar, and eggs.
Step-by-Step Thanksgiving Cake Pops Instructions
Preparing Your Thanksgiving Cake Pops
Ready to get started? Gathering the ingredients is the easy part – the real magic happens in the kitchen. This Thanksgiving Cake Pops recipe is a labor of love, but I promise it’s worth every minute. With a total time of just under an hour, you’ll be enjoying these festive treats in no time. And the best part? You don’t need any fancy equipment – just a few basic tools like a mixing bowl, a baking sheet, and a cake pop maker or lollipop sticks.
1- Start by preheating your oven to 350°F (175°C) and lightly greasing a 9-inch baking pan. In a large mixing bowl, combine the pumpkin puree, cream cheese, sugar, eggs, and vanilla extract, beating until the mixture is smooth and creamy.
2- In a separate bowl, whisk together the flour, baking powder, cinnamon, nutmeg, and ginger. Gradually add the dry ingredients to the wet ingredients, mixing just until combined. Be careful not to overmix, as this can make the cake pops tough.
3- Pour the batter into the prepared baking pan and bake for 25-30 minutes, or until a toothpick inserted into the center comes out clean. Allow the cake to cool completely before crumbling it into a large bowl.
4- Once the cake is crumbled, use your hands to gently shape the mixture into uniform, bite-sized balls. Place the cake balls on a parchment-lined baking sheet and refrigerate for at least 30 minutes to firm up.
5- While the cake balls are chilling, melt the chocolate in a double boiler or in the microwave, stirring frequently until smooth. Carefully dip each cake ball into the melted chocolate, coating it completely. Tap off any excess chocolate and place the coated cake pops back on the baking sheet.
6- Finally, add any desired toppings, such as sprinkles, crushed nuts, or a drizzle of additional melted chocolate. Allow the Thanksgiving Cake Pops to set completely before serving.
Pro Tips for Success
To ensure your Thanksgiving Cake Pops turn out perfectly, here are a few pro tips:
– Make sure the cake is completely cooled before crumbling – this will help the cake pops hold their shape better.
– Use a small cookie scoop or melon baller to ensure the cake balls are all the same size.
– Chill the cake balls for at least 30 minutes before dipping to prevent them from falling apart in the chocolate.
– Work in small batches when dipping the cake pops to keep the chocolate at the right temperature.
– Refrigerate the finished cake pops for at least 30 minutes to allow the chocolate to set completely.
Serving and Storing Your Thanksgiving Cake Pops
Perfect Pairings for Thanksgiving Cake Pops
These Thanksgiving Cake Pops are the perfect sweet treat to serve at your holiday gathering. They pair beautifully with a hot cup of coffee or tea, and can also be enjoyed as an after-dinner dessert. For a truly indulgent experience, try serving them alongside a slice of pumpkin pie or a scoop of vanilla ice cream.
Storage and Make-Ahead Tips
Luckily, Thanksgiving Cake Pops are also incredibly easy to make ahead and store. Simply place the finished cake pops in an airtight container and refrigerate for up to 5 days. When you’re ready to serve, you can even pop them in the freezer for up to 3 months. Just be sure to thaw them at room temperature before enjoying.
Variations and Dietary Adaptations for Thanksgiving Cake Pops
Creative Thanksgiving Cake Pops Variations
While the classic pumpkin spice flavor is hard to beat, you can also get creative with your Thanksgiving Cake Pops. Try swapping out the pumpkin for sweet potato or even a mixture of both. Or, experiment with different spice blends, like adding a touch of ginger or a sprinkle of cinnamon-sugar on top.
Making Thanksgiving Cake Pops Diet-Friendly
For those with dietary restrictions, you can easily adapt this Thanksgiving Cake Pops recipe to be gluten-free, vegan, or low-carb. Simply use a gluten-free flour blend, replace the cream cheese with a dairy-free alternative, and swap the sugar for a keto-friendly sweetener. The possibilities are endless!
Frequently Asked Questions
Q: Can I use canned pumpkin puree instead of making my own?
A: Absolutely! Canned pumpkin puree works perfectly well in this Thanksgiving Cake Pops recipe. Just be sure to look for 100% pure pumpkin, not the pre-sweetened pumpkin pie filling.
Q: How do I know when the cake is fully baked?
A: The best way to test if the cake is done is to insert a toothpick or cake tester into the center. If it comes out clean, with no wet batter clinging to it, the cake is ready.
Q: Can I make the cake pops ahead of time?
A: Yes, you can definitely make the Thanksgiving Cake Pops in advance. Once the cake balls are formed, you can store them in the refrigerator for up to 5 days before dipping them in the chocolate.
Q: How many cake pops does this recipe make?
A: This recipe will yield approximately 24-30 Thanksgiving Cake Pops, depending on the size you make them. Feel free to adjust the recipe as needed to feed a larger crowd.
Q: What if the chocolate starts to thicken while I’m dipping the cake pops?
A: If the chocolate becomes too thick, you can thin it out by adding a small amount of vegetable oil or shortening and stirring until it’s the right consistency for dipping.


Thanksgiving Cake Pops
- Total Time: 45
- Yield: 24
Description
Indulge in the delightful and festive flavors of Thanksgiving with these easy-to-make Thanksgiving Cake Pops. A moist and flavorful cake base, dipped in rich chocolate, and decorated with colorful sprinkles and other holiday-themed accents, these bite-sized treats are the perfect addition to your holiday dessert table.
Ingredients
– 1 box of your favorite vanilla or spice cake mix
– 1/2 cup unsalted butter, softened
– 2 eggs
– 1/2 cup milk
– 1 tsp vanilla extract
– 24 ounces of melted chocolate (milk, dark, or white)
– Assorted sprinkles, edible glitter, and other festive decorations
Instructions
1. 1. Preheat your oven to 350°F (175°C) and grease a 9×13 inch baking pan.
2. 2. In a large mixing bowl, combine the cake mix, butter, eggs, milk, and vanilla extract. Beat the mixture until it’s smooth and well-combined.
3. 3. Pour the batter into the prepared baking pan and bake for 30-35 minutes, or until a toothpick inserted into the center comes out clean.
4. 4. Allow the cake to cool completely, then crumble it into a large bowl.
5. 5. Add 2-3 tablespoons of the melted chocolate to the cake crumbs and mix until the mixture is well-combined and can be easily formed into balls.
6. 6. Scoop the cake mixture by the tablespoonful and roll it into smooth, compact balls.
7. 7. Melt the remaining chocolate in a double boiler or in the microwave, stirring frequently until smooth.
8. 8. Dip each cake ball into the melted chocolate, allowing any excess to drip off.
9. 9. Place the coated cake pops on a parchment-lined baking sheet and immediately decorate with sprinkles, edible glitter, or other festive toppings.
10. 10. Refrigerate the cake pops for at least 30 minutes to allow the chocolate to set.
Notes
– For a richer flavor, use a spice cake mix or add a teaspoon of cinnamon or pumpkin pie spice to the batter.
– Experiment with different chocolate coatings, such as white, dark, or even a combination of colors.
– Store the cake pops in an airtight container in the refrigerator for up to 1 week.
- Prep Time: 15
- Cook Time: 30
- Category: Dessert
- Method: Baking
- Cuisine: American
Conclusion
There you have it – the ultimate Thanksgiving Cake Pops recipe that’s sure to become a new family favorite. These festive treats are the perfect way to celebrate the holiday season, and with their rich pumpkin flavor and decadent chocolate coating, they’re sure to impress your guests. So gather your ingredients, put on your apron, and get ready to create some Thanksgiving magic in the kitchen. Happy baking!
