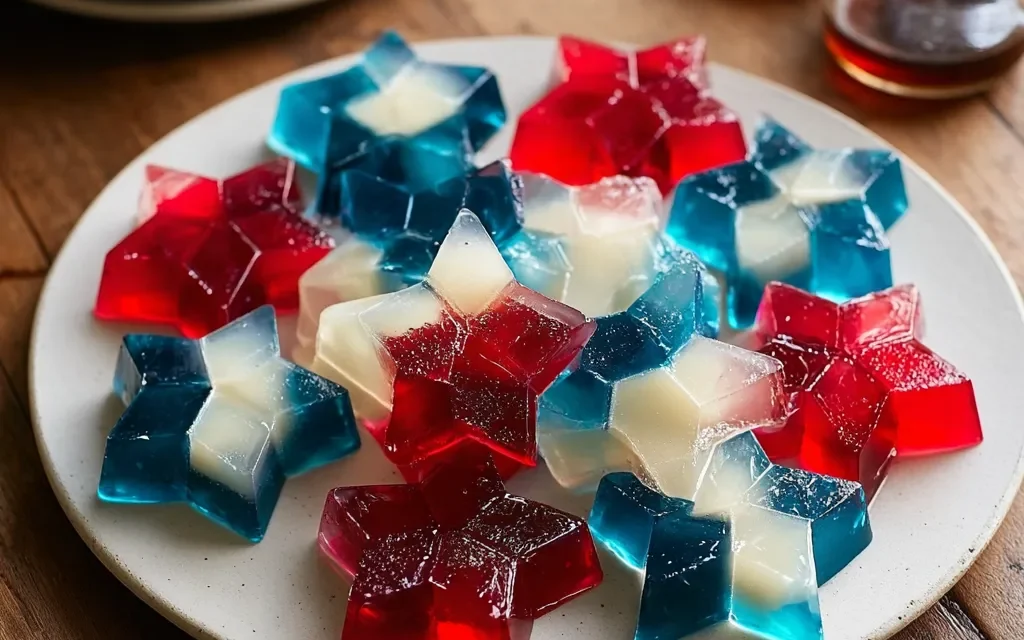
I’ll never forget the first time I made Stained Glass Jello Stars. It was my daughter’s 7th birthday, and I wanted to create something truly special for her party. As I carefully layered the vibrant cherry, lime, and lemon gelatins, I couldn’t help but feel a sense of excitement. The process was so mesmerizing, watching the colors swirl and blend together. And when I finally sliced into those jewel-toned stars, the look on my daughter’s face was absolutely priceless. She was in awe, giggling with delight as she took her first bite.
From that moment on, Stained Glass Jello Stars became a tradition in our household. They’re the perfect sweet treat for any celebration – whether it’s a birthday, holiday gathering, or just a fun family dessert. The vibrant colors and eye-catching presentation never fail to impress, and the refreshing, jiggly texture is simply irresistible. I’m confident this recipe will become a hit in your home too.
Table of Contents
Why This Stained Glass Jello Stars Recipe Will Become Your Go-To
The Secret Behind Perfect Stained Glass Jello Stars
What makes this Stained Glass Jello Stars recipe so special is the unique layering technique that creates those stunning, stained glass-inspired shapes. It takes a bit of patience, but the end result is well worth the effort. By carefully pouring each layer of Jello and allowing it to set before adding the next, you end up with beautifully defined sections of color that almost look too good to eat.
The key is to work quickly but meticulously, ensuring each layer has enough time to firm up before moving on. And don’t be intimidated by the multi-step process – it’s actually quite simple once you get the hang of it. With a little practice, you’ll be whipping up batches of these show-stopping Stained Glass Jello Stars like a pro.
Essential Ingredients You’ll Need
To make these Stained Glass Jello Stars, you’ll need just a few simple ingredients:
- 3 (3 oz) packages of different colored Jello (e.g., cherry, lime, and lemon) – The variety of colors is key for creating that stained glass effect. I like to use a mix of fruit flavors, but you can play around with different combinations to suit your tastes.
- 3 cups boiling water – This is what helps the Jello fully dissolve and set up properly.
- 1 1/2 cups cold water – Adding the cold water after the boiling water helps the Jello start to thicken and hold its shape as you layer it.
With these three items, you can craft a truly dazzling and delicious dessert that’s sure to wow your guests. The contrasting flavors and textures come together in the most wonderful way, creating a treat that’s as fun to look at as it is to eat.
Step-by-Step Stained Glass Jello Stars Instructions
Preparing Your Stained Glass Jello Stars
Prep time for these Stained Glass Jello Stars is just 15 minutes, and the total time from start to finish is 150 minutes. That may seem like a lot, but trust me, it’s worth the wait! All you need is a 9×13 inch baking dish, a few mixing bowls, and a bit of patience.
1- Start by preparing each flavor of Jello according to the package instructions. In separate bowls, dissolve the cherry, lime, and lemon Jello in 1 cup of boiling water each, stirring until completely dissolved.
2- Once the Jello is dissolved, add 1/2 cup of cold water to each bowl and stir to combine. This will help the Jello start to thicken.
3- Carefully pour the cherry Jello into the bottom of your 9×13 inch baking dish, making sure to spread it out evenly. Refrigerate for 30 minutes, or until the Jello is just starting to set.
4- After 30 minutes, the cherry Jello should have a slightly firm, jelly-like consistency. Gently pour the lime Jello over the top, being careful not to disturb the bottom layer. Refrigerate for another 30 minutes.
5- Repeat the process with the lemon Jello, pouring it over the lime layer and refrigerating for a final 30 minutes.
6- Once all three layers are set, remove the dish from the fridge and use a sharp knife to carefully cut the Jello into star shapes. Plate them up and get ready to impress your guests!
Pro Tips for Success
1- Work quickly but precisely when pouring each layer of Jello. The key is to work in short bursts, allowing just enough time for each layer to partially set before adding the next.
2- Use a very sharp knife to cut the Jello into stars. A serrated blade works best to get clean, defined edges on your shapes.
3- Chill your baking dish in the fridge for at least 30 minutes before assembling the Jello. This helps the first layer set up quickly.
4- Play around with different Jello flavor combinations to suit your tastes. Classic fruit flavors like cherry, lime, and lemon work beautifully, but you could also try more seasonal options like cranberry, orange, or even pumpkin.
5- For extra presentation points, try garnishing your Stained Glass Jello Stars with a dollop of whipped cream, a sprinkle of chopped nuts, or a fresh berry or two.
Serving and Storing Your Stained Glass Jello Stars
Perfect Pairings for Stained Glass Jello Stars
These Stained Glass Jello Stars are the perfect light and refreshing dessert to serve at any celebration. With 12 servings per batch, they’re great for birthday parties, holiday gatherings, or even just a fun family treat.
I love serving them alongside a scoop of vanilla ice cream or a dollop of freshly whipped cream. The cool, creamy textures pair beautifully with the jiggly Jello. And for a festive touch, you could even add a drizzle of chocolate sauce or a sprinkle of toasted coconut.
As for beverages, these Stained Glass Jello Stars are delightful with a tall glass of lemonade, iced tea, or even a chilled white wine. The fruity flavors complement a wide range of drinks, so you can’t go wrong.
Storage and Make-Ahead Tips
One of the best things about these Stained Glass Jello Stars is that they keep exceptionally well. Once you’ve cut them into shapes, you can store them in an airtight container in the refrigerator for up to 5 days.
They also freeze beautifully! Just place the individual Jello stars in a single layer on a baking sheet and freeze until solid. Then transfer them to a freezer-safe bag or container. They’ll keep in the freezer for up to 2 months. When you’re ready to serve, simply thaw them in the fridge overnight.
And the best part? You can actually make the entire batch in advance. Prepare the Jello layers as directed, then cover and refrigerate the whole pan for up to 3 days before cutting and serving. This makes them an incredibly convenient and stress-free dessert option for any upcoming event.
Variations and Dietary Adaptations for Stained Glass Jello Stars
Creative Stained Glass Jello Stars Variations
The beauty of this Stained Glass Jello Stars recipe is that it’s so versatile. You can easily adapt the flavors and colors to suit any occasion or personal preference.
For a patriotic twist, try using red, white, and blue Jello. Or for a fall-inspired version, swap in pumpkin, apple, and cinnamon. You could even get creative with tropical flavors like mango, pineapple, and coconut.
Another fun idea is to layer the Jello with different mix-ins, like diced fruit, crushed cookies, or even small candies. This adds delightful pops of texture and flavor throughout.
And if you really want to get fancy, you can make mini Stained Glass Jello Stars by pouring the layers into a muffin tin instead of a baking dish. These bite-sized beauties are perfect for parties and events.
Making Stained Glass Jello Stars Diet-Friendly
Believe it or not, these Stained Glass Jello Stars can be easily adapted to suit a variety of dietary needs and restrictions.
For a gluten-free version, simply use gluten-free Jello flavors. Many major brands now offer certified gluten-free options, so you won’t have to compromise on taste or texture.
To make them vegan, swap out the traditional Jello for plant-based, gelatin-free alternatives. There are lots of great agar-agar or konjac-based options that will give you the same jiggly, translucent effect.
And for a lower-carb twist, you can use sugar-free Jello mixes. Just be mindful that the final product may have a slightly different flavor and consistency.
No matter which dietary modifications you choose, these Stained Glass Jello Stars are sure to delight everyone at your table.
Frequently Asked Questions
Q: Can I use different Jello flavors besides cherry, lime, and lemon?
A: Absolutely! Feel free to get creative with the Jello flavors. Just make sure to use 3 distinct colors for the best stained glass effect. Some other tasty options include orange, raspberry, and grape.
Q: How long does it take to make Stained Glass Jello Stars from start to finish?
A: The total time for this recipe is 150 minutes. That includes 15 minutes of prep time and 135 minutes of refrigeration time to allow the layers to fully set.
Q: Can I make Stained Glass Jello Stars in advance?
A: Yes, you can make these up to 3 days ahead of time. Simply prepare the layered Jello in the baking dish, cover, and refrigerate until ready to serve. When you’re ready, just cut into stars and enjoy!
Q: How many servings does this Stained Glass Jello Stars recipe make?
A: This recipe yields 12 servings of Stained Glass Jello Stars. Depending on the size of your star shapes, you may be able to get a few more or less.
Q: What should I do if the Jello layers don’t set properly?
A: If you find that one of the Jello layers isn’t quite firm enough, try refrigerating it for an additional 30 minutes before adding the next layer. The key is to work in short bursts, allowing each layer to partially set before moving on.
Conclusion
Stained Glass Jello Stars are a delightful and truly unique dessert that are sure to impress at any gathering. With their vibrant colors, refreshing flavors, and eye-catching presentation, they’re a real showstopper.
What I love most about this recipe is how it combines fun, nostalgic Jello with a bit of fancy flair. It’s the perfect treat for kids and adults alike, and it’s surprisingly easy to make with just a few simple ingredients.
Whether you’re celebrating a birthday, hosting a holiday party, or just looking for a fun family dessert, I know you and your guests will adore these Stained Glass Jello Stars. So go ahead and give this recipe a try – I promise it will become a new go-to in your household!

