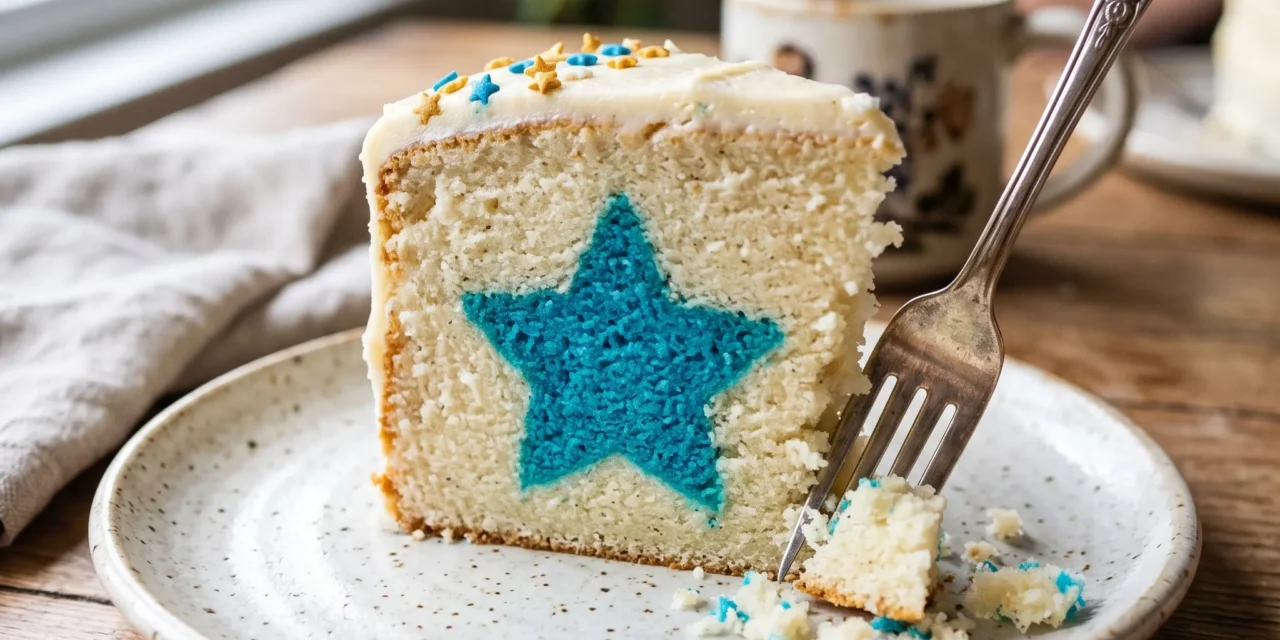
I remember the first time I made a Star-Inside Cake. It was for my daughter’s birthday, and I wanted to create something special that would make her eyes light up. The moment she walked into the kitchen and saw the colorful batter swirling in the mixing bowl, I knew I was onto something magical. She squealed with delight when I revealed the cake, its star pattern hidden inside, waiting to be discovered. We sliced into it together, and her face lit up even more when she saw the vibrant colors of the stars. It was a simple joy, but it felt like an achievement worth celebrating.
As we shared the cake with family and friends, everyone couldn’t help but admire its beauty and taste. The soft, buttery layers paired with the sweet, colorful star-shaped surprise inside was a hit. My Star-Inside Cake didn’t just taste delicious; it became a symbol of love and creativity in our family. Now, every birthday and celebration, this recipe finds its way back to our table. It’s become a tradition, a way to bring smiles and spark joy.
Baking this cake is more than just following a recipe; it’s about creating lasting memories. Every time I make it, I think back to that special day. The laughter, the excitement, and the sheer happiness of sharing something beautiful with those I love. I can’t wait for you to try this Star-Inside Cake and create your own memories!
Table of Contents
Why This Star-Inside Cake Recipe Will Become Your Go-To
The Secret Behind Perfect Star-Inside Cake
This Star-Inside Cake is more than just a dessert; it’s an experience. The unique star pattern hidden within makes each slice a delightful surprise, perfect for any occasion. What sets this cake apart is its moist, buttery texture combined with the vibrant colors of food coloring that bring it to life. The secret lies in the careful mixing of ingredients and the precise baking time, ensuring that the cake rises beautifully and retains its fluffy, tender crumb. The combination of granulated sugar and unsalted butter creates a sweet, rich flavor that everyone will adore. Plus, it’s a fantastic way to get creative with your decorating skills. Whether you want to keep it simple or go all out with colorful frosting, this cake allows for endless possibilities.
Essential Ingredients You’ll Need
To create your own Star-Inside Cake masterpiece, you’ll need:
2 cups all-purpose flour
All-purpose flour provides structure and stability, ensuring your cake rises beautifully while maintaining a tender texture.
1 ½ cups granulated sugar
Granulated sugar not only sweetens the cake but also contributes to its moistness and lightness, creating that perfect melt-in-your-mouth texture.
1 cup unsalted butter, softened
Unsalted butter adds richness and flavor, making the cake tender. Softening it allows for better aeration when creaming with sugar.
4 large eggs
Eggs act as binders and leavening agents, providing structure and moisture. They also contribute to the cake’s lovely yellow color.
1 cup milk
Milk enhances the cake’s moisture and creates a tender crumb. It also helps to dissolve the dry ingredients, resulting in a smooth batter.
2 teaspoons baking powder
Baking powder is a leavening agent that helps the cake rise, giving it a light and airy texture.
1 teaspoon vanilla extract
Vanilla extract enhances the cake’s flavor, adding a warm, aromatic note that balances the sweetness.
½ teaspoon salt
Salt is crucial for enhancing flavors and balancing sweetness, making each bite of the cake more enjoyable.
Food coloring (for decorating the star pattern)
Food coloring allows you to add a fun, festive twist to your cake, making it visually appealing and exciting to reveal the hidden stars.
Step-by-Step Star-Inside Cake Instructions
Preparing Your Star-Inside Cake
Making this Star-Inside Cake is a breeze with just 15 minutes of prep time and 30 minutes of cook time, totaling 45 minutes from start to finish. You’ll need basic baking equipment including mixing bowls, a whisk, an electric mixer, measuring cups and spoons, and a cake pan. Follow these steps to create your beautiful cake:
1- Preheat your oven to 350°F (175°C). Grease and flour a 9-inch round cake pan. This step is crucial as it prevents the cake from sticking, ensuring a smooth release once it’s baked. The aroma of the preheating oven will start to fill your kitchen, building anticipation for the delicious cake to come.
2- In a large mixing bowl, cream together the softened unsalted butter and granulated sugar until light and fluffy, about 3-4 minutes. Use an electric mixer for best results. The mixture should turn a pale yellow and have a light, airy texture. This step is essential as it incorporates air into the batter, contributing to the cake’s fluffiness.
3- Add the eggs one at a time, mixing well after each addition. Then pour in the vanilla extract. Continue mixing until fully combined, and the batter is smooth. The eggs will enrich the batter, making it creamy and helping it rise beautifully during baking.
4- In a separate bowl, whisk together the all-purpose flour, baking powder, and salt. Gradually add this dry mixture to the wet ingredients, alternating with the milk. Start and end with the flour mixture. Mix until just combined, being careful not to overmix. The batter should be thick but pourable.
5- Divide the batter into separate bowls if you plan to add food coloring for the star pattern. Use gel or liquid food coloring to tint portions of the batter to your desired colors. You can get creative here! Each color you add will create the vibrant star shapes within the cake.
6- Pour the colored batter into the prepared cake pan in layers or dollops, creating a marbled effect. Use a toothpick or skewer to swirl the colors if desired. Bake in the preheated oven for 30 minutes, or until a toothpick inserted into the center comes out clean. The cake should be golden brown and spring back when lightly touched. Once baked, let it cool in the pan for about 10 minutes before transferring it to a wire rack to cool completely.
Pro Tips for Success
To ensure your Star-Inside Cake turns out perfectly, here are some expert tips. First, always measure your ingredients accurately. Baking is a science, and even a slight deviation can affect the final outcome. Second, remember to let your butter soften at room temperature for easier creaming. Third, avoid overmixing the batter; it can lead to a dense cake. Fourth, use gel food coloring for vibrant colors without altering the batter’s consistency. Lastly, don’t skip the cooling time before slicing; this allows the cake to set and makes it easier to cut.
Serving and Storing Your Star-Inside Cake
Perfect Pairings for Star-Inside Cake
This Star-Inside Cake serves 12 servings, making it perfect for sharing at gatherings. Pair it with a scoop of vanilla ice cream or a dollop of whipped cream for a delightful contrast in texture. Consider serving it alongside fresh fruit, like strawberries or blueberries, to add a refreshing note. For beverages, a cup of coffee or a glass of milk complements the sweetness beautifully. This cake is perfect for birthdays, holidays, or any celebration where you want to bring joy and delight.
Storage and Make-Ahead Tips
To store your Star-Inside Cake, keep it in an airtight container at room temperature for up to 3 days. If you want to keep it longer, wrap it tightly in plastic wrap and store it in the refrigerator for up to a week. You can also freeze slices for later enjoyment. To reheat, simply place a slice in the microwave for about 10-15 seconds, or warm it in a preheated oven at 350°F (175°C) for about 5-7 minutes. This ensures it retains its moistness while bringing back that fresh-baked flavor.
Variations and Dietary Adaptations for Star-Inside Cake
Creative Star-Inside Cake Variations
There are countless ways to put your spin on this Star-Inside Cake. Consider making a chocolate version by replacing half of the flour with cocoa powder. You could also create a seasonal twist by adding spices like cinnamon or nutmeg for a fall-themed cake. For a tropical flair, try incorporating coconut or pineapple into the batter. Lastly, don’t hesitate to experiment with different color schemes or patterns to suit any occasion!
Making Star-Inside Cake Diet-Friendly
If you need to adapt the Star-Inside Cake for dietary restrictions, there are simple swaps you can make. For a gluten-free version, substitute the all-purpose flour with a gluten-free flour blend. To make it vegan, replace eggs with flax eggs (1 tablespoon ground flaxseed mixed with 2.5 tablespoons water per egg) and use plant-based milk and butter alternatives. For a low-carb option, consider using almond flour and a sugar substitute to keep the delightful flavors while accommodating dietary needs.
Frequently Asked Questions
Q: Can I substitute the all-purpose flour with a gluten-free option?
A: Absolutely! You can use a 1:1 gluten-free flour blend to achieve similar results in texture and flavor.
Q: How can I ensure my cake is ready in the 45-minute total time?
A: Prepping your ingredients and having everything measured before starting will help keep you on track. The cake bakes for 30 minutes, so ensure your oven is preheated to save time.
Q: How do I store the leftover cake?
A: Store the cake in an airtight container at room temperature for up to 3 days, or refrigerate it for up to a week. For longer storage, freeze slices wrapped in plastic for up to 3 months.
Q: Is this recipe enough for 12 servings?
A: Yes, this Star-Inside Cake serves 12 servings. You can easily cut it into 12 equal slices, making it perfect for gatherings.
Q: What should I do if my cake turns out dry?
A: If your cake is dry, it could be due to overbaking or not measuring the ingredients accurately. Always check for doneness a few minutes before the recommended baking time.
Conclusion
I hope you’re as excited to try this Star-Inside Cake as I was when I first made it! It’s a fun and delicious way to bring joy to any gathering. This recipe not only creates a stunning visual but also offers a taste that will leave everyone wanting more. So grab your ingredients, roll up your sleeves, and let the baking adventure begin! Don’t forget to share your experience in the comments and let me know how your cake turned out. Happy baking!