I still remember the first time I made Nut Butter Cracker Sandwiches. It was a lazy Saturday afternoon, and I was rummaging through my pantry, trying to find something to snack on. I stumbled upon a jar of creamy almond butter, some whole grain crackers, and a couple of bananas that were just ripe enough to use. I thought, why not? With just a few simple ingredients, I created something that would become a staple in my home.
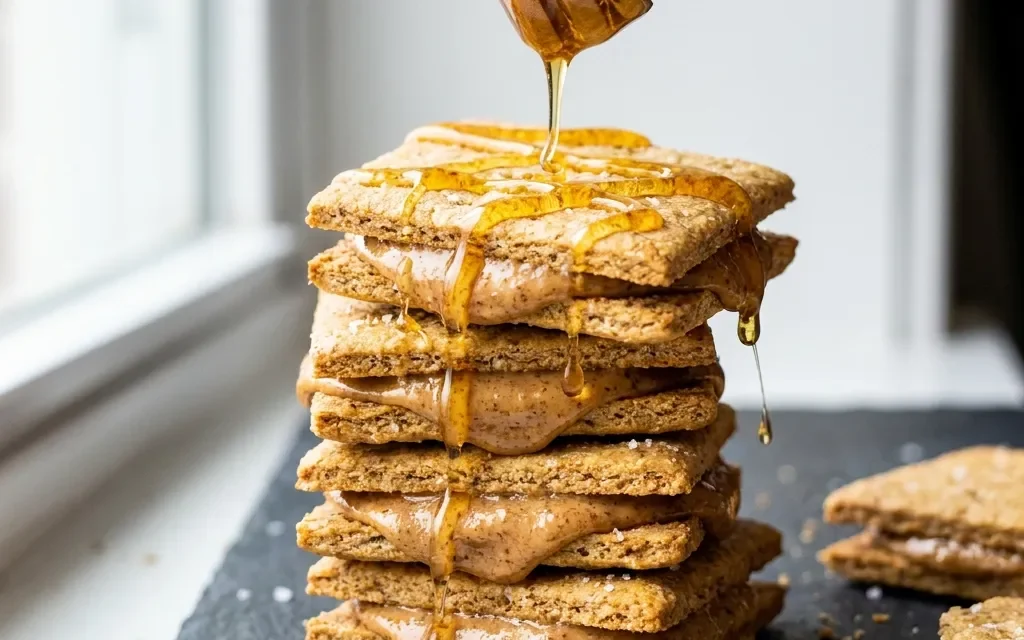
As I spread the nut butter on the crackers, I could already imagine the satisfying crunch and creamy texture that would come together with each bite. I added a drizzle of honey for a touch of sweetness and topped them off with sliced bananas. The first bite was heavenly—sweet, nutty, and oh-so-satisfying! I felt like I had stumbled upon a little piece of heaven, and from that day on, Nut Butter Cracker Sandwiches became my go-to snack.
What I love most about these sandwiches is their versatility. Whether I’m enjoying them as a quick breakfast, an afternoon pick-me-up, or a post-workout snack, they never fail to hit the spot. Plus, they’re super easy to make, taking just 15 minutes from start to finish. Now, whenever I have friends over, I whip up a batch of Nut Butter Cracker Sandwiches, and they’re always a hit. Everyone loves the combination of flavors, and I get to relive that delightful moment every time.
Table of Contents
Why This Nut Butter Cracker Sandwiches Recipe Will Become Your Go-To
The Secret Behind Perfect Nut Butter Cracker Sandwiches
What makes these Nut Butter Cracker Sandwiches truly special is their simplicity and adaptability. You can whip them up in just 15 minutes, making them perfect for busy mornings or impromptu gatherings. The combination of crunchy whole grain crackers and creamy nut butter creates a delightful contrast in textures that’s incredibly satisfying. Plus, the optional honey and fruit add a layer of sweetness that elevates the flavors.
This recipe is so versatile that you can easily customize it to suit your taste preferences. Whether you’re a peanut butter purist or a fan of almond or cashew butter, you can make these sandwiches your own. And let’s not forget about those optional toppings—sliced bananas or strawberries not only add freshness but also provide a nutritional boost. With Nut Butter Cracker Sandwiches, you can have a delicious and nutritious snack that appeals to both kids and adults alike.
Essential Ingredients You’ll Need
To create these irresistible Nut Butter Cracker Sandwiches, you’ll need a few simple ingredients that pack a flavorful punch:
1 cup nut butter (peanut, almond, or cashew)
Nut butter is the star of this recipe, providing a rich, creamy texture and a dose of healthy fats and protein. Whether you prefer the classic taste of peanut butter, the sweetness of almond butter, or the mild flavor of cashew butter, each option offers its unique character.
16 whole grain crackers
Whole grain crackers serve as the perfect vessel for your nut butter, adding crunch and fiber. They balance the richness of the nut butter while keeping the snack nutritious. Plus, the sturdy texture ensures they won’t crumble under the weight of your toppings.
1 tablespoon honey (optional)
If you’re looking to add a hint of sweetness, honey is a fantastic choice. It not only enhances the flavor but also adds a touch of natural sweetness without the need for refined sugars. Feel free to adjust the amount based on your personal preference.
1/4 cup sliced bananas or strawberries (optional)
Sliced bananas or strawberries bring a burst of freshness and flavor to your Nut Butter Cracker Sandwiches. They also add a touch of natural sweetness and a pop of color, making your snack not only delicious but visually appealing.
Step-by-Step Nut Butter Cracker Sandwiches Instructions
Preparing Your Nut Butter Cracker Sandwiches
Making Nut Butter Cracker Sandwiches is as easy as it gets, with a prep time of just 15 minutes and no cooking required, giving you a total time of 15 minutes. You’ll need a butter knife, a cutting board, and a plate for serving. Let’s dive into the steps to create these scrumptious sandwiches!
1- Begin by gathering all your ingredients on a clean surface. Take your 16 whole grain crackers and lay them out in pairs on a cutting board or clean countertop. You’ll want to have enough space to spread the nut butter evenly without making a mess.
2- Grab your 1 cup of nut butter and a butter knife. With one knife scoop of nut butter, spread a generous layer on one cracker from each pair. Aim for an even spread that covers the entire surface of the cracker, so every bite is packed with flavor. The nut butter should be creamy and smooth, making it easy to spread.
3- If you’re using honey, drizzle 1 tablespoon over the nut butter on each cracker. This step is optional, but it adds a delightful sweetness that complements the nut butter beautifully. Use the back of the knife to spread the honey evenly if desired, ensuring it mixes well with the nut butter.
4- Now, take the 1/4 cup of sliced bananas or strawberries, and place a few slices on top of the nut butter and honey layer. The fruit not only adds flavor but also a refreshing contrast to the rich nut butter. Make sure the fruit is evenly distributed to balance the taste in each sandwich.
5- Next, take the second cracker from each pair and gently press it down on top of the cracker with the nut butter and toppings. This creates a sandwich. You want to feel a slight resistance as you press down, but don’t squish them too hard; you want the crackers to stay intact.
6- Finally, arrange your Nut Butter Cracker Sandwiches on a plate. They’re ready to serve! You can cut them in half for easier snacking or leave them whole for a more rustic presentation. Either way, they will look enticing and delicious.
Pro Tips for Success
To ensure your Nut Butter Cracker Sandwiches turn out perfectly every time, here are some expert tips to keep in mind:
- Choose high-quality nut butter for the best flavor. Natural nut butters without added sugars or oils work best.
- Make sure your crackers are fresh and crunchy. Stale crackers can ruin the texture of your sandwiches.
- If you’re adding fruit, make sure it’s ripe but not overly soft, which can make the sandwiches soggy.
- Don’t be afraid to mix and match nut butters and toppings. Experimenting with flavors can lead to delicious new combinations.
- If you’re preparing these sandwiches ahead of time, store them in an airtight container to maintain freshness.
Serving and Storing Your Nut Butter Cracker Sandwiches
Perfect Pairings for Nut Butter Cracker Sandwiches
These Nut Butter Cracker Sandwiches serve 8 sandwiches, making them perfect for sharing. They pair wonderfully with a variety of side dishes and beverages. Consider serving them with a side of fresh fruit salad for a refreshing contrast. You can also enjoy them with a glass of almond milk or your favorite smoothie for a nutritious meal.
For a more substantial snack, try pairing them with yogurt for added protein. Nut Butter Cracker Sandwiches are also a great option for picnics, lunchboxes, or after-school snacks, providing a balanced mix of carbs, protein, and healthy fats.
Storage and Make-Ahead Tips
If you find yourself with leftovers, storing your Nut Butter Cracker Sandwiches is easy. Place them in an airtight container and keep them in the refrigerator for up to 2 days. If you want to prep these sandwiches in advance, assemble them without the fruit and honey. This way, they’ll stay fresh longer, and you can add the toppings right before serving.
For longer storage, consider freezing them. Wrap each sandwich in plastic wrap and place them in a freezer-safe bag. They can last up to a month in the freezer. To enjoy, simply thaw them in the refrigerator overnight or at room temperature for a couple of hours.
Variations and Dietary Adaptations for Nut Butter Cracker Sandwiches
Creative Nut Butter Cracker Sandwiches Variations
There are so many ways to put a twist on your Nut Butter Cracker Sandwiches. Here are a few fun variations to try:
- Chocolate Delight: Swirl in some cocoa powder or spread a thin layer of chocolate hazelnut spread along with the nut butter for a decadent treat.
- Tropical Twist: Use coconut butter instead of nut butter and top with sliced mango and shredded coconut for a tropical vibe.
- Apple Cinnamon: Instead of bananas or strawberries, use thin apple slices and sprinkle cinnamon on top of the nut butter for a cozy flavor.
- Savory Sandwiches: Swap out the nut butter for hummus and top with slices of cucumber and a sprinkle of paprika for a savory snack.
Making Nut Butter Cracker Sandwiches Diet-Friendly
No matter your dietary preferences, you can enjoy Nut Butter Cracker Sandwiches. Here are some substitutions:
- Gluten-Free: Use gluten-free whole grain crackers to make these sandwiches suitable for those with gluten sensitivities.
- Vegan: Ensure your nut butter is vegan-friendly and skip the honey. You can use maple syrup or agave nectar as a sweetener instead.
- Low-Carb: Opt for low-carb crackers or cucumber slices instead of traditional crackers to enjoy a low-carb version of this snack.
- Nut-Free: If you have nut allergies, try sunflower seed butter or pumpkin seed butter as a tasty alternative.
Frequently Asked Questions
Q: Can I substitute the nut butter with something else?
A: Yes! You can use sunflower seed butter or tahini if you have nut allergies. Both options provide a similar creamy texture and flavor.
Q: How long does it take to make these sandwiches?
A: The total time for preparing Nut Butter Cracker Sandwiches is just 15 minutes. It’s a quick and easy snack to whip up!
Q: How should I store leftovers?
A: Store your Nut Butter Cracker Sandwiches in an airtight container in the refrigerator for up to 2 days. They can also be frozen for longer storage.
Q: How many servings does this recipe make?
A: This recipe yields 8 sandwiches, perfect for sharing or enjoying throughout the week.
Q: What should I do if my sandwiches get soggy?
A: To prevent sogginess, assemble the sandwiches without fruit or honey if you’re making them ahead. Add those ingredients just before serving.
Conclusion
Nut Butter Cracker Sandwiches are not only delicious but also incredibly versatile, making them a snack you’ll want to keep on hand at all times. With just a few simple ingredients and 15 minutes of your time, you can create a satisfying treat that everyone will love. I encourage you to try this recipe and let your creativity shine! Don’t forget to leave a comment about your experience or any variations you’ve tried. Happy snacking!


