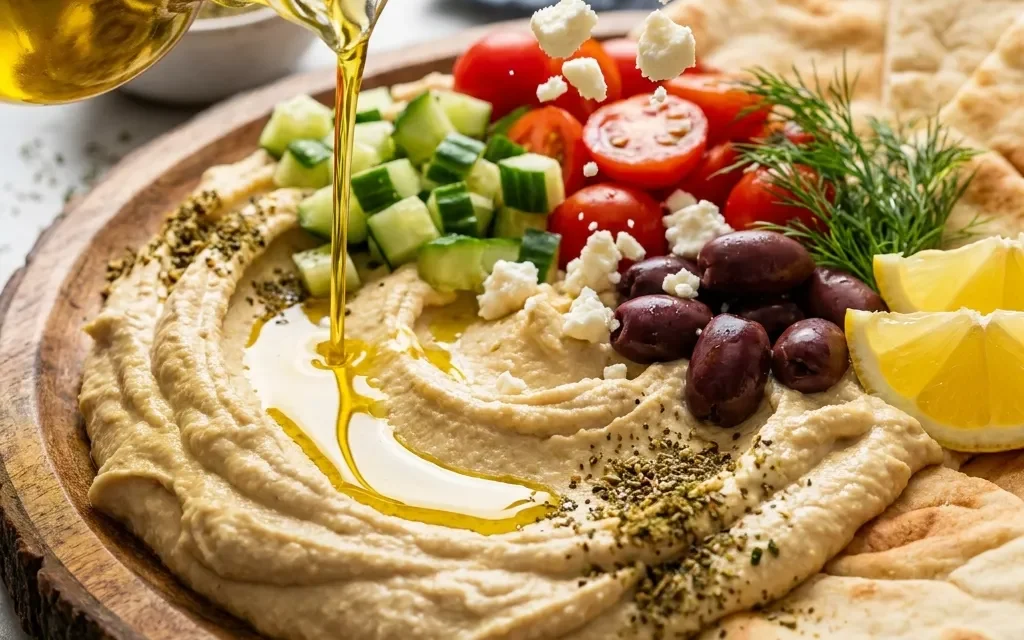
Growing up, I had the pleasure of spending countless summers in a small coastal village in Greece, where the aroma of fresh ingredients filled the air. One of my fondest memories involves my grandmother, who would gather the family around a vibrant table adorned with a Greek Hummus Board. It wasn’t just food; it was a celebration of life, laughter, and togetherness. She’d whip up a batch of her famous hummus, and we’d dive into an array of colorful veggies, crispy pita, and briny olives. Every bite felt like a hug, and all the flavors melded together to create something truly special.
What I love most about the Greek Hummus Board is its simplicity. It’s not just a meal; it’s an experience. Whether we were lounging in the sun or enjoying a balmy evening, that board brought everyone together. The vibrant colors of carrots, cucumbers, and bell peppers made it irresistible, and the creamy hummus was the star of the show, inviting you to dip, scoop, and savor. I can’t help but smile when I think of the joy it brought us, and I knew I had to recreate that magic at home.
Fast forward to today, and I’ve made it a tradition to serve my own Greek Hummus Board at gatherings with friends and family. It’s a hit every single time! The best part? It only takes 15 minutes to prepare and requires no cooking, making it a go-to for busy nights or spontaneous get-togethers. If you’ve never experienced the joy of a Greek Hummus Board, you’re in for a treat. Let’s dive into this delightful recipe that’s sure to become a staple in your home, just like it has in mine.
Table of Contents
Why This Greek Hummus Board Recipe Will Become Your Go-To
The Secret Behind Perfect Greek Hummus Board
This Greek Hummus Board is not just your average appetizer; it’s a vibrant showcase of flavors and textures that tantalize the taste buds. What makes this recipe truly unique is in its balance. The creaminess of the hummus pairs beautifully with the crunch of fresh vegetables, while the olives add a salty brine that elevates every bite. Using high-quality ingredients is essential, especially the tahini and olive oil, which enhance the hummus’s flavor profile. The addition of cumin provides a warm, earthy note that’s surprisingly addictive.
Moreover, this board is incredibly versatile. You can customize it to suit your preferences, swapping in seasonal vegetables or experimenting with different dips. It’s great for serving at parties, as an appetizer, or even as a light lunch. Once you’ve tried this Greek Hummus Board, you’ll find it hard to resist making it again. It’s a delightful way to share a piece of Greek culture and hospitality right at your table.
Essential Ingredients You’ll Need
To create the perfect Greek Hummus Board, you’ll need these essential ingredients:
1 can (15 oz) chickpeas, drained and rinsed
Chickpeas are the backbone of any hummus. They provide a creamy texture and a subtle nuttiness that forms the base of the dip.
1/4 cup tahini
Tahini, made from ground sesame seeds, adds richness and depth to the hummus. It gives it that silky texture and a distinct flavor.
2 tablespoons olive oil
Extra virgin olive oil is key for drizzling on top and blending into the hummus. It enhances the flavor and adds a luxurious mouthfeel.
2 cloves garlic, minced
Garlic infuses the hummus with a robust flavor, balancing the creaminess with a slight kick. Adjust according to your taste preference.
2 tablespoons lemon juice
Fresh lemon juice brightens the hummus, adding acidity that lifts the entire dish. It’s essential for that fresh, zesty flavor.
1 teaspoon cumin
Cumin brings warmth and earthiness to the hummus, making it more complex and flavorful. It’s a staple in Mediterranean cuisine.
Salt to taste
Salt enhances all the flavors in the hummus, so it’s vital to season properly. Adjust according to your preference.
1 cup assorted vegetables (carrots, cucumbers, bell peppers)
Colorful vegetables add crunch and freshness to the board, providing a perfect contrast to the creamy hummus.
1 cup pita bread, cut into triangles
Pita bread is perfect for scooping up the hummus and veggies. It adds a delightful chewiness to each bite.
1/2 cup olives (Kalamata or green)
Olives contribute a briny, savory element that complements the other ingredients beautifully. They’re a must for any Greek-inspired dish.
Step-by-Step Greek Hummus Board Instructions
Preparing your Greek Hummus Board is a breeze, taking only 15 minutes with no cooking time required. You’ll need a food processor, a cutting board, and a serving platter. Let’s get started!
1- Begin by draining and rinsing the chickpeas under cold water. This step is crucial as it removes excess sodium and helps achieve a smoother texture. Once rinsed, add them to your food processor.
2- Next, add the tahini, olive oil, minced garlic, lemon juice, cumin, and a pinch of salt to the food processor. Blend the mixture until it’s creamy and smooth. If it seems too thick, add a tablespoon of water at a time until you reach your desired consistency.
3- Taste the hummus and adjust the seasoning as needed. You might want to add more salt or lemon juice depending on your personal preference. Blend again briefly to incorporate any adjustments.
4- Once your hummus is perfectly seasoned, transfer it to a serving bowl. Use the back of a spoon to create a swirl on top, which will hold your drizzle of olive oil beautifully. This also adds a nice visual appeal.
5- Now, it’s time to prepare your vegetables. Wash and cut the carrots, cucumbers, and bell peppers into bite-sized pieces. Arrange them artfully around your hummus on the serving platter.
6- Finally, add the pita triangles and olives to the platter. Drizzle a little olive oil over the hummus and sprinkle with cumin or paprika for garnish. Your Greek Hummus Board is now ready to serve!
Pro Tips for Success
To ensure your Greek Hummus Board is a hit, follow these expert tips:
- Use high-quality tahini and olive oil for the best flavor. The quality of these ingredients makes a significant difference in taste.
- Don’t skip rinsing the chickpeas! This step enhances the hummus’s creaminess and helps remove any canned flavor.
- Adjust the garlic according to your taste. If you love garlic, feel free to add an extra clove for more punch.
- For a smoother hummus, peel the skins off the chickpeas before blending. It’s a bit time-consuming but worth it for the creaminess.
- Experiment with different toppings, such as fresh herbs or spices, to customize your board further.
Serving and Storing Your Greek Hummus Board
Perfect Pairings for Greek Hummus Board
This Greek Hummus Board serves 6, making it perfect for sharing at gatherings. Pair it with a refreshing Greek salad or some tabbouleh for a Mediterranean feast. A chilled glass of white wine or a light beer complements the flavors beautifully. It’s also great to serve alongside roasted meats or fish for a more substantial meal. For a casual get-together, serve it with some baklava or Greek yogurt for dessert.
Storage and Make-Ahead Tips
If you have leftovers, store the hummus in an airtight container in the refrigerator for up to 3 days. The flavors will meld even more, making it taste even better the next day! Pita bread and fresh vegetables should be stored separately to keep them fresh and crisp. While hummus can be made ahead of time, it’s best to prepare the veggies and pita closer to serving to maintain their crunch. You can also freeze the hummus for up to a month. Just thaw it overnight in the refrigerator before serving.
Variations and Dietary Adaptations for Greek Hummus Board
Creative Greek Hummus Board Variations
Feel free to mix things up with these variations of the Greek Hummus Board. You can create a roasted red pepper hummus by adding roasted red peppers to the base recipe for a sweet, smoky flavor. For a spicy kick, blend in some jalapeños or a touch of harissa. If you’re feeling adventurous, try a beet hummus, which adds a vibrant color and earthy taste. Seasonal adaptations can include grilled vegetables in the summer or roasted root veggies in the fall for a cozy touch.
Making Greek Hummus Board Diet-Friendly
This Greek Hummus Board is already quite diet-friendly, being vegan and vegetarian. For gluten-free options, simply swap out the pita bread for gluten-free crackers or veggie sticks. If you’re looking for a lower-carb alternative, use celery sticks or endive leaves for dipping. You can also add more protein by including some hard-boiled eggs or chickpea salad on the board, making it more filling while keeping it healthy.
Frequently Asked Questions
Q: Can I substitute the chickpeas for another bean?
A: Yes! You can use white beans or even black beans in place of chickpeas for a different flavor profile, but the texture will vary slightly.
Q: How can I make this recipe in less time while maintaining the flavor?
A: To save time, you can use store-bought hummus as a base and simply add your desired seasonings and toppings. This can shorten the prep time significantly.
Q: What’s the best way to store leftover hummus?
A: Store leftover hummus in an airtight container in the refrigerator for up to 3 days. If you freeze it, it can last up to a month. Thaw it overnight in the fridge before serving.
Q: How many servings does this recipe yield?
A: This Greek Hummus Board serves 6, making it perfect for gatherings or as an appetizer at parties. You can easily scale the recipe for larger crowds.
Q: What should I do if my hummus is too thick?
A: If your hummus turns out too thick, add a tablespoon of water or more olive oil while blending until it reaches your desired consistency.
Conclusion
I hope this Greek Hummus Board recipe inspires you to bring a taste of Greece into your home! It’s not just a dish; it’s a celebration of flavors and togetherness. So gather your loved ones, whip up this vibrant board, and enjoy every bite. I’d love to hear your thoughts, variations, or any questions you might have in the comments below. Don’t forget to share this recipe with your friends—everyone deserves to experience the joy of a Greek Hummus Board!