
There’s nothing quite like the comforting aroma of freshly baked apple crisp cheesecake wafting through the kitchen, is there? It takes me right back to my childhood when my grandma would invite the whole family over for her famous homemade apple crisp cheesecake. I can still picture her bustling around the kitchen, mixing the creamy cheesecake batter and carefully arranging the sweet, cinnamon-spiced apples on top. The anticipation was almost too much to bear as we waited for that golden-brown masterpiece to emerge from the oven.
And the first bite? Pure bliss. The rich, velvety cheesecake paired perfectly with the tender, slightly tart apples and the irresistible crumbly topping. It’s a flavor combination that instantly transports me back to those cozy family gatherings, laughter echoing through the house as we savored every single forkful. To this day, apple crisp cheesecake remains one of my all-time favorite desserts, a true comforting classic that never fails to satisfy.
Table of Contents
Why This Apple Crisp Cheesecake Recipe Will Become Your Go-To
The Secret Behind Perfect apple crisp cheesecake
What makes this apple crisp cheesecake recipe so special is the way it seamlessly blends two beloved desserts into one showstopping treat. By starting with a rich and creamy cheesecake base, then topping it with a layer of tender, cinnamon-spiced apples and a crunchy, buttery crumble, you get the best of both worlds in every bite. Plus, the unique technique of baking the cheesecake and the apple crisp topping together ensures that everything cooks to perfection, with no soggy bottoms or dry toppings. Your friends and family are going to go absolutely wild for this apple crisp cheesecake – it’s destined to become your new go-to dessert.


Apple Crisp Cheesecake
- Total Time: 45
- Yield: 8
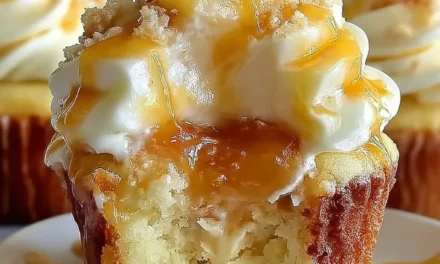
Description
Indulge in this delectable fusion of tart apples, crunchy oat topping, and creamy cheesecake. The perfect balance of flavors and textures in every bite.
Ingredients
– 1 (8 oz) package cream cheese, softened
– 1/2 cup granulated sugar
– 1 egg
– 1 teaspoon vanilla extract
– 3 cups peeled and sliced Granny Smith apples
– 1/2 cup all-purpose flour
– 1/2 cup old-fashioned oats
– 1/2 cup brown sugar
– 1/4 cup unsalted butter, cubed
– 1 teaspoon ground cinnamon
– 1/4 teaspoon ground nutmeg
Instructions
1. – Preheat oven to 375°F. Grease an 8-inch baking dish.
2. – In a medium bowl, beat the cream cheese and granulated sugar until smooth. Beat in the egg and vanilla until well combined.
3. – Spread the cheesecake batter evenly in the prepared baking dish.
4. – In a separate bowl, combine the flour, oats, brown sugar, butter, cinnamon, and nutmeg. Mix until the mixture resembles coarse crumbs.
5. – Arrange the apple slices over the cheesecake batter, then sprinkle the oat topping evenly over the apples.
6. – Bake for 30-35 minutes, or until the topping is golden brown and the center is almost set.
7. – Allow to cool completely before serving.
Notes
For a creamier texture, use full-fat cream cheese. Experiment with different apple varieties to find your preferred flavor. Serve with a scoop of vanilla ice cream for an extra indulgent treat.
- Prep Time: 15
- Cook Time: 30
- Category: Dessert
- Method: Baking
- Cuisine: American
Essential Ingredients You’ll Need
– Cream cheese: The foundation of a luscious cheesecake, be sure to use full-fat cream cheese for the richest texture.
– Granulated sugar: To sweeten the cheesecake batter and balance the tartness of the apples.
– Eggs: Bind the cheesecake and give it a delightfully smooth, creamy consistency.
– Vanilla extract: Enhances the overall flavor profile.
– Apples: Crisp, tart apples like Granny Smith or Honeycrisp work best for this recipe.
– Brown sugar: Brings a warm, caramelized flavor to the apple topping.
– Cinnamon: The quintessential spice for apple desserts, adding cozy, aromatic notes.
– Oats: Create the irresistible crumbly topping.
– Butter: Binds the crumble topping and gives it a rich, indulgent mouthfeel.
– Flour: Helps to thicken the apple filling and hold the crumble together.
Step-by-Step apple crisp cheesecake Instructions
Preparing Your apple crisp cheesecake
This apple crisp cheesecake is a two-in-one masterpiece that bakes up beautifully in about an hour and a half. You’ll need a springform pan, a hand mixer or stand mixer, and a few simple tools to create this showstopping dessert. Let’s dive right in!
1- Begin by preheating your oven to 325°F and greasing a 9-inch springform pan. In a large bowl, use a hand mixer to beat the cream cheese until light and fluffy, about 2-3 minutes.
2- Gradually add in the granulated sugar, beating well after each addition, until the mixture is smooth and creamy. Then, beat in the eggs one at a time, scraping down the sides of the bowl as needed.
3- Finally, stir in the vanilla extract until just combined. Pour the cheesecake batter into the prepared springform pan and smooth the top.
4- In a separate bowl, toss the sliced apples with the brown sugar, cinnamon, and a pinch of salt until evenly coated. Arrange the apple slices in a circular pattern on top of the cheesecake batter.
5- In another bowl, mix together the oats, flour, butter, and a pinch of salt until a crumbly topping forms. Sprinkle the oat crumble evenly over the apples.
6- Bake the apple crisp cheesecake for 55-65 minutes, until the center is almost set. Allow it to cool completely on a wire rack before removing the springform ring. Slice and serve chilled, with a dollop of whipped cream or a scoop of vanilla ice cream, if desired.
Pro Tips for Success
– For an ultra-smooth cheesecake texture, be sure to let the cream cheese come to room temperature before beating.
– Tossing the apple slices in the brown sugar and cinnamon mixture helps them bake up perfectly tender and flavorful.
– Keep a close eye on the apple crisp cheesecake towards the end of baking to prevent over-browning of the crumble topping.
– Allow the cheesecake to cool completely before slicing for the cleanest, most professional-looking presentation.
Serving and Storing Your apple crisp cheesecake
Perfect Pairings for apple crisp cheesecake
This apple crisp cheesecake is the ultimate crowd-pleasing dessert, perfect for any occasion from cozy family gatherings to holiday celebrations. Serve it up with a scoop of vanilla ice cream or a dollop of freshly whipped cream for an extra indulgent treat. It also pairs beautifully with a steaming mug of hot apple cider or a glass of rich, full-bodied red wine.
Storage and Make-Ahead Tips
Leftover apple crisp cheesecake can be stored in the refrigerator, covered, for up to 5 days. For best texture and flavor, it’s recommended to enjoy it within 3 days. You can also make this dessert ahead of time – simply bake the cheesecake, allow it to cool completely, then cover and refrigerate. When ready to serve, top with the apple crisp and bake until the topping is golden brown.
## Variations and Dietary Adaptations for apple crisp cheesecake
Creative apple crisp cheesecake Variations
There are so many ways to put a unique spin on this classic apple crisp cheesecake recipe. Try swapping in different types of apples, like Honeycrisp or Pink Lady, for a twist on the flavor profile. You could also experiment with adding spices like nutmeg, allspice, or ginger to the apple filling. For a seasonal twist, consider substituting pumpkin or sweet potato puree for the cheesecake base, or topping the apple crisp with a streusel made with pecans or walnuts.
Making apple crisp cheesecake Diet-Friendly
To make this apple crisp cheesecake more diet-friendly, try using reduced-fat cream cheese and substitute granulated erythritol or monk fruit sweetener for the sugar in the cheesecake batter. For the apple topping, you can use a sugar-free brown sugar substitute and whole wheat flour or almond flour in the crumble. These simple swaps can help reduce the overall carb and calorie count without sacrificing any of the delicious flavors.
Frequently Asked Questions
Q: Can I use a different type of apple in this recipe?
A: Absolutely! While Granny Smith or Honeycrisp apples work wonderfully, you can get creative with other firm, tart varieties like Braeburn, Fuji, or Gala. Just be sure to adjust the amount of sugar in the apple filling based on the sweetness of the apples you choose.
Q: How do I prevent the cheesecake from cracking?
A: To avoid unsightly cracks in your cheesecake, be sure not to overmix the batter and resist the urge to open the oven door while it’s baking. Gradually introducing the eggs one at a time and gently folding in the vanilla can also help. If a small crack does form, you can easily conceal it with the apple crisp topping.
Q: Can I make this recipe ahead of time?
A: Yes, this apple crisp cheesecake is a great make-ahead dessert. You can bake the cheesecake up to 3 days in advance, then top it with the apple crisp and bake it just before serving. Alternatively, you can assemble the entire dessert, bake it, and then refrigerate it for up to 5 days.
Q: What’s the best way to slice and serve this cheesecake?
A: For the cleanest, most professional-looking slices, make sure the cheesecake is completely chilled before attempting to cut into it. Use a sharp knife, wiping it clean between slices, and cut the cake while it’s still in the springform pan. Serve each slice with a dollop of whipped cream or a scoop of vanilla ice cream for an extra special touch.
Conclusion
There’s no denying the irresistible appeal of this apple crisp cheesecake recipe. With its rich, creamy cheesecake base, tender cinnamon-spiced apples, and crunchy, buttery topping, it’s a dessert that checks all the boxes. Whether you’re serving it at a holiday gathering, a cozy family dinner, or just indulging in a slice for yourself, this apple crisp cheesecake is sure to be a hit. So what are you waiting for? Preheat your oven and get ready to bake up a masterpiece that will have everyone coming back for seconds (and thirds!). Enjoy!


