I’ll never forget the first time I made Bloomin’ Apples for my family. It was a crisp October afternoon, and the air was filled with the scent of cinnamon and caramel. I can still picture my grandma’s face as she took that first bite, her eyes lighting up with delight. “These are the best Bloomin’ Apples I’ve ever tasted!” she exclaimed, and from that moment on, this recipe became a cherished autumn tradition in our household.
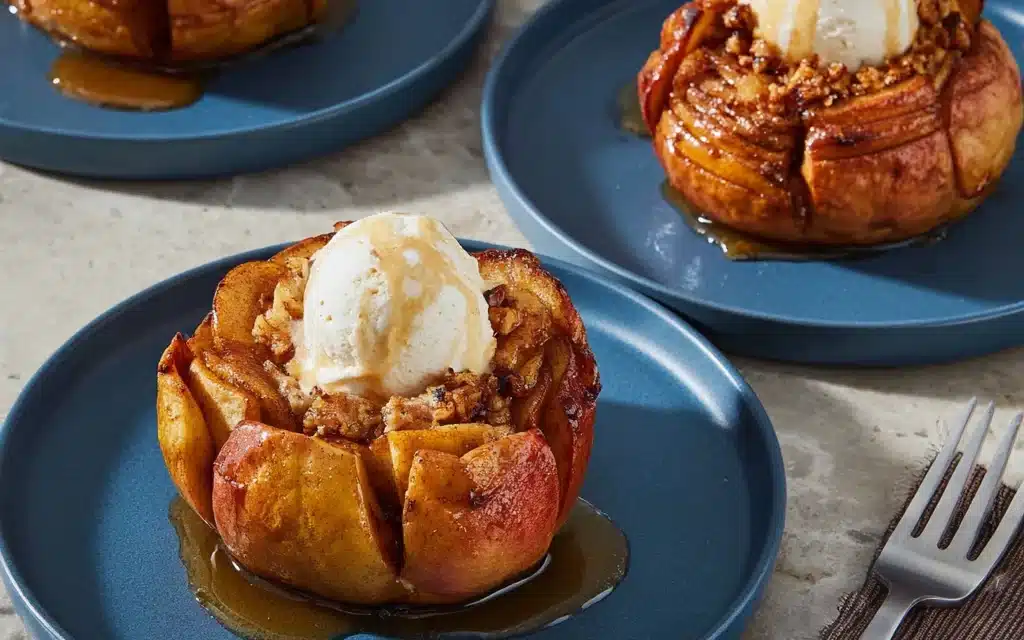
There’s just something so special about Bloomin’ Apples – the way the tart apples meld with the sweet cinnamon-sugar coating, creating a heavenly flavor that’s both comforting and indulgent. And the presentation is just stunning, with the apple “petals” fanning out like the most beautiful edible flower. It’s no wonder this dish has become a fall favorite for so many families.
Table of Contents
Why This Bloomin’ Apples Recipe Will Become Your Go-To
The Secret Behind Perfect Bloomin’ Apples
What sets this Bloomin’ Apples recipe apart is the attention to detail and the unique techniques that ensure perfectly cooked, beautifully presented apples every time. From the way the apples are sliced to the precise timing of the baking process, every step has been carefully crafted to deliver the most impressive and delicious results.
Essential Ingredients You’ll Need
To make these show-stopping Bloomin’ Apples, you’ll need a few simple ingredients: crisp apples (I love using Honeycrisp or Gala), brown sugar, cinnamon, and a touch of butter. That’s it! The key is selecting the right apples and using just the right amount of sweetness to complement their natural tartness.
Step-by-Step Bloomin’ Apples Instructions
Preparing Your Bloomin’ Apples
Bloomin’ Apples may look fancy, but they’re actually quite easy to make. This recipe takes just about an hour from start to finish, and the only equipment you’ll need is a sharp knife, a baking sheet, and a bit of patience. The result is a showstopping dessert that’s sure to impress your family and friends.
1- Start by preheating your oven to 375°F. Then, wash and core your apples, being careful not to cut all the way through.
2- Use a sharp knife to carefully slice the apples into thin wedges, keeping them stacked together to maintain the “bloomin'” shape.
3- In a small bowl, mix together the brown sugar and cinnamon. Gently fan out the apple slices and sprinkle the sugar mixture in between each layer.
4- Place the prepared apples on a baking sheet and dot the tops with small pieces of butter.
5- Bake the Bloomin’ Apples for 35-40 minutes, until the apples are tender and the sugar mixture has caramelized.
6- Remove the Bloomin’ Apples from the oven and let them cool for a few minutes before serving. Enjoy this warm, gooey, and utterly delightful fall treat!
Pro Tips for Success
To ensure your Bloomin’ Apples turn out perfectly, here are a few pro tips:
- Use firm, crisp apples that will hold their shape during baking.
- Be careful when slicing the apples – you want the wedges to stay stacked together.
- Don’t be shy with the cinnamon-sugar mixture! The more you use, the more delicious the caramelized coating will be.
- Keep a close eye on the apples during baking to prevent over-browning.
Serving and Storing Your Bloomin’ Apples
Perfect Pairings for Bloomin’ Apples
Bloomin’ Apples are the ultimate autumn dessert, but they also make a fantastic addition to any fall gathering. Serve them warm with a scoop of vanilla ice cream or a drizzle of caramel sauce for an extra indulgent treat. They also pair beautifully with a mug of hot apple cider or a glass of red wine.
Storage and Make-Ahead Tips
Leftover Bloomin’ Apples can be stored in an airtight container in the refrigerator for up to 3 days. To reheat, simply place them in a 350°F oven for 10-15 minutes until warmed through. For maximum freshness, you can also prepare the apples up to 2 days in advance and bake them just before serving.
Variations and Dietary Adaptations for Bloomin’ Apples
Creative Bloomin’ Apples Variations
While the classic cinnamon-sugar Bloomin’ Apples are hard to beat, there are so many ways to put your own spin on this recipe. Try adding a sprinkle of nutmeg or a splash of bourbon for a grown-up twist. For a festive holiday version, mix in some chopped pecans and a drizzle of caramel. And if you’re feeling extra creative, you can even experiment with different types of fruit, like pears or plums.
Making Bloomin’ Apples Diet-Friendly
Looking to make Bloomin’ Apples a bit more diet-friendly? No problem! You can easily swap the butter for coconut oil or applesauce to reduce the fat content. For a lower-carb version, use a sugar substitute like erythritol or Stevia in place of the brown sugar. And if you need a gluten-free or vegan option, simply use your favorite gluten-free flour and plant-based butter or coconut oil.
Frequently Asked Questions
Q: Can I use a different type of apple for Bloomin’ Apples?
A: Absolutely! While Honeycrisp and Gala are my personal favorites, you can experiment with a variety of firm, crisp apples like Fuji, Braeburn, or Pink Lady. Just keep in mind that some apples may hold their shape better than others during baking.
Q: How can I ensure the apples are cooked through?
A: To make sure your Bloomin’ Apples are tender all the way through, be sure to slice the apples thin, about 1/4-inch thick. This will help them cook evenly. You can also test for doneness by gently inserting a fork or toothpick into the center of the apple.
Q: Can I make Bloomin’ Apples ahead of time?
A: Yes, you can definitely prepare the apples in advance. Slice and assemble the apples up to 2 days ahead, then store them in the refrigerator until you’re ready to bake. When it’s time to serve, simply pop them in the oven and enjoy!
Q: How many Bloomin’ Apples does this recipe make?
A: This recipe will yield 4-6 individual Bloomin’ Apples, depending on the size of your apples. If you’re serving a crowd, you can easily double or triple the recipe to make enough for everyone.
Q: My Bloomin’ Apples turned out soggy. What went wrong?
A: If your Bloomin’ Apples turned out soggy, it’s likely because the apples were too ripe or too thinly sliced. Next time, be sure to use firm, crisp apples and slice them about 1/4-inch thick. You can also try baking the apples on a wire rack set over a baking sheet to allow excess moisture to drain.


Bloomin’ Apples: A Sweet and Easy Treat
- Total Time: 35
- Yield: 12
Description
Bloomin’ Apples are a delightful, easy-to-make baked apple dessert with a sweet, crunchy topping. Serve them warm with a scoop of vanilla ice cream for a cozy and comforting autumn treat.
Ingredients
– 6 large apples, cored and halved
– 1/2 cup brown sugar
– 1/2 cup all-purpose flour
– 1/2 cup old-fashioned oats
– 1/4 cup unsalted butter, softened
– 1 teaspoon ground cinnamon
– 1/4 teaspoon ground nutmeg
– 1/8 teaspoon ground cloves
Instructions
1. 1. Preheat the oven to 375°F (190°C).
2. 2. In a medium bowl, combine the brown sugar, flour, oats, butter, cinnamon, nutmeg, and cloves. Mix until the mixture resembles coarse crumbs.
3. 3. Place the apple halves in a baking dish, cut-side up. Spoon the crumble topping evenly over the apples.
4. 4. Bake for 25-30 minutes, or until the apples are tender and the topping is golden brown.
5. 5. Serve the Bloomin’ Apples warm, with a scoop of vanilla ice cream if desired.
Notes
For a variation, try using different types of apples or adding chopped nuts to the crumble topping. The Bloomin’ Apples can be stored in the refrigerator for up to 3 days.
- Prep Time: 10
- Cook Time: 25
- Category: Dessert
- Method: Baking
- Cuisine: American
Conclusion
There’s no doubt about it – Bloomin’ Apples are a true autumn showstopper. This recipe is not only delicious, but it’s also surprisingly easy to make. With just a few simple ingredients and a bit of creativity, you can transform humble apples into a dessert that’s sure to impress your friends and family.
So why not give Bloomin’ Apples a try this fall? I promise, once you taste that first warm, gooey, cinnamon-sugar bite, it’ll become a new seasonal favorite. Don’t forget to let me know how your Bloomin’ Apples turn out in the comments below!


