I can still remember the first time I made a Cast-Iron Skillet Cobbler. It was a warm summer evening, and my best friend and I were lounging outside, reminiscing about our childhoods. We’d spent countless afternoons picking fresh berries from my grandmother’s garden, laughing and racing to see who could fill their basket the fastest. That day, we decided to recreate those memories by making a cobbler using her old cast-iron skillet, which had been passed down through generations.
As we mixed the berries with sugar and lemon juice, the sweet and tart aroma filled the kitchen. It felt like we were capturing summer in a dish. We poured the batter over the bubbling berries, and the anticipation built as we slid the skillet into the oven. The sizzle of the butter and the smell of vanilla made our mouths water. When it finally came out, the golden crust was just begging to be dug into, and we didn’t hold back.
Each bite of that Cast-Iron Skillet Cobbler was a burst of nostalgia, reminding us of lazy days spent under the sun. Now, every time I make this recipe, it brings back those cherished memories. It’s not just a dessert; it’s a reminder of friendship, laughter, and the joy of cooking together. I can’t wait for you to experience the magic of this Cast-Iron Skillet Cobbler in your own kitchen, where new memories will surely be made.
Table of Contents
Why This Cast-Iron Skillet Cobbler Recipe Will Become Your Go-To
The Secret Behind Perfect Cast-Iron Skillet Cobbler
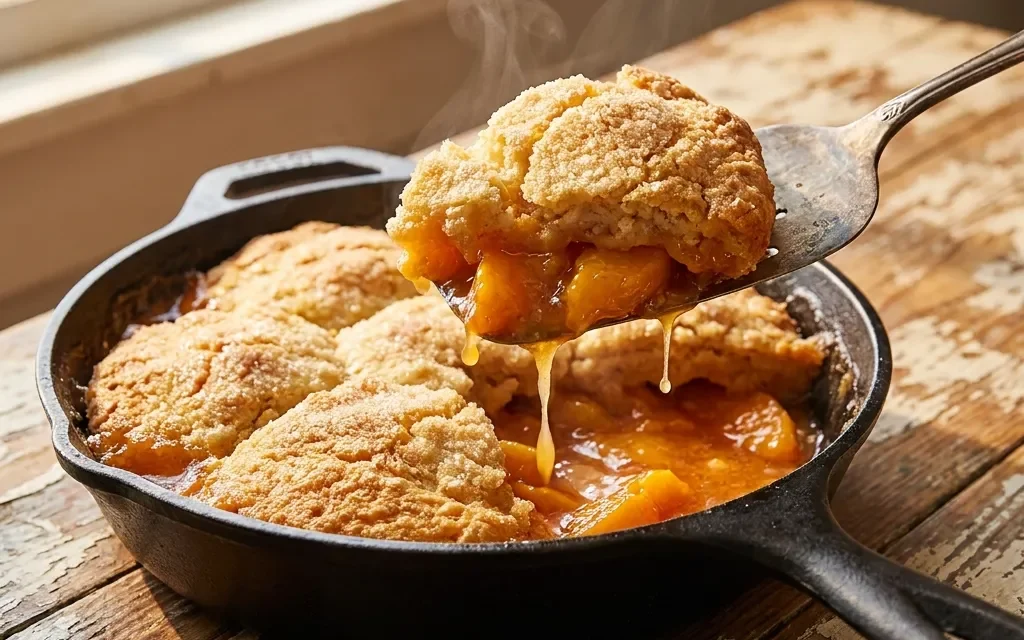
What makes this Cast-Iron Skillet Cobbler truly special is the way it combines convenience with that homemade charm. The cast-iron skillet not only delivers even heat distribution but also creates a perfectly crisp, golden crust that contrasts beautifully with the juicy berries beneath. This recipe is straightforward, requiring just 15 minutes of prep time, allowing you to whip up a mouthwatering dessert without feeling overwhelmed.
You’ll love how the combination of fresh berries and a buttery, vanilla-infused batter creates a harmonious flavor profile. The added touch of cinnamon elevates the dish, making every spoonful a comforting hug. Plus, this cobbler is versatile; you can swap out berries based on the season or what you have on hand, ensuring it remains a staple in your kitchen all year round. Once you make it, you’ll understand why this Cast-Iron Skillet Cobbler becomes a cherished family favorite.
Essential Ingredients You’ll Need
To make this Cast-Iron Skillet Cobbler, you’ll need a few essential ingredients that come together to create a delightful dessert:
4 cups mixed berries (such as blueberries, raspberries, and strawberries)
These juicy fruits are the star of the show, providing a natural sweetness and vibrant color that makes this cobbler visually appealing. You can mix and match based on your preference or what’s in season.
1 cup granulated sugar
Sugar not only sweetens the berries but also helps create a syrupy filling as it cooks. This balance of sweetness is crucial for a delicious cobbler.
1 tablespoon lemon juice
The acidity from lemon juice brightens the flavors of the berries, enhancing their natural sweetness while preventing them from becoming too cloying.
2 cups all-purpose flour
Flour is the backbone of the batter, giving it structure. Using all-purpose flour results in a delightful crumb that complements the fruit.
1 tablespoon baking powder
This leavening agent ensures your cobbler rises beautifully, creating a light and fluffy texture.
1/2 teaspoon salt
A tiny bit of salt enhances all the flavors in the dish, bringing out the sweetness of the berries and the richness of the butter.
1/2 cup unsalted butter, melted
Melted butter adds richness and moisture to the batter, resulting in a tender crumb. It also contributes to that golden crust we all love.
1 cup milk
Milk helps to create a smooth batter, ensuring it spreads evenly over the berries and contributes to the cobbler’s moistness.
1 teaspoon vanilla extract
Vanilla adds a warm, aromatic flavor that elevates the entire dish. It’s an essential ingredient that enhances the sweetness without overpowering the berries.
1/2 teaspoon cinnamon
Cinnamon adds a comforting warmth, making this cobbler perfect for any occasion. Its subtle spice notes complement the sweetness of the berries beautifully.
Step-by-Step Cast-Iron Skillet Cobbler Instructions
Preparing your Cast-Iron Skillet Cobbler is an enjoyable process that takes just 15 minutes of prep time and 30 minutes of cooking, totaling 45 minutes from start to finish. Grab your trusty cast-iron skillet and your ingredients, and let’s get started!
1- Preheat your oven to 350°F (175°C). This ensures the cobbler bakes evenly. While waiting for the oven to heat, wash and dry your mixed berries. Feel free to slice the strawberries if they’re large, making sure all the berries are roughly the same size for even cooking.
2- In a large bowl, combine the mixed berries, granulated sugar, and lemon juice. Gently toss the ingredients together, allowing the sugar to coat the berries. Let this mixture sit for about 10 minutes. You’ll notice the berries will start to release their juices, creating a beautiful syrup.
3- In another bowl, whisk together the flour, baking powder, salt, and cinnamon. This step is crucial for evenly distributing the leavening agent and spices throughout the batter. After mixing, create a well in the center to add the wet ingredients.
4- In a separate bowl, combine the melted butter, milk, and vanilla extract. Pour this mixture into the well of the dry ingredients. Stir gently until just combined; don’t overmix, as this can lead to a tough cobbler. The batter should be slightly lumpy, and that’s perfectly okay!
5- Pour the berry mixture into your pre-greased cast-iron skillet. Then, dollop the batter over the berries, evenly spreading it out with a spatula. The batter will spread more as it bakes, so don’t worry if it doesn’t cover every inch.
6- Bake your Cast-Iron Skillet Cobbler in the preheated oven for 30 minutes. You’ll know it’s done when the top is golden brown and a toothpick inserted into the center comes out clean. Let it cool for a few minutes before serving. This cobbler is best enjoyed warm, perhaps with a scoop of vanilla ice cream or a dollop of whipped cream on top.
Pro Tips for Success
To ensure your Cast-Iron Skillet Cobbler turns out perfectly every time, here are some expert tips and common pitfalls to avoid:
- Use fresh berries when possible. Frozen berries can work, but they tend to release more moisture, which can affect the cobbler’s texture.
- Don’t overmix the batter! A few lumps are okay. Overmixing can lead to a dense cobbler rather than a light and fluffy one.
- Keep an eye on the baking time. Ovens can vary, so start checking your cobbler a few minutes before the 30-minute mark to prevent overbaking.
- Let the cobbler cool slightly before serving. This allows the juices to settle and makes for easier serving.
- Experiment with different fruits and spices. This recipe is adaptable, so feel free to make it your own!
Serving and Storing Your Cast-Iron Skillet Cobbler
Perfect Pairings for Cast-Iron Skillet Cobbler
This Cast-Iron Skillet Cobbler serves 6 servings, making it perfect for a family gathering, potluck, or cozy night in. Pair it with a scoop of vanilla ice cream or a dollop of freshly whipped cream for a delightful contrast to the warm cobbler.
For beverages, consider serving it alongside a refreshing iced tea or a glass of chilled rosé for a summer picnic vibe. It’s also fabulous with a cup of coffee, making it a lovely dessert option for brunch. Whether it’s a birthday celebration or a simple weeknight treat, this cobbler fits all occasions beautifully.
Storage and Make-Ahead Tips
If you happen to have leftovers (though I doubt it!), your Cast-Iron Skillet Cobbler can be stored in the refrigerator for up to 3 days. Just cover it with plastic wrap or transfer it to an airtight container to keep it fresh.
To reheat, simply place it in a 350°F (175°C) oven for about 10-15 minutes until warmed through. Alternatively, you can microwave individual portions for about 30-45 seconds.
If you want to make this dish ahead of time, prepare the berry mixture and the batter separately. Keep them stored in the fridge for up to 24 hours. When ready to bake, combine and follow the baking instructions as usual.
Variations and Dietary Adaptations for Cast-Iron Skillet Cobbler
Creative Cast-Iron Skillet Cobbler Variations
This Cast-Iron Skillet Cobbler is incredibly versatile, allowing for a variety of delicious adaptations. Here are a few ideas to switch things up:
- Peach Cobbler: Use fresh or canned peaches instead of mixed berries for a classic southern twist.
- Apple Cinnamon Cobbler: Swap in sliced apples and enhance the cinnamon to create a cozy autumn dessert.
- Chocolate Berry Cobbler: Add dark chocolate chips to the batter for a decadent chocolate twist that pairs beautifully with mixed berries.
- Nutty Oat Cobbler: Mix oats into the batter for a heartier texture and a delightful crunch on top.
Making Cast-Iron Skillet Cobbler Diet-Friendly
For those with dietary restrictions, there are simple swaps you can make to enjoy this Cast-Iron Skillet Cobbler guilt-free:
- Gluten-Free: Substitute all-purpose flour with a gluten-free baking blend. Ensure your baking powder is gluten-free as well.
- Vegan: Replace the milk with almond or oat milk, and use coconut oil instead of butter.
- Low-Carb: For a low-carb version, use almond flour and a sugar substitute like erythritol or monk fruit sweetener.
- Dairy-Free: Just use plant-based milk and butter alternatives to create a dairy-free delight.
Frequently Asked Questions
Q: Can I use frozen berries instead of fresh?
A: Yes, you can use frozen berries, but they may release more moisture during baking, affecting the texture. Thaw and drain them before using for the best results.
Q: How long does it take to bake the cobbler?
A: The total baking time is 30 minutes. Check for a golden crust and a clean toothpick to ensure it’s fully cooked.
Q: Can I make this cobbler ahead of time?
A: Absolutely! You can prepare the berry mixture and batter in advance and store them separately in the refrigerator for up to 24 hours.
Q: How many servings does this recipe yield?
A: This recipe serves 6 servings, making it perfect for sharing with family and friends or enjoying over a couple of days.
Q: What should I do if my cobbler doesn’t rise?
A: Ensure your baking powder is fresh, as expired leavening agents can fail to provide the necessary lift. Also, avoid overmixing the batter to maintain its light texture.
Conclusion
Now that you’ve experienced the joy of making a Cast-Iron Skillet Cobbler, I hope you’re inspired to create this delightful dessert in your own kitchen. It’s not just about the delicious flavors but also the memories you’ll create while making and sharing it. I encourage you to try the recipe and put your own spin on it! Don’t forget to share your thoughts and experiences in the comments below. Happy baking!

