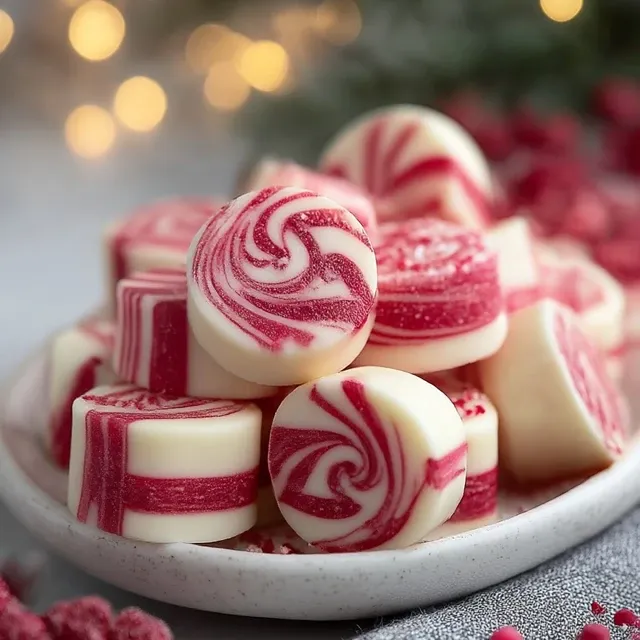
Christmas Peppermints have always been a special holiday tradition in my family. When I was a little girl, my grandma would spend an entire afternoon making batch after batch of these classic minty candies, filling our home with the most wonderful aroma. I can still remember the joy of helping her roll out the dough, carefully cutting the peppermint shapes, and then watching as she expertly swirled the red and white stripes onto each one. There was something so magical about the whole process, and of course, the best part was sneaking a few to enjoy straight out of the tin. To this day, the taste of those homemade Christmas Peppermints instantly transports me back to those cherished memories with my grandma.
Table of Contents
Why This Christmas Peppermints Recipe Will Become Your Go-To
The Secret Behind Perfect Christmas Peppermints
This Christmas Peppermints recipe is truly a labor of love, but the end result is so worth it. The secret is in the perfect balance of flavors and textures – the cool, refreshing peppermint paired with the satisfying crunch of the candy coating. And the best part? This recipe yields 24 peppermints, so you’ll have plenty to share with family and friends.
Essential Ingredients You’ll Need
To make these delectable Christmas Peppermints, you’ll need just a few simple ingredients:
- 12 ounces white chocolate, chopped or chips
- 1/2 cup crushed peppermint candies
- 1 teaspoon peppermint extract (optional)
- 1/4 teaspoon salt
That’s it! With these basic pantry staples, you can create a batch of homemade peppermints that will rival anything you’d find in a specialty shop.
Step-by-Step Christmas Peppermints Instructions
Preparing Your Christmas Peppermints
This recipe takes 25 minutes total – 10 minutes for prep and 15 minutes for cooking. You’ll need a baking sheet, a rolling pin, and a sharp knife or cookie cutters to get started. Once you have your ingredients and tools ready, it’s time to start mixing and shaping those Christmas Peppermints!
1- In a medium saucepan, combine the 1 cup of granulated sugar and 1/2 cup of corn syrup. Heat the mixture over medium, stirring constantly, until it reaches 300°F on a candy thermometer.
2- Remove the pan from the heat and stir in 1 teaspoon of peppermint extract and 2-3 drops of red food coloring. The mixture will sizzle and bubble up, so be careful.
3- Working quickly, pour the hot peppermint candy onto the baking sheet and use the rolling pin to roll it out into a thin, even layer. This should take about 15 minutes.
4- Look for the candy to start turning opaque and losing its glossy sheen – that’s your cue that it’s ready to be cut.
5- Use a sharp knife or cookie cutters to cut the peppermint candy into your desired shapes, such as rounds, stars, or candy canes.
6- Allow the cut peppermints to cool completely before transferring them to an airtight container.
Pro Tips for Success
The key to perfect Christmas Peppermints is to work quickly and precisely. Be very careful when handling the hot candy, and make sure to keep a close eye on the temperature. If the mixture gets too hot, it can easily burn. And don’t be afraid to get creative with your shapes and designs – the possibilities are endless!
Serving and Storing Your Christmas Peppermints
Perfect Pairings for Christmas Peppermints
These festive Christmas Peppermints are the perfect accompaniment to a cozy cup of hot cocoa or mulled wine. They also make a wonderful addition to holiday cookie trays or as a thoughtful homemade gift. Since this recipe yields 24 peppermints, you’ll have plenty to share with your loved ones.
Storage and Make-Ahead Tips
To store your homemade Christmas Peppermints, simply keep them in an airtight container at room temperature for up to 2 weeks. You can also make the peppermints in advance and store them in the freezer for up to 3 months. When you’re ready to serve them, just thaw them at room temperature.
Variations and Dietary Adaptations for Christmas Peppermints
Creative Christmas Peppermints Variations
While the classic red and white striped peppermints are a holiday staple, you can get creative with different color combinations and shapes. Try using green food coloring for a minty green hue, or experiment with swirling in chocolate or drizzling with white chocolate for an extra special treat.
Making Christmas Peppermints Diet-Friendly
For those with dietary restrictions, you can easily adapt this Christmas Peppermints recipe to be gluten-free, vegan, or low-carb. Simply swap out the corn syrup for a maple or agave-based syrup, and use a sugar substitute in place of the granulated sugar.
Frequently Asked Questions
Q: Can I use a different flavor extract instead of peppermint?
A: Absolutely! While the classic peppermint flavor is hard to beat, you can experiment with other extracts like cinnamon, vanilla, or even citrus. Just be sure to adjust the amount to taste.
Q: How many servings does this recipe make?
A: This recipe makes exactly 24 peppermints, with each serving being 1 peppermint.
Q: How do I get the peppermint stripes to look perfect?
A: The key is to work quickly and evenly when rolling out the candy. Try to keep the thickness consistent across the entire sheet, and be gentle when cutting the shapes to avoid distorting the stripes.
Q: Can I store the peppermints long-term?
A: Yes, you can store the peppermints in an airtight container at room temperature for up to 2 weeks. For longer-term storage, they can be frozen for up to 3 months.
Q: My peppermints turned out sticky – what did I do wrong?
A: If your peppermints are coming out sticky, it’s likely because the candy mixture didn’t reach the proper temperature. Make sure to use a candy thermometer and heat the sugar and corn syrup to 300°F before removing it from the heat.


Christmas Peppermints
- Total Time: 25
- Yield: 24 peppermints
Description
These easy-to-make Christmas Peppermints are a delightful holiday treat that are perfect for gift-giving, parties, and enjoying with family and friends. With just 4 simple ingredients, you can whip up a batch of these refreshing, minty candies in under 30 minutes.
Ingredients
– 12 ounces white chocolate, chopped or chips
– 1/2 cup crushed peppermint candies
– 1 teaspoon peppermint extract (optional)
– 1/4 teaspoon salt
Instructions
1. 1. Line a baking sheet with parchment paper or a silicone baking mat.
2. 2. In a double boiler or microwave, melt the white chocolate, stirring occasionally until smooth.
3. 3. Remove the melted chocolate from the heat and stir in the crushed peppermint candies, peppermint extract (if using), and salt until well combined.
4. 4. Spoon the peppermint mixture onto the prepared baking sheet, forming small mounds or rounds.
5. 5. Refrigerate for at least 30 minutes, or until the peppermints are firm.
6. 6. Enjoy the Christmas Peppermints immediately, or store in an airtight container in the refrigerator for up to 2 weeks.
Notes
These peppermints make a great holiday gift! You can also customize the flavor by using different types of crushed candy canes or adding a touch of food coloring to the melted chocolate.
- Prep Time: 10
- Cook Time: 15
- Category: Cookies, Bars & Brownies
- Method: No-Bake
- Cuisine: American
Conclusion
Christmas Peppermints are a quintessential holiday treat, and this recipe is sure to become a new family favorite. With its perfect balance of peppermint flavor, satisfying crunch, and festive presentation, it’s no wonder these candies have stood the test of time. So gather your ingredients, get ready to channel your inner candy maker, and create a batch of homemade Christmas Peppermints that will delight all your loved ones. Don’t forget to share your creations with us in the comments below – we’d love to see your holiday masterpieces!


