I still remember the first time I made Stars-and-Stripes Gelatin for our Fourth of July picnic. It was one of those sunny afternoons where the sky felt endless, and the smell of barbecue wafted through the air. My kids were running around with sparklers, and I was in the kitchen, already feeling the excitement of the day. I wanted to create something festive, something that would not only capture the essence of the holiday but also be a hit with both kids and adults alike. That’s when I stumbled upon the idea of making Stars-and-Stripes Gelatin.
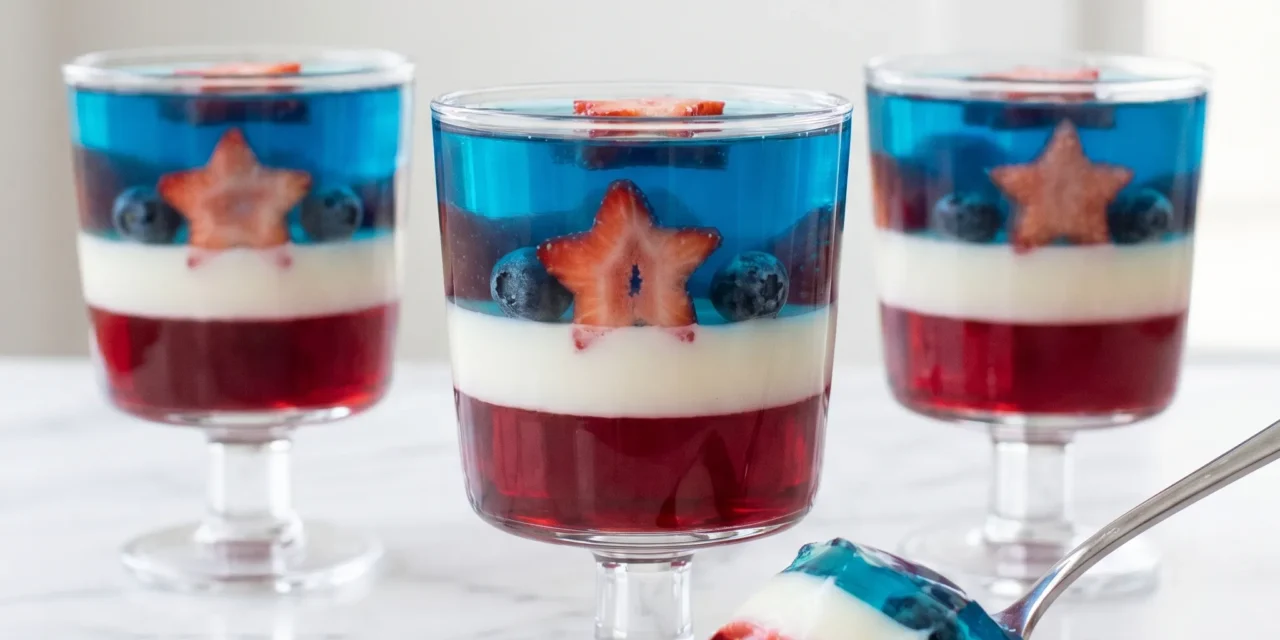
I can still hear my daughter’s delighted squeal when she saw the vibrant layers of red, white, and blue shimmering in the sunlight. It was like a tiny flag in dessert form! The preparation was simple enough, just mixing the gelatins with boiling water and letting them set. But the best part? Watching everyone’s faces light up when they took their first bite. The contrasting flavors of strawberry, coconut, and blue raspberry danced on the tongue, making the dessert not just pretty but delicious too.
Now, every year, making Stars-and-Stripes Gelatin has become a cherished tradition in our home. It’s not just about the dessert; it’s about celebrating togetherness, joy, and those little moments that make summer unforgettable. If you’re looking for a show-stopping treat that’s as fun to make as it is to eat, then this Stars-and-Stripes Gelatin is perfect for your next gathering. Trust me; it’ll become a staple in your summer celebrations too!
Table of Contents
Why This Stars-and-Stripes Gelatin Recipe Will Become Your Go-To
The Secret Behind Perfect Stars-and-Stripes Gelatin
What makes this Stars-and-Stripes Gelatin truly special is the combination of simplicity and visual appeal. It’s not just another dessert; it’s a statement piece that brings color and festive flair to any occasion. The technique is straightforward yet impressive, allowing you to create vibrant layers that look like they came straight from a bakery. The use of three different flavors—strawberry, unflavored coconut, and blue raspberry—adds depth, giving each layer its own unique taste.
Moreover, this recipe requires just 15 minutes of active prep time, making it a perfect choice for busy bakers. The real magic happens as the gelatin layers set in the refrigerator. You’ll find yourself eagerly checking in every so often, waiting for those radiant colors to come together. And let’s not forget the option to top it with whipped cream! It adds a touch of creaminess that complements the fruity layers perfectly, making every spoonful an experience to savor.
Essential Ingredients You’ll Need
To create your stunning Stars-and-Stripes Gelatin, you’ll need the following ingredients:
1 box (3 oz) red gelatin (strawberry)
This adds a vibrant red color and a sweet, fruity flavor that’s synonymous with summer.
1 box (3 oz) white gelatin (unflavored or coconut)
The unflavored gelatin serves as a neutral base, allowing the other flavors to shine. If you choose coconut, it adds a delightful tropical twist.
1 box (3 oz) blue gelatin (berry or blue raspberry)
This brings a burst of blue color and a tart sweetness that balances perfectly with the strawberry.
4 cups boiling water (divided)
The boiling water is crucial for dissolving the gelatin, ensuring that each layer sets beautifully.
1 cup cold water (divided)
Cold water helps cool down the gelatin mixture, speeding up the setting process for each layer.
1 cup whipped topping (optional for serving)
This is an optional but delicious addition that adds creaminess and a lovely visual contrast when served.
Step-by-Step Stars-and-Stripes Gelatin Instructions
Preparing Your Stars-and-Stripes Gelatin
Making Stars-and-Stripes Gelatin is a delightful process that requires just 15 minutes of prep time, with no cooking involved. The total time for this recipe is 120 minutes, which includes setting time in the refrigerator. You’ll need a mixing bowl, measuring cups, and an 8-inch square baking dish to bring this festive dessert to life.
1- Start by boiling 2 cups of water. Once it reaches a rolling boil, remove it from heat. In a mixing bowl, pour in the entire box of red gelatin. Carefully add 1 cup of the boiling water to the gelatin and stir until it’s completely dissolved. This should take about 2-3 minutes. The mixture will be a beautiful, vibrant red.
2- Next, pour the red gelatin mixture into the 8-inch square baking dish. Place it in the refrigerator and allow it to set for about 30 minutes, or until it’s firm to the touch. This first layer is crucial for the visual appeal of your Stars-and-Stripes Gelatin, so be patient!
3- While the red layer is setting, combine the white gelatin in another mixing bowl. Pour in 1 cup of boiling water and stir until dissolved, which should take another 2-3 minutes. After the red layer has set for about 30 minutes, slowly add 1 cup of cold water to the white gelatin mixture and stir well.
4- Once the red layer is ready, gently pour the white gelatin mixture over the set red layer. To avoid disturbing the red layer, pour it slowly over the back of a spoon. This helps maintain the beautiful separation of colors. Return the dish to the refrigerator and let it set for another 30 minutes.
5- Now, it’s time to prepare the blue layer. In yet another mixing bowl, add the blue gelatin and pour in the remaining 1 cup of boiling water. Stir until it’s completely dissolved, about 2-3 minutes. After the white layer has set, mix in 1 cup of cold water with the blue gelatin.
6- Finally, pour the blue gelatin mixture over the set white layer, using the same spoon trick to preserve the layers. Once you’ve added the blue layer, let the entire dessert chill in the refrigerator for at least 60 minutes to ensure it’s fully set. When you’re ready to serve, cut it into squares and optionally top with whipped cream for an extra treat.
Pro Tips for Success
To ensure your Stars-and-Stripes Gelatin turns out perfectly, here are some expert tips to keep in mind:
- Make sure each layer is fully set before adding the next one. This will help maintain the beautiful, distinct layers.
- Be gentle when pouring each new layer over the previous one. Use the back of a spoon to diffuse the liquid and prevent mixing.
- If your gelatin doesn’t seem to be setting properly, check the temperature of your refrigerator. It should be at a steady, cool temperature to facilitate proper setting.
- Feel free to experiment with flavors! You can switch up the gelatin flavors according to your preferences or availability.
- If you’re making this for an event, prepare it a day in advance. It keeps well in the refrigerator and allows for stress-free serving on the day of your gathering.
Serving and Storing Your Stars-and-Stripes Gelatin
Perfect Pairings for Stars-and-Stripes Gelatin
This recipe serves 8 servings, making it a fantastic choice for summer gatherings, picnics, barbecues, and even birthday parties. Pair your Stars-and-Stripes Gelatin with classic sides like grilled burgers or hot dogs, and don’t forget a fresh garden salad to balance out the sweetness. For beverages, consider serving it alongside lemonade, iced tea, or even sparkling water with a splash of fresh fruit for a refreshing contrast.
Storage and Make-Ahead Tips
To store your Stars-and-Stripes Gelatin, cover the baking dish with plastic wrap or transfer the squares to an airtight container. It can stay in the refrigerator for up to 5 days. If you plan to make it ahead, it’s best to prepare it 1-2 days in advance, allowing the flavors to meld beautifully. However, avoid storing it in the freezer, as freezing can compromise the texture of the gelatin, leading to a less desirable eating experience. When you’re ready to serve, simply cut into squares and enjoy cold!
Variations and Dietary Adaptations for Stars-and-Stripes Gelatin
Creative Stars-and-Stripes Gelatin Variations
Get creative with your Stars-and-Stripes Gelatin by trying out different flavors and add-ins. Here are a few ideas:
- Tropical Twist: Use pineapple-flavored gelatin for the white layer and add crushed pineapple bits for extra tropical flair.
- Berry Blast: Replace the blue raspberry with blueberry gelatin for a more intense berry flavor while keeping the stunning colors intact.
- Layered Fruit: Add fresh fruit like strawberries or blueberries between the layers for added texture and freshness.
- Gelatin Cups: Instead of a single dish, pour the mixtures into individual cups for a fun and portable dessert option.
Making Stars-and-Stripes Gelatin Diet-Friendly
If you’re looking to adapt this recipe for dietary restrictions, here are some easy swaps:
- Gluten-Free: This recipe is naturally gluten-free, but always check the gelatin packaging to ensure it’s certified.
- Vegan: Replace traditional gelatin with agar-agar, a plant-based alternative. Follow the instructions on the package for dissolving and setting.
- Low-Carb: Use sugar-free gelatin options available in stores for each flavor to lower the carbohydrate content while still enjoying the colorful layers.
Frequently Asked Questions
Q: Can I substitute any of the gelatin flavors?
A: Absolutely! You can switch out flavors based on your preferences. Just make sure to keep the color scheme in mind for the visual appeal.
Q: How long does it take for each layer to set?
A: Each layer should set for about 30 minutes before adding the next. The total time for the dessert to be fully ready is approximately 120 minutes.
Q: Can I make this dessert ahead of time?
A: Yes! You can prepare this Stars-and-Stripes Gelatin a day or two in advance. Just store it in the fridge, and it will stay fresh for up to 5 days.
Q: How many servings does this recipe make?
A: This recipe yields 8 servings, perfect for sharing at gatherings or keeping in the fridge for a sweet treat throughout the week!
Q: What should I do if my gelatin isn’t setting properly?
A: If your gelatin isn’t setting, check the temperature of your refrigerator and ensure that you’ve followed the mixing instructions correctly. Sometimes, letting it chill for a bit longer can help!
Conclusion
Stars-and-Stripes Gelatin isn’t just a fun and festive dessert; it’s a celebration of summer, family, and tradition. With its vibrant layers and delicious flavors, this recipe is sure to be a hit at your next gathering. I hope you give it a try and create your own cherished memories with loved ones! Don’t forget to share your thoughts in the comments and let me know how your Stars-and-Stripes Gelatin turned out. Happy baking and enjoy the festivities!


