I remember the first time I made Strawberry Jam Thumbprints. It was a rainy Saturday afternoon, and the kind of gloomy weather that makes you want to bake something sweet and comforting. I had just returned from a trip to the local farmers’ market, arms laden with fresh strawberries. As I washed and hulled those plump berries, I remembered a cherished family recipe that always brought smiles to our faces—Strawberry Jam Thumbprints.
My grandmother used to whip these up for family gatherings, each cookie a little jewel filled with vibrant strawberry goodness. I can still hear her laughter echoing through the kitchen as we would press our thumbs into the dough, creating those perfect little wells for the jam. The smell of buttery cookies baking in the oven filled our home, mingling with the sweet aroma of strawberries, creating an irresistible invitation to gather around the table.
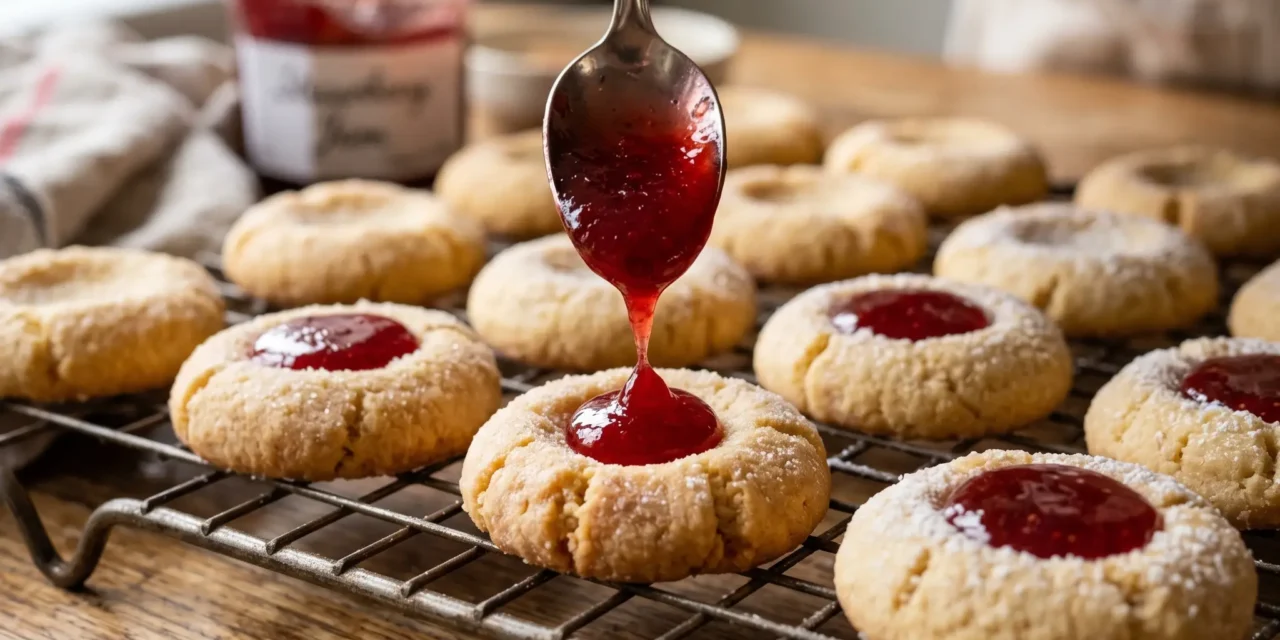
When I finally pulled those Strawberry Jam Thumbprints out of the oven, the golden edges were crisp, and the jam was bubbling just a bit. I took a bite, and oh, that first taste transported me right back to my grandmother’s kitchen. The buttery cookie melted in my mouth, perfectly complemented by the sweet-tart strawberry jam. It’s a simple recipe, yet it carries so much love and nostalgia. I knew right then that I had to share this delightful treat with everyone. Whether you’re baking for a special occasion or just a cozy day at home, these Strawberry Jam Thumbprints are sure to warm your heart and satisfy your sweet tooth.
Table of Contents
Why This Strawberry Jam Thumbprints Recipe Will Become Your Go-To
The Secret Behind Perfect Strawberry Jam Thumbprints
What sets this Strawberry Jam Thumbprints recipe apart is its simplicity and the balance of flavors. The dough, made with just a few key ingredients, is rich and buttery, creating a perfect base for the sweet strawberry jam. The technique of pressing your thumbs into the dough not only gives these cookies their characteristic look but also ensures that each cookie is perfectly filled with jam.
You’ll love how quickly these cookies come together. With just 15 minutes of prep time and another 15 minutes of baking, you can have a batch ready in 30 minutes. Plus, they’re incredibly versatile—feel free to swap out the strawberry jam for other flavors like raspberry or apricot, depending on what you have on hand. This recipe is a crowd-pleaser, making it ideal for everything from holiday gatherings to simple afternoon treats. Once you make these Strawberry Jam Thumbprints, you’ll find yourself coming back to this recipe again and again.
Essential Ingredients You’ll Need
- 1 cup unsalted butter, softened
The unsalted butter is crucial here, as it provides a rich flavor while allowing you to control the saltiness of your cookies. Softening the butter ensures it mixes well with the sugar, creating a creamy texture that results in tender cookies. - 1/2 cup granulated sugar
Granulated sugar adds sweetness and helps achieve the perfect texture. It creates that delightful contrast with the tartness of the strawberry jam, making each bite a balance of flavors. - 1 teaspoon vanilla extract
Vanilla extract enhances the overall flavor profile, adding depth to the buttery cookies. It’s the secret ingredient that takes these Strawberry Jam Thumbprints from good to exceptional. - 2 cups all-purpose flour
All-purpose flour is the backbone of this recipe. It provides structure to the cookies, ensuring they hold their shape while still being soft and tender in the center. - 1/4 teaspoon salt
A small amount of salt is essential for enhancing the sweetness of the cookies. It rounds out the flavors and helps to elevate the taste of the jam. - 1/2 cup strawberry jam
The star of the show! Strawberry jam adds a burst of flavor and sweetness. It’s important to use a high-quality jam, as it makes a significant difference in the final taste of the cookies.
Step-by-Step Strawberry Jam Thumbprints Instructions
Preparing Your Strawberry Jam Thumbprints
To whip up these delicious Strawberry Jam Thumbprints, you’ll need just 15 minutes of prep time and another 15 minutes for baking, totaling 30 minutes to cookie bliss. Grab your mixing bowls, a baking sheet, and parchment paper to make cleanup a breeze. Let’s dive into the steps!
1- Start by preheating your oven to 350°F (175°C). While the oven warms up, grab a mixing bowl and cream together the softened unsalted butter and granulated sugar. Use a hand mixer or stand mixer on medium speed for about 2-3 minutes until the mixture is light and fluffy. This is crucial for achieving the right texture.
2- Next, add the vanilla extract to the butter-sugar mixture, mixing until fully incorporated. In a separate bowl, whisk together the all-purpose flour and salt. Gradually add this flour mixture to the wet ingredients, mixing on low speed until just combined. Be careful not to overmix; you want a soft dough that holds together but isn’t tough.
3- Once your dough is ready, scoop out tablespoon-sized portions and roll them into balls. Place them on a lined baking sheet about 2 inches apart. This spacing allows your cookies to spread without merging together.
4- Now comes the fun part! Using your thumb or the back of a rounded measuring spoon, create a small indentation in the center of each ball. This is where the strawberry jam will go. Make sure the well is deep enough to hold a generous amount of jam, but not so deep that the cookie crumbles.
5- After you’ve shaped all your cookies, fill each indentation with about 1/2 teaspoon of strawberry jam. Watch out for overflow! You want just enough jam to create a lovely, sweet surprise in each bite.
6- Bake the cookies in your preheated oven for 12-15 minutes, or until the edges are lightly golden. You’ll know they’re done when the jam looks bubbly and the cookies are firm to the touch. Let them cool on the baking sheet for a few minutes before transferring them to a wire rack to cool completely. Serve these Strawberry Jam Thumbprints once they’ve cooled, and watch them disappear!
Pro Tips for Success
- Make sure your butter is truly softened. If it’s too cold, it won’t cream properly with the sugar, resulting in a denser cookie. Aim for a consistency that’s creamy and spreadable.
- Don’t skip the cooling step! Letting the cookies rest on the baking sheet for a few minutes helps them firm up, making them easier to transfer without breaking.
- Use a high-quality strawberry jam for the best flavor. If you can find homemade or artisanal jam, that’s even better!
- If you find that your dough is too soft to handle, chill it in the refrigerator for 15-20 minutes. This will make it easier to roll without sticking to your hands.
- Experiment with different jams! While strawberry is classic, feel free to try raspberry, apricot, or even lemon curd for a zesty twist.
Serving and Storing Your Strawberry Jam Thumbprints
Perfect Pairings for Strawberry Jam Thumbprints
These Strawberry Jam Thumbprints serve 24 cookies, perfect for sharing at gatherings or enjoying throughout the week. Pair them with a steaming cup of tea or coffee for a delightful afternoon treat. They also make a wonderful addition to a dessert platter at parties or holiday celebrations. For a light summer dessert, serve them alongside fresh whipped cream and berries.
If you want to elevate your cookie experience, consider pairing these with a scoop of vanilla ice cream. The warm, buttery cookies combined with cold ice cream create a heavenly contrast, sure to impress your guests.
Storage and Make-Ahead Tips
To keep your Strawberry Jam Thumbprints fresh, store them in an airtight container at room temperature for up to a week. If you’d like to prepare them in advance, you can make the dough and refrigerate it for up to three days. When you’re ready to bake, simply scoop and shape the cookies, then proceed with the rest of the instructions.
For longer storage, these cookies freeze beautifully. Place them in a single layer in a freezer-safe container, separating layers with parchment paper. They can be frozen for up to three months. When you’re ready to enjoy them, thaw at room temperature for about 30 minutes before serving.
Variations and Dietary Adaptations for Strawberry Jam Thumbprints
Creative Strawberry Jam Thumbprints Variations
Get creative with your Strawberry Jam Thumbprints! Here are some fun variations to try:
- Nutty Twist: Add 1/2 cup of finely chopped nuts, like walnuts or almonds, to your dough for a delightful crunch.
- Chocolate Lovers: Substitute half of the strawberry jam with chocolate hazelnut spread for a rich, decadent take on the classic cookie.
- Spiced Up: Incorporate a teaspoon of cinnamon or nutmeg into the flour mixture for a warm, spiced flavor—perfect for fall!
- Citrus Burst: Replace the strawberry jam with lemon curd for a zesty and refreshing alternative that’s perfect for warmer months.
Making Strawberry Jam Thumbprints Diet-Friendly
If you need to adapt this recipe for dietary restrictions, here are some substitutions:
- Gluten-Free: Use a 1:1 gluten-free all-purpose flour blend in place of regular flour. Make sure it contains xanthan gum for the best texture.
- Vegan: Substitute the unsalted butter with coconut oil or vegan butter, and replace the egg with unsweetened applesauce or a flax egg (1 tablespoon flaxseed meal mixed with 2.5 tablespoons water).
- Low-Carb: For a low-carb version, swap out the all-purpose flour for almond flour and use a sugar substitute like erythritol or stevia for the sugar.
- Dairy-Free: Use a dairy-free butter alternative and ensure your jam does not contain any dairy ingredients.
Frequently Asked Questions
Q: Can I substitute the strawberry jam with something else?
A: Absolutely! You can use any fruit jam or preserve you prefer, like raspberry, apricot, or even lemon curd for a citrusy twist.
Q: How do I ensure my cookies are done in 30 minutes?
A: The total time for this recipe, including prep and baking, is 30 minutes. The key is to have your ingredients ready and to monitor the cookies closely during the last few minutes of baking to ensure they don’t overcook.
Q: How should I store my Strawberry Jam Thumbprints?
A: Store your cookies in an airtight container at room temperature for about a week. For longer storage, freeze them for up to three months.
Q: Can I scale this recipe for more or fewer servings?
A: Yes, this recipe yields 24 cookies. You can easily double or halve the ingredients depending on how many cookies you want to make.
Q: What should I do if my cookies spread too much?
A: If your dough is too warm or the butter was too soft, the cookies might spread more than desired. Chill the dough for about 15 minutes before baking to help them maintain their shape.
Conclusion
I can’t wait for you to try these Strawberry Jam Thumbprints! They’re quick, easy, and utterly delicious—perfect for any occasion or just to satisfy your sweet tooth. Whether you’re making them for a gathering or keeping them all to yourself, I promise these cookies will bring joy to your kitchen. I’d love to hear how your baking adventure goes, so please share your thoughts in the comments. Happy baking, and enjoy every bite of your Strawberry Jam Thumbprints!

