I remember the first time I made Caramel Apple Cheesecake Bars. It was a crisp autumn afternoon, and the leaves outside were a vibrant mosaic of reds and oranges. My friends were coming over for a seasonal gathering, and I wanted to whip up something that screamed fall while also satisfying our sweet tooth. I had just picked some fresh apples from the orchard, and the thought of combining them with creamy cheesecake and luscious caramel was too tempting to resist.
As I mixed the graham cracker crust and melted butter, the warm, sweet aroma filled my kitchen, instantly bringing back memories of family gatherings and holidays. The best part? Watching my friends’ faces light up with delight as they took that first bite. The combination of the creamy cheesecake, tender apples, and rich caramel was a match made in heaven. These Caramel Apple Cheesecake Bars quickly became a staple at our gatherings, and I can’t help but smile every time I make them.
These bars are not just a dessert; they’re a celebration of flavors, textures, and memories. They embody the essence of fall, making them perfect for everything from Thanksgiving to cozy nights in. If you haven’t yet experienced the joy of baking these Caramel Apple Cheesecake Bars, I can’t recommend it enough.
Table of Contents
Why This Caramel Apple Cheesecake Bars Recipe Will Become Your Go-To
The Secret Behind Perfect Caramel Apple Cheesecake Bars
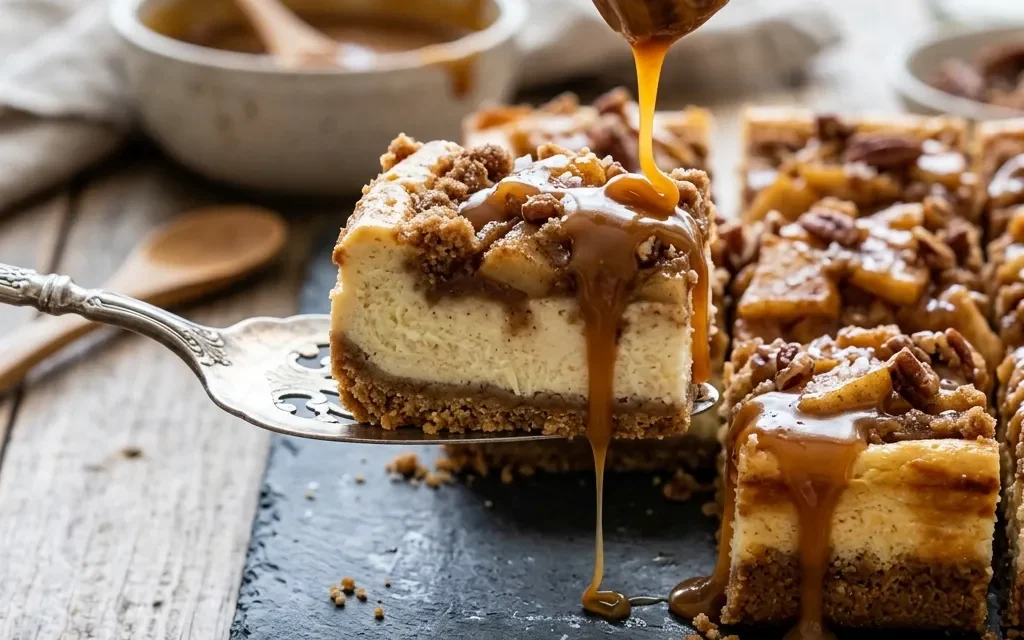
What makes these Caramel Apple Cheesecake Bars so special? It’s the harmonious blend of flavors and textures that keeps you coming back for more. The crust, made from graham cracker crumbs, is buttery and crunchy, providing a perfect base that contrasts beautifully with the creamy cheesecake filling. The apples, diced and tossed with cinnamon, add a delightful pop of flavor and sweetness.
But the true magic lies in the caramel sauce. It drizzles beautifully over the top, turning an already delicious dessert into something decadent and irresistible. The balance of creamy, sweet, and tart makes every bite a taste sensation. Plus, this recipe is incredibly easy to follow, making it accessible for bakers of all skill levels. With just a 15-minute prep time and a total of 45 minutes to get these bars from your kitchen to the table, you’ll find yourself making them time and again.
Essential Ingredients You’ll Need
1 ½ cups graham cracker crumbs
The foundation of your crust, graham cracker crumbs provide a subtle sweetness and a satisfying crunch. They’re essential for that classic cheesecake bar texture.
½ cup unsalted butter, melted
This rich ingredient binds the graham cracker crumbs together while adding a luxurious flavor. Unsalted butter gives you control over the saltiness of your dessert.
2 cups cream cheese, softened
The star of the show! Cream cheese is what gives these bars their luscious, creamy filling. Make sure it’s softened for easy mixing and a smooth texture.
1 cup granulated sugar
Sugar not only sweetens the cheesecake but also helps create a lovely balance with the tartness of the apples. It’s a key player in achieving that perfect flavor profile.
3 large eggs
Eggs provide structure and stability to the cheesecake filling. They help bind everything together and create a rich, custardy texture.
1 teaspoon vanilla extract
Vanilla enhances the overall flavor, adding depth and warmth to the cheesecake filling. It’s the finishing touch that elevates this dessert to the next level.
2 cups diced apples (peeled)
Fresh, peeled apples add a delightful texture and natural sweetness. They’re the star ingredient alongside the cheesecake, bringing a fruity freshness to the bars.
½ teaspoon ground cinnamon
Cinnamon offers that warm, cozy flavor that pairs wonderfully with apples. It’s the spice that makes these bars feel like a comforting hug in dessert form.
½ cup caramel sauce (plus extra for drizzling)
Caramel sauce is the crowning glory of these bars. It adds sweetness and a rich, buttery flavor that ties all the elements together beautifully. A drizzle on top makes them even more tempting.
Step-by-Step Caramel Apple Cheesecake Bars Instructions
Preparing Your Caramel Apple Cheesecake Bars
Ready to dive into making these Caramel Apple Cheesecake Bars? You’ll need just 15 minutes to prep, followed by 30 minutes of baking, for a total time of 45 minutes. Gather your equipment: a 9×13-inch baking dish, mixing bowls, a whisk, and a spatula. With everything ready, let’s get started!
1- Preheat your oven to 350°F (175°C). While the oven warms up, prepare your baking dish by greasing it lightly with cooking spray or butter. In a bowl, mix the graham cracker crumbs and melted butter until the crumbs are evenly coated. The mixture should resemble wet sand. Press this mixture firmly into the bottom of your prepared baking dish to create the crust.
2- In another large mixing bowl, beat the softened cream cheese and granulated sugar together until smooth and creamy. This step is crucial, as it ensures the cream cheese is free of lumps. Take your time with this process; you want a luxurious texture.
3- Add in the eggs, one at a time, mixing well after each addition. This will help incorporate air into the mixture, giving the bars a light and fluffy texture. After the eggs, stir in the vanilla extract until everything is well combined.
4- Gently fold in the diced apples and ground cinnamon. You should see the apples evenly distributed throughout the creamy mixture. The aroma of cinnamon will fill your kitchen, making it hard to resist tasting the batter!
5- Pour the cheesecake mixture over the prepared crust, spreading it evenly with a spatula. Bake in your preheated oven for 30 minutes, or until the edges are set and the center is slightly jiggly. The bars will firm up as they cool.
6- Once baked, remove the bars from the oven and allow them to cool completely in the pan. Drizzle with caramel sauce before cutting into squares. Serve chilled or at room temperature for the best flavor and texture.
Pro Tips for Success
- Make sure your cream cheese is fully softened to avoid lumps in your filling. Leave it out at room temperature for about an hour before you start.
- For added flavor, consider using a tart apple variety like Granny Smith. It provides a nice contrast to the sweetness of the cheesecake and caramel.
- Let the bars cool completely before cutting. This step is crucial for achieving clean, neat slices.
- If you prefer a thicker crust, increase the amount of graham cracker crumbs and butter slightly. This will give you a more substantial base.
- Drizzle the caramel sauce just before serving to ensure it stays fresh and doesn’t soak into the bars.
Serving and Storing Your Caramel Apple Cheesecake Bars
Perfect Pairings for Caramel Apple Cheesecake Bars
These Caramel Apple Cheesecake Bars serve 12, making them perfect for gatherings or potlucks. Pair them with a scoop of vanilla ice cream for an extra indulgence or serve with whipped cream for a lighter touch. They’re also delightful alongside a warm cup of spiced cider or a pumpkin spice latte, making them a fantastic dessert for fall gatherings or holiday parties. For a fun twist, consider pairing them with a slice of sharp cheddar cheese; the sweet and savory combination works wonderfully!
Storage and Make-Ahead Tips
To store your Caramel Apple Cheesecake Bars, place them in an airtight container in the refrigerator. They’ll last up to a week, though I doubt they’ll last that long! You can also freeze them for up to three months. Just make sure to wrap them tightly in plastic wrap and then in foil to prevent freezer burn. When you’re ready to enjoy them, allow them to thaw in the fridge overnight. For reheating, simply take out the desired portion and let it come to room temperature, or warm them up in the microwave for about 10-15 seconds.
Variations and Dietary Adaptations for Caramel Apple Cheesecake Bars
Creative Caramel Apple Cheesecake Bars Variations
Looking to switch things up? Try adding different spices such as nutmeg or allspice for an extra kick. You could also swap out the apples for pears or a mix of seasonal fruits for a different flavor profile. For a fun twist, consider adding crushed nuts like pecans or walnuts to the crust for added texture. Another variation is to incorporate a layer of chocolate ganache on top of the cheesecake before adding the caramel drizzle – chocolate and caramel are a match made in heaven!
Making Caramel Apple Cheesecake Bars Diet-Friendly
If you’re looking to make these Caramel Apple Cheesecake Bars diet-friendly, consider using gluten-free graham crackers for the crust. You can also substitute the cream cheese for a vegan alternative, like cashew cream or coconut cream, and use a sugar substitute for a lower-calorie version. For a low-carb option, you can use almond flour mixed with butter for the crust and opt for sugar-free caramel sauce. These adaptations allow everyone to enjoy the deliciousness of these bars without compromising on taste!
Frequently Asked Questions
Q: Can I substitute the cream cheese for something else?
A: Yes! You can use vegan cream cheese or a cashew cream alternative for a dairy-free version. Just ensure it’s softened for the best texture.
Q: How long do these bars take to make?
A: The total time for making these Caramel Apple Cheesecake Bars is 45 minutes, including 15 minutes of prep and 30 minutes of baking.
Q: Can you make these bars ahead of time?
A: Absolutely! You can make them up to a week in advance. Just store them in the refrigerator or freeze them for longer storage.
Q: How many servings does this recipe yield?
A: This recipe serves 12 bars, making it perfect for sharing with friends and family during gatherings or celebrations.
Q: What should I do if my cheesecake cracks?
A: Cracking can happen if the cheesecake is overbaked. To avoid this, ensure you bake it just until the edges are set and the center is slightly jiggly.
Conclusion
I hope you’re as excited to try these Caramel Apple Cheesecake Bars as I am to share the recipe with you! With their creamy texture, sweet caramel drizzle, and delightful apple flavor, these bars are sure to impress. Whether you’re baking for a special occasion or just because you want a sweet treat, this recipe is a winner. Don’t forget to leave a comment with your thoughts or share your own twists on this classic dessert. Happy baking!