I’ll never forget the first time I made Frozen Pavlova with Berries. It was a sunny afternoon, and I was hosting a small gathering for some friends. I wanted to impress them with something light, airy, and delicious. As I whisked those egg whites until they were glossy and stiff, I felt a rush of excitement. There’s something magical about transforming simple ingredients into a stunning dessert. The smell of vanilla wafting through the kitchen was intoxicating, and I could already envision the bright, colorful berries adorning the top of my creation.
As I baked the pavlova, I anxiously paced around the kitchen, occasionally peeking through the oven door. The perfect pavlova should rise and develop a slightly crispy exterior while maintaining a soft, marshmallow-like center. I could hardly wait to see how it would turn out! When it finally came out of the oven, I felt an overwhelming sense of accomplishment. The pavlova was beautiful, and once it was frozen, the berries added a burst of color that made it even more appealing.
When my friends arrived and saw the Frozen Pavlova with Berries, their eyes lit up. It was a showstopper, and the flavor? Well, let’s just say it was the highlight of the evening! Each slice was a delightful combination of sweetness from the pavlova, richness from the cream, and a refreshing tartness from the berries. I knew I had stumbled upon something special. Ever since that day, Frozen Pavlova with Berries has been a staple in my dessert repertoire, perfect for any occasion.
Table of Contents
Why This Frozen Pavlova with Berries Recipe Will Become Your Go-To
The Secret Behind Perfect Frozen Pavlova with Berries
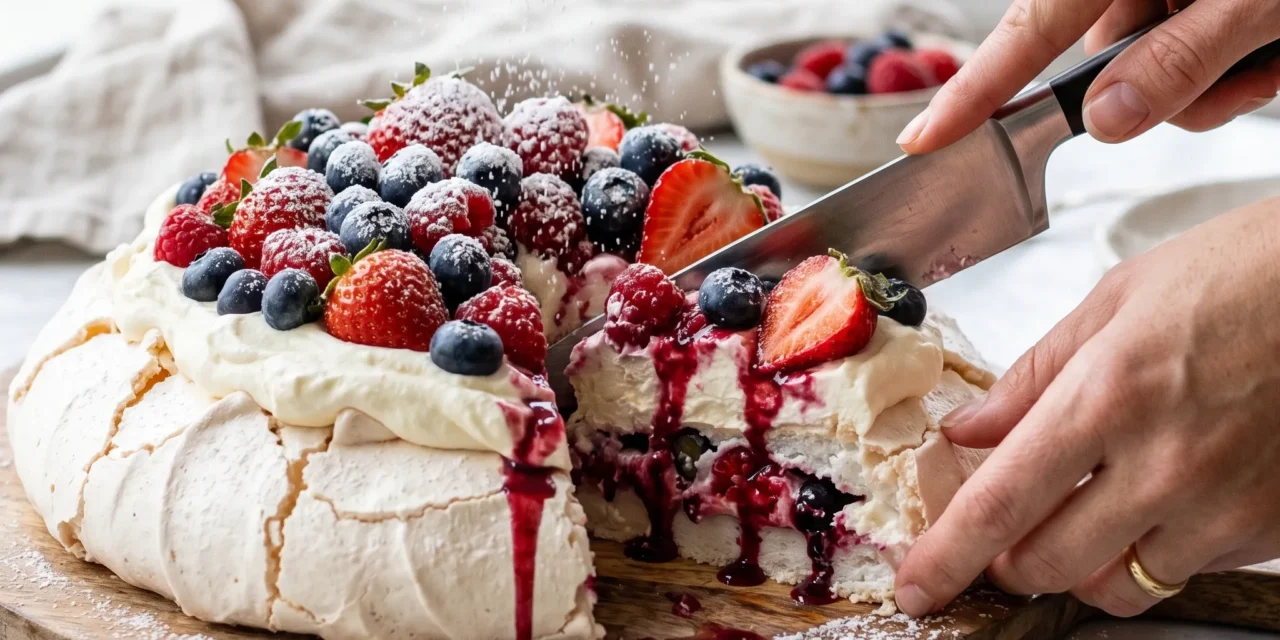
What makes this Frozen Pavlova with Berries recipe truly special? It’s all about the texture and balance of flavors. The pavlova’s outer shell is crisp, while the inside remains soft and chewy—creating a delightful contrast. The addition of heavy cream, lightly sweetened with powdered sugar, adds richness that complements the lightness of the pavlova. And let’s not forget about the fresh berries! They’re not just for decoration; they bring a burst of flavor that elevates the entire dessert. This is a recipe that’s not only stunning to look at but also a joy to eat. It’s versatile enough for casual gatherings or elegant dinners, making it a go-to for any occasion.
Essential Ingredients You’ll Need
To create the perfect Frozen Pavlova with Berries, the quality of your ingredients matters. Here’s what you’ll need:
4 large egg whites
Egg whites are the key to achieving the pavlova’s light and airy texture. They whip up into voluminous peaks that give the dessert its structure.
1 cup granulated sugar
Granulated sugar not only sweetens the pavlova but also helps stabilize the egg whites, ensuring they hold their shape during baking.
1 teaspoon vanilla extract
Vanilla extract adds a wonderful depth of flavor, enhancing the overall taste of the pavlova. It’s a must for that comforting, familiar taste.
1 teaspoon cornstarch
Cornstarch is essential in this recipe as it helps create that perfect chewy interior while maintaining the crisp exterior. It’s a small but mighty ingredient!
1 cup heavy cream
Heavy cream is what transforms the pavlova into a luxurious dessert. Whipped to soft peaks, it’s the perfect complement to the meringue.
2 tablespoons powdered sugar
Powdered sugar sweetens the whipped cream without making it grainy. It blends seamlessly, giving a smooth finish that balances the dish.
2 cups mixed fresh berries (strawberries, blueberries, raspberries)
Berries bring a burst of freshness and color. Their natural tartness cuts through the sweetness of the pavlova and cream, making each bite exciting.
Step-by-Step Frozen Pavlova with Berries Instructions
Preparing Your Frozen Pavlova with Berries
This Frozen Pavlova with Berries is surprisingly easy to make, requiring just 15 minutes of prep time and 60 minutes of cooking, bringing the total time to 75 minutes. You’ll need a stand mixer or a hand mixer, a baking sheet, parchment paper, and a serving platter to assemble your dessert.
1- Start by preheating your oven to 250°F (120°C). Line a baking sheet with parchment paper, creating a circle about 8 inches in diameter in the center. This will guide you in shaping your pavlova.
2- In your mixing bowl, add the 4 large egg whites. Using a stand mixer or handheld mixer, whip the egg whites on medium speed until they become frothy, about 2-3 minutes. Gradually add in the 1 cup of granulated sugar, a tablespoon at a time, while continuing to whip on high speed until stiff peaks form. This should take about 8-10 minutes. You’ll know you’re there when the mixture looks glossy and holds its shape.
3- Once the sugar is fully incorporated, gently fold in the 1 teaspoon of vanilla extract and 1 teaspoon of cornstarch using a spatula. Be careful not to deflate your whipped egg whites. This folding technique ensures the mixture remains light and airy.
4- Transfer the meringue to the prepared baking sheet, using the circle you drew as a guide. Spread it out evenly, making a slight indentation in the center where the cream and berries will go. Bake the pavlova for 60 minutes until it’s firm to the touch and lightly golden. The edges should be crisp, while the center remains soft.
5- After baking, turn off the oven but leave the pavlova inside to cool completely. This gradual cooling process helps to prevent cracking. Once cooled, you can transfer it to a serving platter for the next step.
6- In a clean mixing bowl, whip the 1 cup of heavy cream with 2 tablespoons of powdered sugar until soft peaks form. Carefully spread the whipped cream over the top of your pavlova. Finally, top it with 2 cups of mixed fresh berries. The vibrant colors of the strawberries, blueberries, and raspberries will make your Frozen Pavlova with Berries an eye-catching centerpiece.
Pro Tips for Success
1- Make sure your mixing bowl and beaters are completely clean and dry. Any trace of grease can prevent the egg whites from whipping up properly.
2- Gradually add the sugar to the egg whites. This helps them to incorporate smoothly and avoids graininess.
3- Be gentle when folding in the cornstarch and vanilla. Over-mixing can deflate the egg whites, affecting the texture of your pavlova.
4- Allow the pavlova to cool in the oven. This helps to avoid sudden temperature changes that can cause cracks.
5- For a stunning presentation, consider layering the berries in a decorative pattern on top of the whipped cream.
Serving and Storing Your Frozen Pavlova with Berries
Perfect Pairings for Frozen Pavlova with Berries
This Frozen Pavlova with Berries serves 8, making it perfect for gatherings. Pair it with a light dessert wine like Moscato or a refreshing iced tea. It also goes well with a scoop of vanilla ice cream for those who crave an extra touch of indulgence. For a brunch occasion, serve alongside a fruit salad or light pastries such as scones. The combination of flavors will delight your guests, ensuring this dish is the star of the table.
Storage and Make-Ahead Tips
You can prepare your Frozen Pavlova with Berries ahead of time. Store the pavlova in an airtight container in the freezer for up to a week. If you plan to make it in advance, assemble the whipped cream and berries just before serving to maintain their freshness and texture. If you have leftovers, cover them with plastic wrap and store in the refrigerator for up to two days. However, note that the pavlova may lose its crispness over time. For best results, enjoy it fresh!
Variations and Dietary Adaptations for Frozen Pavlova with Berries
Creative Frozen Pavlova with Berries Variations
Feeling adventurous? Here are some variations to switch up your Frozen Pavlova with Berries! Try adding citrus zest, like lemon or orange, to the meringue for a hint of brightness. You can also experiment with different fruits—think tropical options like mango or kiwi for a fun twist. For a chocolate lover’s dream, drizzle melted dark chocolate over the whipped cream and berries. Lastly, consider a seasonal approach: use peaches in summer or caramelized apples in fall for a delightful change.
Making Frozen Pavlova with Berries Diet-Friendly
If you’re looking to make this dessert diet-friendly, there are several substitutions you can try. For a gluten-free option, this recipe is naturally gluten-free, so just ensure your ingredients are certified gluten-free. If you want to make it vegan, use aquafaba (the liquid from canned chickpeas) instead of egg whites, and a plant-based whipping cream alternative. For a lower-carb version, consider using a sugar substitute like erythritol or monk fruit to replace the granulated sugar and powdered sugar.
Frequently Asked Questions
Q: Can I substitute egg whites for something else?
A: Yes! If you’re looking for a vegan option, aquafaba is an excellent substitute. Use 3 tablespoons of aquafaba for each egg white.
Q: How long does it take to make the Frozen Pavlova with Berries?
A: The total time for this recipe is 75 minutes, including 15 minutes for prep and 60 minutes for cooking.
Q: How do I store leftover pavlova?
A: Store any leftover pavlova in an airtight container in the refrigerator for up to two days. Keep in mind that it may lose some crispness.
Q: How many servings does this recipe make?
A: This recipe serves 8, making it perfect for gatherings or special occasions.
Q: What should I do if my pavlova cracks during baking?
A: Cracking can happen due to rapid temperature changes. If it does crack, don’t worry! It will still taste delicious. Serve it topped with whipped cream and berries to hide the imperfections.
Conclusion
I hope you’re as excited to try this Frozen Pavlova with Berries as I was when I first made it! It’s a delightful dessert that’s not only beautiful but also incredibly delicious. Don’t hesitate to experiment with different toppings and flavors. I’d love to hear your thoughts and any variations you might try, so share your experiences in the comments! Enjoy the light, airy bliss of this pavlova, and let it impress your friends and family just like it did for me. Happy baking!

