I remember the first time I made Strawberry Ice Cream Bars for a summer picnic. The sun was shining, the air was filled with laughter, and my kids were running around with friends in the backyard. I had promised them a special treat, and my mind immediately went to these delightful bars that I’d seen in a magazine. I gathered fresh strawberries, all perfectly ripe and bursting with flavor, and the kids helped me slice them up, giggling at their sticky fingers. As we mixed the strawberries with heavy cream and sweetened condensed milk, the kitchen filled with the sweet aroma of summer.
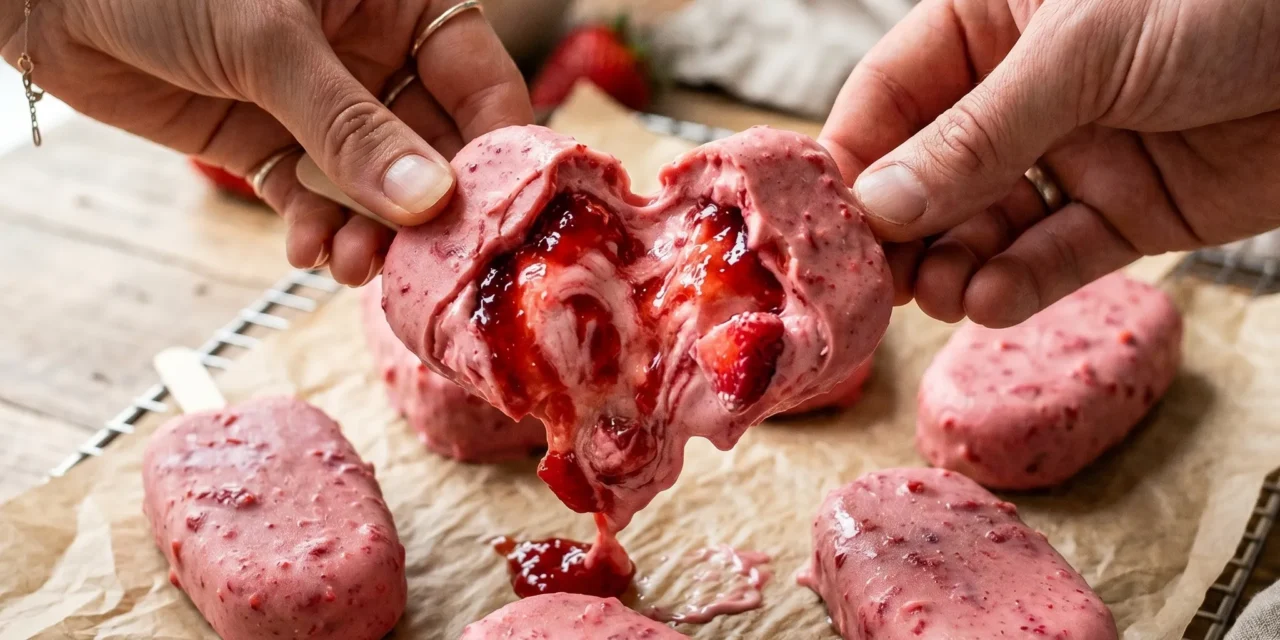
Once we poured the mixture into the molds, I couldn’t wait for the four hours of freezing to be over. The wait felt eternal, but finally, we were able to pull out those vibrant pink Strawberry Ice Cream Bars. Each bite was a creamy explosion of strawberry goodness, a blend of sweetness and a hint of lemon that had us all coming back for more. I remember watching their faces light up with joy, and it was such a simple yet rewarding way to celebrate the season. Now, every summer, these Strawberry Ice Cream Bars have become a beloved tradition in our home. They’re not just a treat; they’re a memory in the making, a way to savor those fleeting moments of sunshine and laughter.
Table of Contents
Why This Strawberry Ice Cream Bars Recipe Will Become Your Go-To
The Secret Behind Perfect Strawberry Ice Cream Bars
What makes these Strawberry Ice Cream Bars stand out is their simplicity and the burst of fresh flavor in every bite. Unlike store-bought ice cream, which can often be overly sweet or artificial, this recipe utilizes fresh strawberries, allowing the true essence of the fruit to shine. The combination of heavy cream and sweetened condensed milk creates a rich, creamy texture that melts beautifully in your mouth. The touch of lemon juice adds a zingy brightness that balances the sweetness, making these bars refreshing rather than overwhelming.
Another secret lies in the preparation. This recipe requires no cooking, making it incredibly accessible even for those who may not feel confident in the kitchen. Plus, with just a few ingredients, you can whip up a batch in 15 minutes and let the freezer do the rest. Whether you’re hosting a summer gathering or just looking for a sweet treat to enjoy at home, these Strawberry Ice Cream Bars are perfect. They’re easy to make, fun to share, and, most importantly, utterly delicious.
Essential Ingredients You’ll Need
To create these Strawberry Ice Cream Bars, you’ll need the following ingredients:
2 cups fresh strawberries, hulled and sliced
Fresh strawberries are the star of this recipe. Using ripe, sweet strawberries ensures that your bars have an authentic fruit flavor. The natural sweetness and vibrant color will make your ice cream bars not just tasty but visually appealing as well.
1 cup heavy cream
Heavy cream is essential for achieving that rich, creamy texture that makes these bars feel indulgent. It contributes to the smooth mouthfeel and provides the necessary fat to make the ice cream bars creamy rather than icy.
1 cup sweetened condensed milk
Sweetened condensed milk is a game-changer. It acts as both a sweetener and a creamy base, eliminating the need for additional sugar while also enhancing the overall flavor. This ingredient is what gives the bars their luscious, melt-in-your-mouth quality.
1 teaspoon vanilla extract
Vanilla extract adds a warm, aromatic flavor that complements the strawberries beautifully. It enhances the overall taste profile, making the bars even more delightful.
1 tablespoon lemon juice
A splash of lemon juice brightens the flavor and balances the sweetness of the strawberries and sweetened condensed milk. It brings a refreshing tang that cuts through the richness, making each bite refreshing.
Pinch of salt
A pinch of salt is vital in any sweet recipe. It helps to enhance the flavors and brings out the natural sweetness of the strawberries, creating a well-rounded taste.
Step-by-Step Strawberry Ice Cream Bars Instructions
Preparing Your Strawberry Ice Cream Bars
This recipe is incredibly easy to follow, with a prep time of just 15 minutes and no cooking time at all. The total time from start to finish is 240 minutes, which allows for plenty of freezing time to ensure your bars are firm and ready to enjoy. You’ll need a blender or food processor, a mixing bowl, and a popsicle mold or a shallow dish to freeze the mixture in.
1- Start by hulling and slicing the fresh strawberries. You want to remove the green tops and slice them into small pieces. This not only makes the strawberries easier to incorporate into the mixture but also helps them freeze evenly. You should have about two cups of sliced strawberries, which will provide a vibrant flavor and color to your bars.
2- In a mixing bowl, combine the sliced strawberries, heavy cream, sweetened condensed milk, vanilla extract, lemon juice, and a pinch of salt. Use a spatula to gently fold the ingredients together until they’re well mixed. If you want to keep some strawberry chunks for texture, reserve a few slices to add just before pouring the mixture into molds.
3- Once everything is combined, it’s time to pour the mixture into your popsicle molds or shallow dish. If using molds, fill them almost to the top, leaving a little room for expansion as they freeze. If using a dish, spread the mixture evenly. Use the back of a spoon to smooth out the surface and ensure there are no air pockets.
4- Now, place your molds or dish in the freezer. Allow the bars to freeze for at least four hours, or until they are completely solid. You’ll know they’re ready when they’re firm to the touch and have a glossy finish. The smell of strawberries will fill your kitchen, heightening your anticipation for the treat!
5- Once frozen, remove the bars from their molds by running warm water over the outside of the molds for a few seconds. This will help them release easily. If using a dish, cut the mixture into bars or squares with a sharp knife. You can also dip the bars in chocolate or sprinkle them with crushed nuts for a fun twist!
6- Serve your Strawberry Ice Cream Bars immediately, letting them sit for a minute if they’re too hard to bite into. They’re best enjoyed on a warm day when the sun is shining, and you’re ready for something refreshing. Place them on a platter and watch as everyone gathers around for a taste!
Pro Tips for Success
Creating perfect Strawberry Ice Cream Bars is simple, but here are a few tips to ensure your bars are a hit:
- Use the ripest strawberries you can find for the best flavor. Look for berries that are bright red and fragrant for maximum sweetness.
- Don’t skip the lemon juice! It’s crucial for balancing the flavors and preventing the bars from becoming overly sweet.
- If you prefer a smoother texture, blend the strawberries into a puree instead of leaving them in chunks. This will give you a creamy, uniform consistency.
- Make sure to freeze the bars for the full four hours. This ensures they’re firm enough to hold their shape when removed from the molds.
- Experiment with serving ideas! Try adding a drizzle of chocolate or a sprinkle of crushed graham crackers for an added layer of flavor and texture.
Serving and Storing Your Strawberry Ice Cream Bars
Perfect Pairings for Strawberry Ice Cream Bars
These Strawberry Ice Cream Bars serve up to eight servings, making them ideal for summer gatherings or family movie nights. They pair wonderfully with a variety of sides and beverages. For a refreshing afternoon treat, serve them alongside a light fruit salad or a bowl of whipped cream.
If you’re hosting a barbecue, consider offering these bars with grilled peaches or a platter of fresh berries. They also go great with a glass of lemonade or iced tea, adding a refreshing complement to the sweetness of the bars. For a fun twist, serve them with a scoop of vanilla ice cream on the side for a double dessert delight!
Storage and Make-Ahead Tips
These Strawberry Ice Cream Bars can be made ahead of time, making them a convenient dessert option. If stored properly, they can last in the freezer for up to two months. To store, wrap each bar in plastic wrap or place them in an airtight container to prevent freezer burn.
If you have leftovers, simply return them to the freezer immediately. When ready to enjoy again, let them sit at room temperature for a few minutes to soften slightly before serving. This will make them easier to bite into while still maintaining that refreshing chill.
Variations and Dietary Adaptations for Strawberry Ice Cream Bars
Creative Strawberry Ice Cream Bars Variations
You can easily switch things up with these Strawberry Ice Cream Bars to keep things exciting. Here are a few variations to try:
- Mixed Berry Bars: Substitute half of the strawberries with raspberries or blueberries for a mixed berry delight. This adds a new flavor profile and a stunning color.
- Chocolate-Dipped Bars: After freezing, dip the bars in melted dark or white chocolate and sprinkle with nuts or coconut flakes for a decadent treat.
- Minty Strawberry Bars: Add a few drops of peppermint extract to the mixture for a refreshing minty twist that pairs beautifully with the strawberries.
- Coconut Cream Bars: Replace half of the heavy cream with coconut cream for a tropical flavor. You can also add shredded coconut into the mixture for added texture.
Making Strawberry Ice Cream Bars Diet-Friendly
If you have dietary restrictions, don’t worry! You can easily adapt this recipe to fit your needs:
- Vegan Option: Substitute heavy cream with full-fat coconut milk and sweetened condensed milk with coconut cream or a dairy-free sweetened condensed milk alternative.
- Low-Carb Option: Use a sugar-free sweetened condensed milk or make your own using unsweetened almond milk and a sugar substitute like erythritol.
- Gluten-Free Option: This recipe is naturally gluten-free. Just ensure that any additional toppings or mixes you add are also gluten-free.
- Nut-Free Option: If you want to avoid nuts, simply skip any nut toppings or variations. This recipe is inherently nut-free, ensuring it’s safe for those with allergies.
Frequently Asked Questions
Q: Can I substitute the strawberries with other fruits?
A: Absolutely! You can use any fruit you enjoy, such as raspberries, blueberries, or even pureed mango. Just keep in mind that some fruits may alter the flavor and sweetness.
Q: How long do I need to freeze the bars?
A: The bars need at least four hours to freeze completely. If they’re not firm enough, leave them in the freezer for an additional hour or two until they reach the desired consistency.
Q: Can I make these bars ahead of time?
A: Yes! These Strawberry Ice Cream Bars can be made up to two months in advance. Just wrap them well and store them in the freezer to maintain freshness.
Q: What’s the best way to serve these bars?
A: These bars can be served directly from the freezer. Let them sit for a couple of minutes to soften slightly before serving for the best texture.
Q: What if my bars are too icy?
A: If your bars turn out icy, it might be due to using low-fat cream or not freezing them long enough. Ensure you use heavy cream for creaminess and let them freeze thoroughly.
Conclusion
I can’t wait for you to try this Strawberry Ice Cream Bars recipe! It’s such a delightful treat that brings back all those sunny memories and creates new ones. Perfect for summer gatherings or simply to enjoy with family, these bars are sure to become a staple in your kitchen. So, gather your ingredients, and dive in! I’d love to hear how yours turn out—feel free to leave a comment or share your experiences. Happy freezing!


